Inspection of Connecting Rod and Piston Assembly Components
PROCEDURE
1. Before starting, thoroughly clean the connecting rod and piston assemblies. Remove the piston rings from the pistons.
Piston rings must always be replaced.
2. Using a special tool, remove the rings from the pistons. Take care not to accidentally damage the piston walls.
3. Scrape carbon deposits from the piston crowns. After removing the main layer of deposits, clean the surface by hand with a wire brush or fine emery cloth.
Never use wire wheel attachments for an electric drill to clean pistons made of soft material that are prone to erosion!
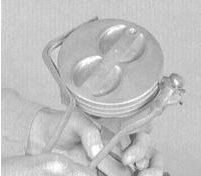
4. Using a special tool, clean the piston ring grooves.

Alternatively, a piece of an old piston ring may be used for this purpose. However, take care not to scratch the bottom and walls of the groove or cut your fingers.
5. After removing the main deposits, wash the connecting rod assemblies with solvent and dry them thoroughly, preferably with compressed air. Check that the oil return holes in the rear walls of the piston ring grooves and the oil holes in the connecting rod small ends are clear.
When using compressed air, always wear safety glasses!
6. If the piston skirts and cylinder bores are not damaged or excessively worn, and the cylinder block has not been bored or replaced, the pistons do not need to be replaced. Normal piston wear appears as vertical wear marks on the thrust surface and slight play of the top compression ring in its groove. Remember that piston rings must always be replaced regardless of their condition.
7. Carefully inspect each piston for cracks in the skirt, around the piston pin bosses, and in the ring area.
8. Check the thrust surfaces of the piston skirt for scratches, and the crown for through holes and burning along the edge. Scratches on the skirt may indicate prolonged engine overheating or excessively early ignition of the air-fuel mixture; check the cooling system for proper operation. Burning along the crown edge is evidence of detonation. In any case, the cause of the identified fault must be eliminated to prevent recurrence. Possible causes of these defects may also include intake air leaks, incorrect air-fuel mixture, incorrect ignition timing, and malfunction of the ignition or EGR systems.
9. Pitting corrosion of the pistons in the form of cavities indicates coolant entering the combustion chambers and/or crankcase. Again, make sure the cause of the internal leak is eliminated.
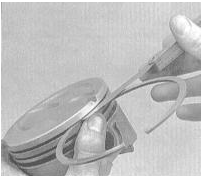
10. Measure the side clearance of the piston rings in their grooves. Insert a new ring into its groove on the piston and measure the remaining gap with a feeler gauge. Repeat the measurement at two or three points around the groove circumference. Be careful not to mix up the compression rings (the top ring differs from the second). If the side clearance exceeds the specified limit (refer to Specifications), replace the pistons.
11. Measure the side clearance of the piston rings in their grooves. Insert a new ring into its groove on the piston and measure the remaining gap with a feeler gauge. Repeat the measurement at two or three points around the groove circumference. Be careful not to mix up the compression rings (the top ring differs from the second). If the side clearance exceeds the specified limit (refer to Specifications), replace the pistons.
On 4-cylinder engines, pistons are selectively fitted to the cylinders. The pistons are marked accordingly. Two types of pistons are available: marked with the letter A (or with no marking at all) and marked with the letter B (refer to Specifications).

12. If the piston-to-cylinder clearance exceeds the specified limit (refer to Specifications), take the block to a machine shop for boring and fit new oversize pistons.
13. Check the piston-to-connecting rod fit by attempting to rotate the components in opposite directions. Any noticeable play indicates excessive wear of the joint. To correct the condition, take the connecting rod and piston assemblies to an automotive repair shop, where the necessary repairs and pin replacement will be performed.
14. The removal of pistons from the connecting rods (if necessary) must also be performed by specialists at an automotive repair shop. The connecting rods can also be checked for bending, twisting and other distortion using special diagnostic equipment.
Do not remove the pistons from the connecting rods unless necessary.
15. Check the connecting rods for cracks and other mechanical damage. Temporarily remove the lower end caps, remove the old bearing shells, wipe the seats in the caps and rods, and check them for burrs, scoring and roughness. When the inspection is complete, reinstall the old bearing shells, install the caps on the lower ends of the connecting rods and tighten the retaining bolts by hand.
If the engine is being repaired to eliminate piston pin knock, replace the connecting rod assemblies.
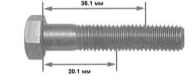
16. Using a micrometer or vernier caliper, measure the thickness of the connecting rod cap bolts at two points. Compare the measurement results. A difference of more than 0.102 mm indicates that the bolts have stretched and must be replaced (as a set).
17. After completing the inspection of the connecting rods and connecting rod bolts, reinstall the lower end caps and hand-tighten the fasteners.
Test yourself
A quick Honda Accord quiz: every answer comes with an explanation and a link to the manual page.