Crankshaft Removal
Crankshaft removal is only possible with the engine removed from the vehicle. It is assumed that the flywheel/drive plate, timing belt, oil pan, oil pickup, oil pump and connecting rod and piston assemblies have already been removed. On 4-cylinder engines, the main bearing cap bridge must be removed before the connecting rods (see Section Connecting Rod and Piston Assembly Removal). Before removing the crankshaft, also unbolt and separate the rear oil seal retainer from the cylinder block.
PROCEDURE

1. Before removing the crankshaft from the engine, measure its axial play. Mount the DTI gauge on the block coaxial with the crankshaft, with its plunger resting against the web of one of the crank throws.
The main bearing caps and their connecting bridge (4-cylinder engines) must remain in place, with their fasteners tightened to the specified torque.
2. Push the crankshaft fully rearward and zero the gauge dial. Now push the shaft in the opposite direction and read the gauge. The free travel of the shaft in the longitudinal direction is its axial play. Compare the measured result with the Specifications. If the play exceeds the maximum permissible value, check the crankshaft thrust surfaces for signs of excessive wear. If there are no obvious signs of wear, installing new thrust washers usually corrects the condition.
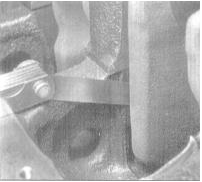
3. If a dial gauge is not available, a standard feeler gauge may be used. Carefully push the shaft fully forward in the engine, then determine the clearance formed between the crank throw web and the rear face of the front (thrust) main bearing by inserting feeler gauge blade(s) of the appropriate thickness snugly into the gap.
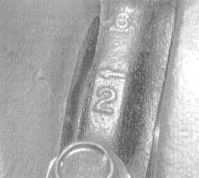
4. Check the main bearing caps for alignment marks. The caps must be numbered consecutively from front to rear of the engine. If necessary, make the marks yourself using a centre punch. In addition to the sequence number, the caps are usually marked with cast arrows. On correctly installed caps, the arrow must point toward the timing belt drive.
5. On 4-cylinder engines, in several steps (1/4 turn per pass), loosen the bolts securing the main bearing caps/their connecting bridge just enough to allow them to be unscrewed by hand. Remove the bridge. Using a soft-faced hammer, gently tap the bearing caps and separate them from the block; if necessary, use the bolts as levers. Take care not to drop the main bearing shells.

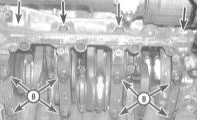
6. On V6 engines, each main bearing cap is secured by four bolts - two bolts are threaded in the vertical plane (viewed from below the block) and two more are threaded on each side in the horizontal plane. Before attempting to separate the caps from the block, make sure all bolts have been removed.
7. Carefully remove the crankshaft from the engine (use an assistant). Make sure the main bearing shells remain in their seats in the block and caps. Install the caps on the block, then hand-tighten their securing bolts.
Test yourself
A quick Honda Accord quiz: every answer comes with an explanation and a link to the manual page.