Removal and Installation of Front Upper Control Arm
PROCEDURE
1. Loosen the wheel nuts of the corresponding front wheel. Raise the vehicle and support it on safety stands. Remove the wheel. Support the lower control arm with a floor jack.
2. Remove the coil spring strut assembly (see Removal and Installation of Front Coil Spring Strut Assembly). Remove the ABS wheel speed sensor bracket from the upper control arm.
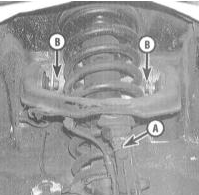
3. Remove the cotter pin and loosen the castellated nut on the upper control arm ball joint stud. Do not remove the nut completely yet to prevent the arm from separating from the steering knuckle unexpectedly.
4. Using a 2-jaw puller, separate the upper control arm from the steering knuckle. Remove the castellated nut (take care not to let the knuckle drop; if necessary, secure the assembly with wire).
5. Unscrew the upper control arm pivot bolts and remove the upper control arm assembly from the vehicle.
6. Installation is performed in the reverse order. Make sure all fasteners are tightened to the specified torque. Note: Be sure to replace the cotter pin securing the ball joint castellated nut (see Note to Step 3 in the Steering Knuckle Removal and Installation section).
Test yourself
A quick Honda Accord quiz: every answer comes with an explanation and a link to the manual page.