Strut Assembly or Coil Spring Replacement

Typical front strut assembly with coil spring design
1 — Self-locking nut
2 — Damper rod support washer
3 — Damper rod rubber dust boot
4 — Damper rod support bushing
5 — Damper support base
6 — Support rubber insulator
7 — Spring seat rubber insulator
8 — Coil spring
9 — Dust cover plate
10 — Dust cover
11 — Rebound bumper plate
12 — Rebound bumper
13 — Damper assembly
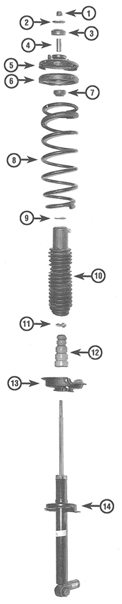
Typical construction of a rear shock absorber assembly with coil spring
1 — Self-locking nut
2 — Damper rod support washer
3 — Damper rod rubber dust boot
4 — Damper rod support bushing
5 — Damper support base
6 — Support rubber insulator
7 — Spring seat rubber insulator
8 — Coil spring
9 — Dust cover plate
10 — Dust cover
11 — Rebound bumper plate
12 — Rebound bumper
13 — Spring seat insulator
14 — Damper assembly
PROCEDURE
1. Remove the shock absorber assembly from the vehicle (refer to Front Shock Absorber with Coil Spring Assembly Removal and Installation or Rear Shock Absorber with Coil Spring Assembly Removal and Installation).
2. Inspect the shock absorber for signs of leakage, dents, cracks and other mechanical damage. Inspect the coil spring for chips, cracks and signs of sagging, and inspect the spring seat rubber insulators for hardening and material aging. Remanufactured shock absorber assemblies with coil springs are available on an exchange basis at Honda dealerships, which can significantly reduce time and cost. For this reason, before disassembling the shock absorber for overhaul, compare the prices of replacement components with the cost of a remanufactured assembly.
Removing the coil spring from the shock absorber assembly is potentially hazardous and must only be performed with high-quality special service tools.
3. Secure the shock absorber assembly in a vise with soft jaws (do not overtighten).
4. Mark the position of the support base relative to the spring (if the spring is to be replaced, mark its position relative to the damper assembly).

5. Following the manufacturer's instructions, install the coil spring compressor. Tighten the nuts on the compressor studs and compress the spring until the support base is fully unloaded.
6. Remove the protective cap and loosen the self-locking nut while holding the damper rod from turning with a rod wrench. Remove the upper mount components from the shock absorber and lay them out in order on a clean surface in the order they were installed on the assembly.
7. Carefully remove the compressed coil spring from the assembly and place it in a safe location.
Never point the ends of a compressed spring toward yourself!
8. Remove the remaining components from the damper rod and lay them out on the workbench in installation order.
9. Transfer the rebound bumper with its plate, the dust cover and its plate to the new damper assembly. Extend the rod fully and thread it through the components being installed.
10. Carefully install the compressed coil spring onto the assembly. Make sure the lower end of the spring seats correctly in its seat.
11. Install the spring seat rubber insulator, the rod support bushing, the support base, the mounting nut washer and a new self-locking nut. Before tightening the nut, make sure the marks made during removal are aligned.
12. Holding the damper rod from turning with a rod wrench, tighten the self-locking nut to the specified torque. Release the spring compressor and remove it from the assembly. Install the protective cap.
13. Install the assembly in its original position and mount it on the vehicle (refer to Front Shock Absorber with Coil Spring Assembly Removal and Installation or Rear Shock Absorber with Coil Spring Assembly Removal and Installation).
Test yourself
A quick Honda Accord quiz: every answer comes with an explanation and a link to the manual page.