General Specifications
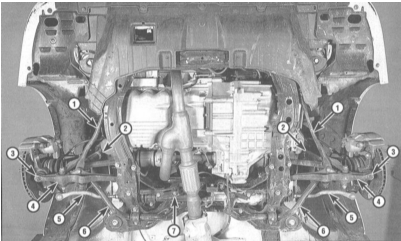
Front suspension components
1 — Push rod
2 — Coil spring shock absorber assembly
3 — Lower ball joint
4 — Lower control arm
5 — Tie-rod end
6 — Stabilizer bar
7 — Rack and pinion assembly
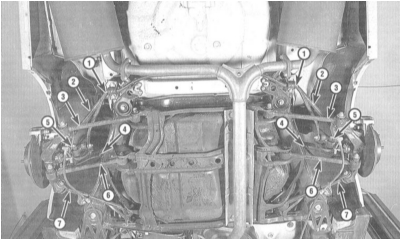
Rear suspension components
1 — Stabilizer bar
2 — Rear trailing arm
3 — Control arm
4 — Upper arm
5 — Coil spring shock absorber assembly
6 — Lower arm
7 — Front trailing arm
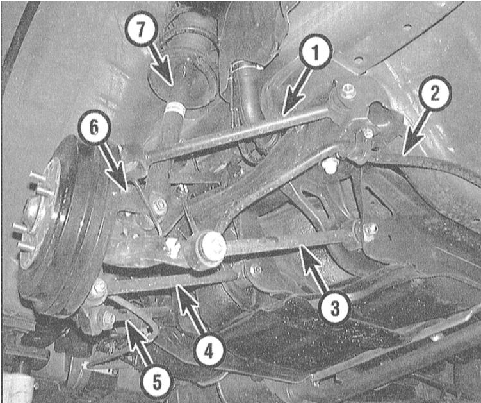
Rear suspension components
1 — Front trailing arm
2 — Stabilizer bar
3 — Arm
4 — Lower arm
5 — Rear trailing arm
6 — Knuckle
7 — Shock absorber strut
The front suspension is fully independent, with upper and lower control arms, coil spring strut assemblies, and a stabilizer bar.
The rear suspension uses trailing arms (front and rear), two lower control arms of unequal length (one is simply called the lower arm, the other the control arm), an upper control arm, and coil spring strut assemblies. The stabilizer bar links the right and left sides of the suspension, which reduces body roll.
All models are equipped with a rack and pinion steering gear with hydraulic power assistance. The power steering (PAS) system uses an engine-driven power steering pump connected to the steering gear housing by flexible hydraulic hoses.
During suspension service, you will often encounter seized fasteners. Fasteners become seized because they are constantly exposed to the elements and come into contact with water, dirt, soot, and other substances that promote corrosion. To make seized fasteners easier to loosen, soak them thoroughly with penetrating oil well in advance. Cleaning the exposed threads of the fastener with a stiff wire brush also makes it easier to loosen rusted nuts. In particularly difficult cases, a drift punch can be used to free a seized bolt or nut. Place the drift punch against the edge of the nut slot or bolt head, then strike the opposite end sharply with a hammer. Make sure the drift punch does not slip, and avoid damaging the threads with inaccurate blows. Heating the seized fastener and the surrounding component with the flame of a blowtorch or gas torch is also an effective method. However, the authors of this Manual do not recommend this method unless absolutely necessary, due to the potential danger of fire and burns. Various extensions, breaker bars, and pipe extensions can be used to increase torque when loosening fasteners. However, do not use these leverage tools with a ratchet-type drive, as there is a high risk of damaging the ratchet mechanism. Sometimes a nut or bolt will start to loosen after being tightened slightly clockwise. Any fastener that required unusual measures to loosen must be replaced during assembly!
After loosening, carefully inspect the condition of all fasteners and replace them with fasteners of the same size if necessary. During installation, tighten the suspension and steering fasteners strictly to the specified torque.
Never attempt to straighten deformed suspension and steering components. Replace damaged parts with new ones!
Since suspension service is performed under the vehicle, make sure in advance that you have the means to lift the vehicle and support it in the raised position (use a reliable jack and support stands).
Never work under a vehicle supported only by a jack!
Test yourself
A quick Honda Accord quiz: every answer comes with an explanation and a link to the manual page.