Chain Tensioner, Chain Guide and Drive Sprockets
Removal
PROCEDURE
Chain Tensioner1. Drain the engine oil and remove the oil filter (see subsection 2.2.1). If the filter is damaged during removal, replace it.
2. Unscrew the two nuts and remove the chain tensioner from the rear side of the cylinder head. Remove the O-ring gasket. Warning: Do not rotate the crankshaft while removing the tensioner.
Chain Guide
3. Remove the timing chain cover (see subsection 3.2.1.6).
4. Remove the chain tensioner.
5. Loosen and remove the bolts, then remove the chain guide.
Chain Tensioner Shoe
6. Remove the timing chain cover (see subsection 3.2.1.6).
7. Remove the tensioner shoe pivot bolt and remove the shoe from the cylinder block.
8. Remove the chain tensioner.
9. Unscrew the shoe pivot bolt and remove the shoe.
Upper Chain Guide
10. Remove the cylinder head cover (see subsection 3.2.1.4).
11. Unscrew the bolts and remove the guide from the cylinder head.
Chain Sprockets
12. Remove the chain and camshaft sprockets (see subsection 3.2.1.7). If the chain is not to be removed, unscrew the sprocket bolts from both camshafts (see step 9 of subsection 3.2.1.7) and mark the sprockets so they can be reinstalled in their original positions.
Inspection. See subsection 3.2.1.7.
Installation
PROCEDURE
Chain Tensioner1. Make sure the mating surfaces of the tensioner and the cylinder head cover are clean.

2. Release the tensioner ratchet lever (1), press the plunger into the body, and hold it in this position by hooking the installation hook onto the plunger pin (2).
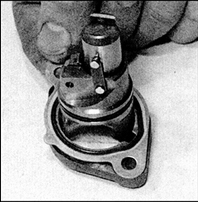
3. Install a new gasket on the tensioner flange, and place a new O-ring in the groove of the body.
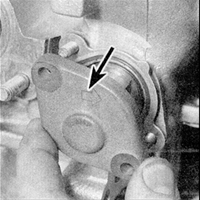
4. Install the tensioner, making sure the arrow on the flange points away from the cylinder head. Install the washers and tighten the tensioner nuts to the specified torque. After tightening the nuts, the installation hook should automatically disengage from the pin, releasing the plunger.
Chain Guide
5. Install the chain guide on the cylinder block and tighten the bolts to the specified torque.
6. Install the tensioner (see steps 1–4).
7. Install the timing chain cover (see subsection 3.2.1.6). Chain Tensioner Shoe
8. Install the chain tensioner shoe on the cylinder block and tighten the pivot bolt to the specified torque.
9. Install the tensioner (see steps 1–4).
10. Install the timing chain cover (see subsection 3.2.1.6). Upper Chain Guide
11. Install the upper chain guide on the cylinder head and tighten the mounting bolts to the specified torque.
12. Install the cylinder head cover (see subsection 3.2.1.4).
Chain Drive Sprockets
13. Install the chain and sprockets (see subsection 3.2.1.7).
14. If the chain was not removed, install the sprockets on the corresponding camshafts, aligning them with the marks made during disassembly. During assembly, make sure the marks align exactly. Install the sprocket bolts with washers and tighten them to the specified torque.
Test yourself
A quick Nissan Sunny quiz: every answer comes with an explanation and a link to the manual page.