Connecting Rod and Piston Assembly - Inspection
GENERAL INFORMATION
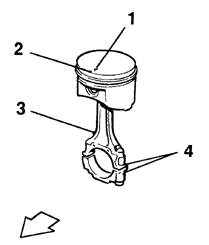
Correct Relative Orientation of Piston and Connecting Rod
1. Piston size group number
2. Orientation mark (arrow)
3. Lubrication hole in connecting rod body
4. Cylinder number mark for the cylinder to which the connecting rod belongs (may also be on the opposite side)
PROCEDURE
1. Before inspection, clean the connecting rods and pistons and remove the old rings from the pistons.
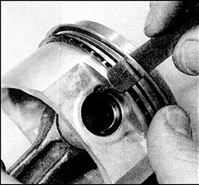
2. Carefully spread the ring and slide it toward the top of the piston. To prevent the ring from dropping into an empty groove during removal, insert two or three old feeler gauges under the ring.
3. When removing the rings, do not damage the piston surfaces with sharp edges. The rings are very fragile and may break if the ring gap is spread excessively. Also protect your fingers from cutting on the ring edges. Remove the rings only from the top of the piston. If old rings are to be reinstalled, store the removed rings together with the piston from which they were removed.
4. Scrape carbon deposits from the piston crown. After removing the thick outer layer of carbon, clean the piston crown by hand with a wire brush (or with cloth-backed abrasive paper).
5. Remove carbon deposits from the piston ring grooves using an old broken piston ring. For this purpose, break the old ring in half (taking care of its sharp edges). Remove carbon only; do not remove any metal. During cleaning, do not scratch the groove walls.
6. After removing the carbon, wash the piston and connecting rod assembly in kerosene or solvent and dry thoroughly. Make sure the oil drain holes in the ring grooves are clean.
7. Measure the piston diameter with a micrometer perpendicular to the piston pin axis (at the specified distance from the edge of the piston skirt) and compare the result with the value specified in subsection 3.2.1.1). The piston size group is stamped on the piston crown. If piston wear exceeds the maximum permissible limit, replace the piston.
8. Check the clearance between the piston ring and the piston ring groove wall. To do this, insert the ring into the corresponding groove from the outside and measure the clearance between the top surface of the ring and the groove wall with a feeler gauge. If the clearance exceeds the limit even with a new ring, replace the piston.
9. Check the piston ring end gap. Insert the ring into the corresponding cylinder and push it in with the piston crown to keep the ring square to the bore during measurement. Push the ring in to a depth where the bottom edge of the piston skirt is level with the cylinder block mating surface, then remove the piston. Measure the gap with a feeler gauge. If the gap exceeds the limit, replace the rings and repeat the procedure. If the gap still exceeds the limit with new rings, the cylinder must be bored and honed.
10. Carefully inspect the piston skirt, piston pin bosses and the areas between the piston ring grooves for cracks.
11. Check the piston skirt friction surface for chipping and scoring, and the edges of the crown for signs of burning. Chipping and scoring indicate frequent engine overheating, one possible cause of which is abnormal fuel combustion. In this case, thoroughly check the lubrication and cooling systems. Melting marks on the side surface of the piston indicate combustion gas leakage from the combustion chamber. Burn-through of the piston crown or burnt areas along the crown edges indicate abnormal engine operation due to incorrect ignition timing (ignition too early) or detonation. If any of these defects are found, find and eliminate the cause; otherwise, the same wear will recur. Causes of abnormal engine operation may include air leaks at the intake manifold, incorrect ignition timing, or a fuel injection system malfunction.
12. Pitting corrosion of the piston in the form of small pits indicates coolant has entered the combustion chamber (and the crankcase). Again, find and eliminate the cause; otherwise, the corrosion will reappear in the rebuilt engine.
13. Carefully inspect the connecting rods for damage such as cracks in the small end near the piston pin and in the areas where the connecting rod bearings are fitted. Check the connecting rod shank for distortion (twisting or bending). Connecting rod damage is unlikely and occurs only in cases of engine seizure or severe overheating. A thorough inspection of the connecting rods can only be performed at a dealer service workshop or a specialist workshop with the necessary equipment.
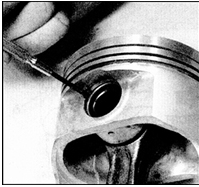
14. If necessary, remove the piston from the connecting rod and reassemble it as follows: using a flat-blade screwdriver, remove the piston pin circlips and push out the piston pin. If necessary, support the piston and drive out the pin by tapping with a hammer and a drift. Take care not to damage the piston pin bores in the piston and connecting rod.
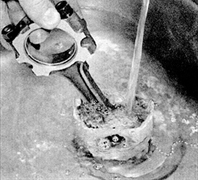
15. Removing the piston pin is much easier if the piston is first heated to 60–70 °C. Immerse the piston in hot water, remove it, and press out the piston pin, taking care to avoid injury.
16. Make marks on the piston, connecting rod and pin so that all parts can be reassembled in the same position. Always replace the circlips.
17. Check the piston pin and the connecting rod small end bore for signs of wear or damage. If the necessary measuring tools are available, determine the pin clearance in the piston and in the connecting rod by directly measuring the diameters of the pin and the bore.
18. If the connecting rod small end bushing and the piston pin are heavily worn, or if the pin clearance in the connecting rod small end exceeds the specification, replace the pin and the bushing. Replacement of the connecting rod small end bushings must be performed at a workshop, since a press for removing them and a reamer for the new pressed-in bushings are required.
19. If the clearance between the piston and the pin significantly exceeds the specification, replace the piston and the pin as a set. Note that the clearance between the piston and the pin does not play as significant a role as the clearance in the connecting rod small end, since the pin is retained by circlips.
20. Connecting rods do not normally require replacement, except in cases of engine seizure or other serious failure. Check the condition of the connecting rods by visual inspection. If connecting rod distortion is found, take them to an automotive service workshop for inspection and repair by an experienced technician.
21. Check the condition of all parts and, if necessary, purchase new ones from a dealer service center.
22. Orient the piston and connecting rod so that the mark on the piston (arrow or line), which must face the front of the engine, is correctly positioned relative to the lubrication hole in the connecting rod body (see illustration Correct Piston and Connecting Rod Orientation). In the correct orientation, the mark on the piston must face the timing chain side, and the lubrication hole in the connecting rod body must face the rear of the cylinder block.
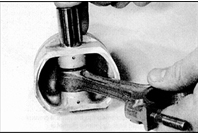
23. Lightly lubricate the piston pin with fresh engine oil, and insert the piston pin into the bores in the piston and the connecting rod small end.
WARNING: To facilitate installation of the piston pin, it is recommended to heat the piston.
24. If necessary, seat the pin in place by light taps with a hammer on a drift, after securing the piston.
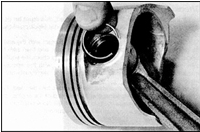
25. Check that the pin rotates freely in the piston bosses, then install the circlips. Make sure the circlips seat in the grooves next to the piston pin bores.
Test yourself
A quick Nissan Sunny quiz: every answer comes with an explanation and a link to the manual page.