Engine Disassembly and Assembly Procedure
GENERAL INFORMATION
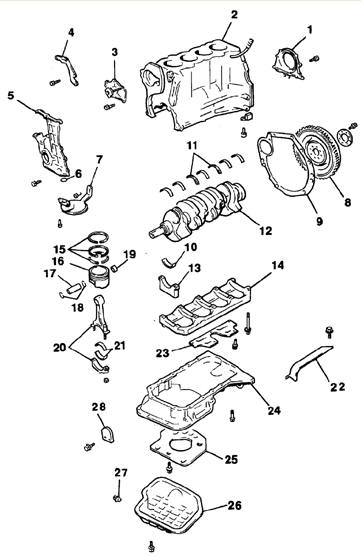
Cylinder Block, Crankshaft and Piston-Connecting Rod Assembly
1. Oil seal retainer
2. Cylinder block
3. Water pump
4. Alternator bracket
5. Timing chain cover
6. O-ring
7. Oil strainer with coarse filter
8. Flywheel (torque converter drive plate)
9. Adapter plate
10. Main bearing inserts
11. Thrust half-washers
12. Crankshaft
13. Main bearing caps
14. Main bearing cap frame
15. Piston rings
16. Piston
17. Piston pin
18. Snap rings
19. Connecting rod bushing
20. Connecting rod and connecting rod cap
21. Connecting rod bearing inserts 22, 23,
25. Oil baffle plate
24. Aluminum oil pan
26. Steel oil pan
27. Drain plug
28. Adapter plate
Disassembly sequence. The easiest way to disassemble the engine and perform all types of work is on a portable engine stand designed specifically for engine repair. Such stands can often be rented. Before mounting the engine on the stand, remove the flywheel with the clutch mechanism so that the stand bolts can be screwed into the cylinder block (crankcase).
If a stand is not available, the engine can be disassembled by securing it to a sturdy workbench or to the floor. When disassembling without a stand, be very careful when handling the engine.
If you are going to purchase a rebuilt engine, first remove all attached components so that they can be reinstalled in exactly the same order as during an independent engine overhaul. These components include: – alternator and brackets of the power steering pump and/or air conditioning compressor (depending on vehicle equipment); – ignition distributor, spark plugs and high-tension leads; – coolant pump and thermostat and radiator hoses; – carburetor parts or fuel injection system parts; – all sensors and solenoid valves together with wiring; – intake and exhaust manifolds; – oil filter; – fuel pump – for carbureted engines; – engine mounting parts; – flywheel/drive plate of torque converter. Warning: When removing attached components from the engine, pay special attention to small details that can simplify engine assembly. Mark gaskets, seals, spacer sleeves, dowels, bolts, washers, nuts, etc., so that they can be installed in their original positions during assembly.
If a short block assembly (i.e., a cylinder block with the crankshaft and connecting rod and piston assemblies fitted and installed) is to be installed, the cylinder head, oil pan, oil pump and camshaft drive chains must also be removed. If a complete overhaul is planned, the engine must be fully disassembled and the internal engine components removed in the following order (unless otherwise specified, see subsection 3.1.1 and subsection 3.1.2.2.1).
– intake and exhaust manifolds; – oil pan; – camshaft drive chains with sprockets; – cylinder head; – flywheel; – piston and connecting rod assemblies; – crankshaft.
Before disassembly and overhaul procedures, make sure that all required equipment and tools are available. A list of required tools is given at the beginning of this manual.
Assembly sequence. Before starting assembly, prepare all required new parts, gaskets and seals, as well as the necessary tools and fixtures. Review the assembly procedures to understand the scope of the work ahead and confirm again that everything needed is available. In addition to conventional tools and materials, a thread locking compound will also be required. Liquid gasket sealant is also needed for sealing mating surfaces where a gasket is not provided. The manufacturer recommends Genuine Liquid Gasket (available from Nissan service stations).
To save time and labor, it is recommended to assemble in the following order: – crankshaft; – pistons with connecting rods; – cylinder head and tappets; – timing chain(s); – oil pan; – flywheel; – attached components.
Before assembly, all parts must be thoroughly cleaned and dried, and all defects must be corrected. Lay the parts out on a perfectly clean workbench (or keep them in individual packaging).
Test yourself
A quick Nissan Sunny quiz: every answer comes with an explanation and a link to the manual page.