Camshaft Drive Chain
GENERAL INFORMATION

Valve Timing Drive Components
1. Cylinder block
2. Camshafts
3. O-ring
4. Upper chain guide
5. Upper guide bolt
6. Intake camshaft sprocket
7. Exhaust camshaft sprocket
8. Camshaft sprocket bolt
9. Chain
10. Chain tensioner nut and bolt
11. Chain tensioner
12. O-ring
13. Gasket
14. Tensioner shoe
15. Tensioner shoe pivot bolt
16. Chain damper
17. Chain damper bolt
18. Crankshaft sprocket
19. Oil pump drive spacer
20. Camshaft timing chain cover
21. Crankshaft pulley
22. Timing chain cover bolt
23. Crankshaft pulley bolt
Removal
PROCEDURE
1. Set the No. 1 piston to TDC on the compression stroke (refer to subsection 3.1.1.3).
2. Remove the cylinder head cover (refer to subsection 3.2.1.4).
3. Remove the camshaft timing chain cover (refer to subsection 3.2.1.6).
4. Remove the oil filter (refer to subsection 2.2.1). If the filter is damaged during removal, replace the filter.
5. Remove the nuts and bolts and take out the chain tensioner. Remove the tensioner O-ring.

Warning: Do not rotate the crankshaft while removing the tensioner.
6. Remove the mounting bolts and remove the upper chain guide from the top of the cylinder head.
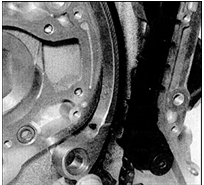
7. Remove the tensioner shoe pivot bolt and remove the shoe from the cylinder block.
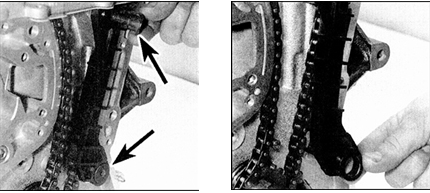
8. Loosen and remove the bolts (arrows) and remove the chain damper.
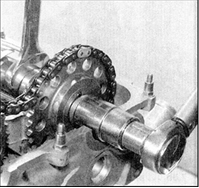
9. Loosen the camshaft sprocket bolts, holding each camshaft with a open-end wrench on the flats at the front. Remove each bolt together with its washer.
10. Remove the camshaft sprockets. If the locating pins in the camshaft ends are loosened, remove the pins and store them together with the sprockets.
11. Remove the chain from the crankshaft sprocket.
12. If necessary, remove the crankshaft sprocket, noting its correct position beforehand, and remove the woodruff key (if it has loosened in the crankshaft keyway). Store the key together with the crankshaft sprocket.
Condition Inspection
PROCEDURE
1. Check the crankshaft sprocket and the two camshaft sprockets for signs of wear or damage, such as chipped teeth, hooked teeth, or missing teeth. If any of these signs of wear or damage are found, replace all sprockets and the chain as a set.
2. Inspect the chain links and check roller wear. The degree of chain wear can be determined by its deflection in the horizontal plane. A new chain has almost no deflection. If there is noticeable axial play in the chain links, replace the chain. Note that, regardless of visible signs of wear, the chain must also be replaced after high mileage, or if excessive chain noise is heard with the engine running. It is strongly recommended to replace the chain together with the sprockets, since installing a new chain on worn sprockets, or vice versa, causes accelerated wear of the new part and is not cost-effective. If the condition of the chain and sprockets is in doubt, consult a qualified Nissan service facility.
3. Check the chain damper and the chain guide at the contact points with the chain for signs of wear or damage. Replace these parts if any defects are found.
4. The condition of the tensioner can only be assessed by comparison with a new part. If there is even slight doubt about the condition of the tensioner, replace it.
Installation
PROCEDURE
1. Make sure the No. 1 piston is still at TDC on the compression stroke (the keyway on the crankshaft nose must face straight up when viewed from the right side of the engine). Insert the key into the keyway on the crankshaft nose.

2. Correctly orient the crankshaft sprocket (the timing mark on the sprocket must face away from the crankshaft, and the keyway in the sprocket must align with the key), then install it on the crankshaft.
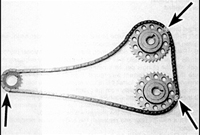
3. The chain has three links of different colors (indicated by arrows), each corresponding to a separate timing mark. The two links closer to each other correspond to the camshaft timing marks, and the third link must align with the timing mark on the crankshaft sprocket.
Warning: On some vehicles, the chain links that correspond to the camshaft sprocket timing marks may differ in color from the link corresponding to the crankshaft sprocket timing mark.
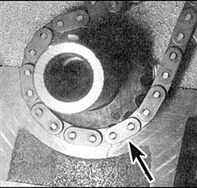
4. Position the chain so that the differently colored links face outward and are opposite the corresponding timing marks. Place the chain on the crankshaft sprocket, aligning the color-coded link (arrow) with the timing mark on the sprocket.
5. Install the camshaft sprockets on the intake and exhaust camshafts, with the timing marks on the sprockets facing outward. Warning: Both sprockets are identical.
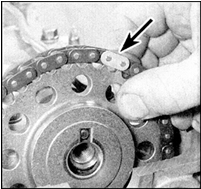
6. Place the chain (indicated by arrow) over the exhaust camshaft sprocket so that the differently colored links align with the timing marks.
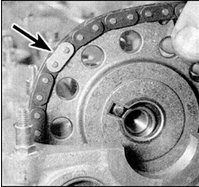
7. Then place the chain (indicated by arrow) over the intake camshaft sprocket, aligning the differently colored links with the timing marks.
8. Insert the locating pins into the ends of the camshafts (if removed), and align the slots in the sprockets with the locating pins. Make sure that the differently colored chain links align with the corresponding timing marks on the sprockets. Otherwise, remove the chain from the sprockets and perform the necessary adjustments.
9. After aligning the timing marks with the corresponding chain links, install the washers and tighten the camshaft sprocket bolts.
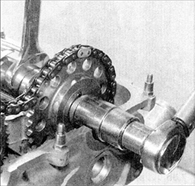
10. Tighten the bolts to the specified torque. During tightening, do not allow the camshaft to rotate; hold it by the flats with an open-end wrench.
11. Install the chain guide and tighten the guide bolt to the specified torque.
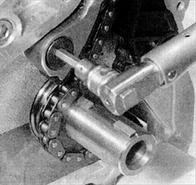
12. Install the chain tensioner shoe and tighten the shoe pivot bolt to the specified torque.
13. Install the upper chain guide on the cylinder head and tighten the bolts to the specified torque.
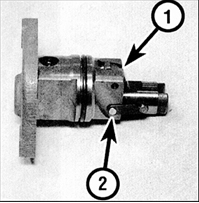
14. Release the tensioner ratchet lever (1), press the plunger into the body, and hold it in this position by hooking the installation hook onto the plunger pin (2).
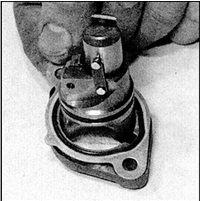
15. Install a new gasket on the tensioner flange, and place a new O-ring in the groove of the body.

16. Install the tensioner, making sure the arrow on the flange points away from the cylinder head. Install the washers and tighten the tensioner nuts to the specified torque. After tightening the nuts, the installation hook should automatically disengage from the pin, releasing the plunger.
17. Install a new oil filter and fill the engine with oil (see subsection 2.2.1).
18. Install the timing chain cover (see subsection 3.2.1.6).
19. Install the cylinder head cover (see subsection 3.2.1.4).
Test yourself
A quick Nissan Sunny quiz: every answer comes with an explanation and a link to the manual page.