Cylinder Block and Crankshaft
Cleaning
PROCEDURE
1. Remove all attached units and sensors from the cylinder block. Plugs must also be removed for cleaning. To do this, drill a small hole in each plug and screw in a self-tapping screw. Pull the plugs out with pliers by the screw heads, or with a slide hammer.
2. Scrape off all remaining gasket material from the cylinder block and the main bearing cap frame (on engines equipped with a frame), taking care not to damage the mating sealing surfaces.
3. Remove all oil gallery plugs (if fitted). These plugs are a very tight fit, so it may be necessary to drill them out and then pass a reamer through the hole. Replace all plugs when assembling the engine.
4. If the cylinder block surface is heavily contaminated, steam cleaning will be required.
5. After steam cleaning the block, repeat the cleaning of the lubrication holes and passages. Flush all internal passages of the cylinder block with warm water until clean water runs out. Dry the block thoroughly and lubricate all mating and machined surfaces with light oil to prevent rust. The drying process can be accelerated by blowing out the internal passages with compressed air.
6. If the cylinder block surface is moderately dirty, it is sufficient to clean the block with a stiff brush, hot water (at a temperature that will not cause burns) and soap or detergent. Take your time and thoroughly wash the cylinder block. Regardless of the cleaning method, very carefully flush all internal oil passages and dry thoroughly. Lubricate the cylinder walls with oil to prevent rust.
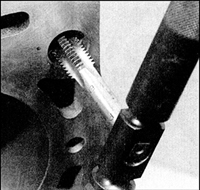
7. Clean the threaded holes in the block to ensure accurate torque readings during assembly. Run a tap through the threads, as this removes dirt, corrosion traces and sealant residue, and restores the threads. If possible, blow out the holes with compressed air to remove debris left by the tap.
Warning: Good results are obtained by injecting water-based dispersion lubricants under high pressure into the holes, which are commercially available in long aerosol cans. When cleaning this way, wear protective goggles.
8. Install new plugs in the cylinder block, after first coating them with a suitable sealant.
9. If engine assembly is postponed, cover the cylinder block with polyethylene film to prevent dirt from entering and rust from forming. Lubricate all mating sealing surfaces to protect them from corrosion.
Condition Inspection
PROCEDURE
1. Visually inspect the cylinder block for cracks and signs of corrosion. Check the condition of the threads in the holes and mark any stripped threads. If coolant leakage into the cylinder block is suspected, the block must be pressure tested; it is advisable to have this done by a specialist. If defects are found, repair the block (if possible) or replace it.
2. Check the internal cylinder surfaces for chips and scoring. Check for a ridge at the top of the cylinder; a ridge indicates excessive cylinder wear.
3. Check the inner cylinder surfaces for chips and scoring.
4. Measure the cylinder bore diameter 10 mm from the edge of the cylinder, parallel and perpendicular to the engine axis. Repeat the measurements at 60 mm and 100 mm from the edge of the cylinder. Use these six measurements to determine the taper and out-of-round of the cylinder.
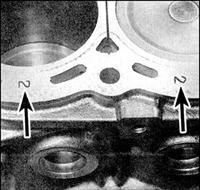
5. The cylinder size group markings (indicated by arrows) are stamped on the head gasket mating surface of the block, next to the cylinders.
6. Check the condition of the pistons and rings (see subsection 3.2.2.12). The piston-to-cylinder clearance is determined as the difference between the measured cylinder and piston diameters.
7. Compare the results with the values specified in subsection 3.2.1.1. If any measured value is outside the specified limits, the cylinder must be bored to the next repair size; if this is not possible, the cylinder block must be replaced. To determine the most appropriate next steps, consult a specialist. Pistons are supplied in only one repair size: 0.2 mm.
8. If the condition of the pistons and cylinders is satisfactory, and wear is such that the piston-to-cylinder clearance is within limits, only the piston rings need to be replaced.
9. In this case, the cylinders are only honed, which ensures better bedding-in of the piston rings and their sealing contact with the cylinder walls.
10. Honing is usually carried out with a spring-loaded stone hone chucked in an electric drill. Prepare kerosene or honing oil and rags. During honing, move the tool up and down in the cylinder periodically, liberally lubricating the cylinder walls.
11. After honing, the cylinder wall surface should show a pattern of fine lines crossing at an angle of about 60°. Do not remove excess material; finish honing immediately after the surface is finished. If new pistons are to be installed, note that the piston manufacturer may recommend cylinder wall finishing with a slightly different crosshatch angle. In this case, follow the piston manufacturer's instructions.
12. Do not remove the honing head from the cylinder while it is rotating; wait until it has come to a complete stop first. When finished, thoroughly wipe the cylinder clean of oil. If you do not have honing equipment, or if you are not confident you can perform this operation properly, have the cylinders honed at a workshop for a reasonable fee.
Test yourself
A quick Nissan Sunny quiz: every answer comes with an explanation and a link to the manual page.