Cylinder Head and Valves
GENERAL INFORMATION
Thorough cleaning of the cylinder head and valvetrain components followed by inspection will allow you to assess the scope of valve and valvetrain repair work during an engine overhaul. WARNING: If the engine has frequently overheated, the cylinder head may have warped. Carefully check the head for signs of distortion.Cleaning
PROCEDURE
1. Remove all gasket material residue from the mating surfaces of the cylinder head, the cylinder block, the intake manifold and the exhaust manifold.
2. Scrape carbon deposits from the combustion chambers, clean all carbon from the holes and passages, then wash the cylinder head with solvent.
3. Scrape heavy carbon deposits from all valve surfaces. Use a power wire brush to remove carbon from the valve heads and stems.
Inspection WARNING: Before deciding whether parts need to be resurfaced in a workshop, be sure to perform all of the inspection procedures described below. Make a list of items that require particular attention.
PROCEDURE
Cylinder Head1. Carefully inspect the head for cracks, signs of coolant leakage and other damage. If cracks are found, replace the cylinder head.
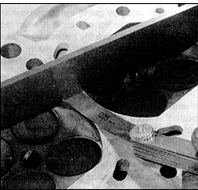
2. Check the flatness of the cylinder head mating surface with a feeler gauge and a straightedge. If the mating surface is warped, resurface the head. If the distortion is such that the head height after resurfacing would be less than specified in subsection 3.2.1.1, replace the head.
3. Check the condition of the valve seats in each combustion chamber. If pitting, cracks or burn marks are present, the head requires repair at an automotive service workshop. Minor defects can be removed by lapping the valve to the seat with fine lapping compound.
4. Check valve guide wear. Insert the valve into its guide and rock it from side to side. A small, barely noticeable amount of play is acceptable. If valve play in the guide is excessive, measure the valve stem diameter. If the stem diameter has noticeably decreased due to wear, replace the valve. If the stem diameter is within specification, replace the valve guide. This work is best performed at an automotive service workshop or entrusted to a qualified mechanic.
5. If the valve guides are to be replaced, the valve seats should be re-cut (or re-ground) only after the new guides have been pressed in.
Valves
6. Carefully inspect the head of each valve for cracks, degree of wear and signs of burning. Check the valve stems for scoring and for a shoulder formed by wear. Rotate the valve to check for bending. Check the wear on the valve stem ends. If any signs of wear or damage are found, replace the valve.
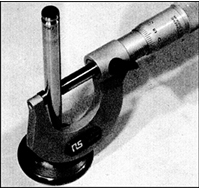
7. If the inspection shows that the valve is in satisfactory condition, measure the valve diameter at several points. A noticeable difference in diameters indicates stem wear. If a noticeable difference in diameter is found at two or more points, replace the valve (or valves).
8. If the valves are in satisfactory condition, lap them to the seats to ensure a tight seal that prevents gas leakage. If the seats have only minor damage, or if a seat has been re-cut, lapping can be performed with a fine abrasive compound. Use a coarse lapping compound only if deep wear or severe burning of the seats is found. In this case, have the cylinder head and valves inspected by a qualified specialist to determine whether the seats should be re-cut or even the seat inserts replaced (if provided).
9. To lap the valves, place the cylinder head on a flat surface with the combustion chambers facing up.
10. Apply a thin layer of lapping compound (of the appropriate grade) to the seat chamfer and press the suction cup of the valve lapping tool onto the valve head.
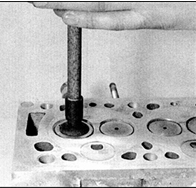
11. Lap by rotating the tool 180° in both directions. During lapping, periodically lift the valve to distribute the abrasive evenly. Lapping is much easier if a not-too-stiff spring is placed under the valve head.
12. Finish lapping with the coarse compound once a uniform matte band forms on the valve and seat chamfers, then wipe the valve and seat clean of compound and continue lapping with the fine compound. Lapping is complete when a uniform, continuous grayish band forms on the chamfers of the valve and seat. Do not lap further, as excessive removal of the seat may make subsequent repair impossible.
13. After all valves have been lapped, remove all abrasive residue by thoroughly washing all parts in kerosene or solvent.
Valve Train Components
14. Check the springs for signs of chipping and damage. The manufacturer recommends checking valve springs by measuring the force required to compress the spring to a specified length. This method requires special equipment, so spring checks should be performed at a dealer service facility. A rough check of spring condition can be made by comparing the free length of the spring with the value specified in Subsection 3.2.1.1.
15. Place each spring on a flat surface and set a square alongside it. Measure the distance between the spring coil and the square at the top and compare it with the value specified in Subsection 3.2.1.1.
16. If any spring is damaged, is out of square beyond the limit, or has lost its tension, replace the entire set of springs. In general, valve springs should be replaced during an overhaul regardless of their condition.
17. Valve stem seals must be replaced regardless of their condition.
Test yourself
A quick Nissan Sunny quiz: every answer comes with an explanation and a link to the manual page.