Cylinder Head
GENERAL INFORMATION
Warning: To simplify assembly, mark the brackets being removed and identify the routing of wiring harnesses and hoses.Removal
PROCEDURE
1. Drain the coolant.
2. Remove the camshafts (see subsection 3.2.1.9).
3. Note that the procedure described below assumes removal of the cylinder head together with the intake and exhaust manifolds. This reduces the amount of work required to remove the head, but makes handling the head more difficult due to the increased size and weight of the assembly. It is recommended to first remove both manifolds (see subsection 6.1.12 and subsection 6.1.13).
4. On engines with pre-mixed fuel-air mixture (single-point injection system), perform the following: – remove the air filter; – relieve fuel system pressure and disconnect the fuel supply hose and return hose from the throttle body (plug all openings to prevent fuel loss and dirt entering the fuel system); – disconnect the throttle cable; – disconnect the wiring connectors from the throttle body, intake manifold and other components; – disconnect the vacuum hoses of the brake booster, cooling system and crankcase ventilation system from the corresponding valves and fittings mounted on the cylinder head; – remove the intake manifold support bracket; – disconnect the exhaust pipe of the muffler from the exhaust manifold.
5. On engines with direct fuel injection (multi-point injection system), perform the following: – remove the air filter and air duct; – relieve fuel system pressure and disconnect the fuel supply hose and return hose from the fuel rail (plug all openings to prevent fuel loss and dirt entering the fuel system); – disconnect the throttle cable; – disconnect the wiring connectors from the throttle body, intake manifold and other components. Disconnect the injector wiring and move it aside so it does not interfere with cylinder head removal; – disconnect the vacuum hoses of the brake booster, cooling system and crankcase ventilation system from the corresponding valves and fittings mounted on the cylinder head; – remove the intake manifold support bracket(s); – disconnect the exhaust pipe of the muffler from the exhaust manifold.
6. On vehicles equipped with an automatic transmission, disconnect the low-range shift cable from the throttle body.
7. Loosen the clamps and disconnect the hoses from the coolant pump, the heater radiator and the oil cooler (if equipped). Also disconnect the radiator hoses of the cooling system at the front of the cylinder head.
8. On engines with direct fuel injection, Phase I modification: remove the starter (see subsection 7.6), then loosen and remove the bolt securing the coolant lines to the rear of the cylinder block.
9. Disconnect the wiring connectors from the distributor, the ignition coil and the power transistor unit. Detach the wiring harness from the clamps and move it aside from the cylinder head. Remove the bolts and all ground wires secured to the cylinder head and the intake manifold.
10. Loosen the bolts securing the alternator bracket to the cylinder head.
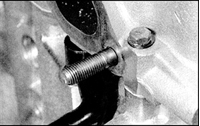
11. Loosen and remove the M6 bolts securing the cylinder head to the timing chain cover (if these bolts have not already been removed). Also remove the bolt at the front of the cylinder head.
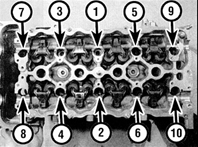
12. Following the sequence shown in the diagram in reverse, loosen all ten main cylinder head bolts. Loosen the bolts in several passes, 1/2 turn per pass, until the bolts can be turned out by hand.
13. Remove the bolts and washers, noting their positions in the cylinder head.
14. Remove the cylinder head. It is advisable to perform this operation with an assistant, as the head assembly with the camshafts is quite heavy (especially if the manifolds have not been removed). Remove the gasket from the cylinder block, noting the two locating dowels. If the dowels come out of their holes, remove them, noting their original position, and store them with the cylinder head. Also note the correct installation of the oil jets in the cylinder block. If the jets are loose and can be removed, remove them and store them with the cylinder head.
15. Inspect the mating surfaces of the cylinder head and cylinder block for damage (deep scratches, chips, etc.). Minor damage can be removed with a file; serious damage must be removed by grinding only.
16. If the cylinder head is to be disassembled for major repair, refer to the description in the corresponding subsection. Preparation for Installation
PROCEDURE
1. The manufacturer recommends measuring the cylinder head bolts to determine whether they are still serviceable. Measure the length of each bolt (after removing the washers) from the underside of the bolt head to the end of the threaded portion. If the length of all bolts is less than 158.2 mm, the bolts may be reused. If the length of at least one bolt exceeds 158.2 mm, replace the complete set of bolts. Given the loads the cylinder head bolts are subjected to, replacing them regardless of condition is strongly recommended.
2. Before installing the cylinder head on the engine, thoroughly clean the mating surfaces of the head and block. Remove carbon deposits and gasket material using a hard plastic or wooden scraper, and also clean carbon from the piston crowns. Use particular care during cleaning, as the surfaces can be easily damaged. Also take measures to prevent removed carbon from entering the oil galleries or coolant passages in the cylinder block, otherwise the passages may become blocked and lubrication of engine parts may be disrupted. Cover the oil gallery openings, coolant passage openings and the bolt holes in the cylinder block with adhesive tape and paper. To prevent dirt from entering the gap between the piston and the cylinder, apply grease around the edge of the piston crown. After cleaning the pistons, remove the grease from the gap with a brush and wipe up any remaining grease with a clean rag.
3. Inspect the mating surfaces of the cylinder head and block for damage (deep scratches, chips, etc.). Remove minor damage with a fine file. Serious damage must be removed by grinding only.
4. If deformation of the mating surfaces is suspected, check the deviation of these surfaces from flatness using a straightedge.
Installation
PROCEDURE
1. Wipe the mating surfaces of the cylinder head and block dry. Install the two locating dowels (if removed) and insert the oil jets into the cylinder block.
2. Place a new gasket on the cylinder block, aligning the gasket holes with the dowels.
3. With an assistant, carefully install the cylinder head on the cylinder block, aligning the head with the locating dowels.
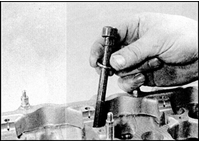
4. Lubricate the bolt threads and the underside of the bolt heads with clean engine oil. Fit the washers onto the bolts and carefully insert the bolts into the corresponding holes in the cylinder head (do not drop the bolts into the holes). Screw in the bolts and tighten them by hand.
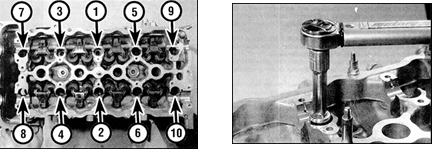
5. Tighten the ten main cylinder head bolts in the specified sequence to the Stage 1 torque, using a torque wrench with a socket.
6. After completing Stage 1 tightening, tighten the bolts to the Stage 2 torque.
7. Wait one minute, then loosen the bolts in the reverse order of the tightening sequence shown in the diagram in step 5.
5. Loosen the bolts gradually, 1/2 turn per pass, until the bolts can be turned out by hand.
8. Tighten the 10 bolts again by hand, then tighten them in sequence to the Stage 3 torque.
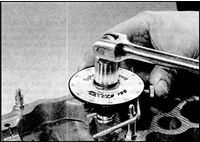
9. After completing Stage 3, turn the bolts through the angle specified for Stage 4. Tightening at this stage should be performed with an angle-gauge wrench to ensure accurate compliance with the requirements. If no angle-gauge wrench is available, mark the bolt head and the cylinder head surface with paint. The marks must be positioned at the specified angle. Use these marks as a guide when performing Stage 4 tightening.
10. After completing Stage 4 tightening of the main cylinder head bolts, tighten the bolts to the Stage 5 torque, following the specified sequence.
11. After final tightening of the main cylinder head bolts, install the M6 bolts at the front of the cylinder head and tighten them to the specified torque.
12. Route the wiring along its original path and connect the wiring connectors to the distributor, the ignition coil and the power transistor unit. Secure the wiring in place with straps and clamps.
13. Connect the ground wires to the cylinder head and the manifold, and securely tighten the bolts.
14. On direct injection engines of Phase I, screw the coolant pipe mounting bolt into the cylinder block and tighten it securely. Install the starter motor (see subsection 7.6).
15. Connect the cooling system hoses, observing the original installation sequence, and secure the hoses with clamps.
16. Referring to the appropriate Part in Chapter 4, perform the following operations: – connect all wiring, hoses and control cables to the fuel system components and to the intake manifold; – install the intake manifold support bracket; – connect the muffler inlet pipe to the exhaust manifold; – install the air filter and air duct (if equipped).
17. On vehicles equipped with an automatic transmission, connect and adjust the downshift control cable.
18. Install the camshafts (see Subsection 3.2.1.9).
Test yourself
A quick Nissan Sunny quiz: every answer comes with an explanation and a link to the manual page.