Instruments and Warning Systems. Diagnostic System
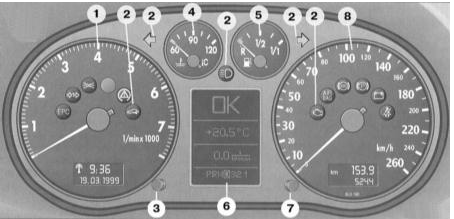 Instrument cluster 1 – tachometer and digital clock with date display 2 – indicator lamps 3 – clock setting button / control button 4 – coolant temperature 5 – fuel level gauge 6 – display – service interval indication – warning symbols – outside temperature – selector lever position* – driver information system* 7 – service interval indicator reset button – trip meter button 8 – speedometer with odometer and trip meter display
1 tachometer and digital clock with date display
Tachometer
The red zone of the tachometer scale corresponds to the maximum engine speed permitted for short periods for a broken-in and warmed-up engine.
However, it is recommended to shift to a higher gear or reduce throttle no later than when the needle reaches this zone of the scale.
During the break-in period, avoid high engine speeds.
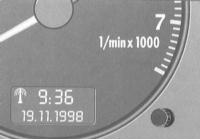 Digital clock with date display
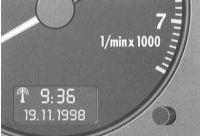
The clock display panel is located within the tachometer scale.
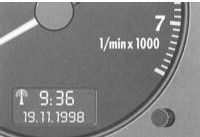
The upper display shows the time, and the lower display shows the date.
The time and date are set using the setting button. The clock can operate as a radio-controlled quartz clock* or as a conventional quartz clock.
When important radio information is received, the clock automatically switches to "radio-controlled quartz clock" mode, and the radio signal reception symbol (radio tower) appears on the display. If no important radio information is received for three days, the clock automatically switches to "quartz clock" mode. The radio signal reception symbol then disappears.
Setting the clock time / date
The time and date can be set manually only in "quartz clock" mode.
To set the current hour, pull the button until the hour display starts flashing. Change the hour display by turning the button left / right.
To set the minutes, pull the button several times until the minutes display starts flashing. Change the minutes display by turning the button left / right.
To set the calendar date, pull the button several times until the day, month or year display starts flashing. Change the day, month or year display by turning the button left / right.
The setting process is completed when the display stops flashing after the button is released.
Setting the time zone
When traveling by vehicle to another time zone, change the clock display accordingly.
To set the time zone (in radio-controlled mode), pull the button until the hour display starts flashing. Change the time zone (current hour) display by turning the button left / right.
Displaying the calendar date
Pull the button several times until the calendar date display starts flashing.
The calendar date is displayed by turning the button right and disappears when the button is turned left. The setting process is completed when the display stops flashing after the button is released.
2 indicator lamps
Refer to the description below.
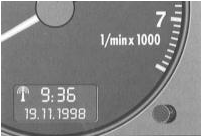 3 clock setting button / control button
The control button has the following functions:
Displaying the remaining distance to service. Briefly press the button with the ignition on to display the remaining distance to the next service. The system check can be performed with the engine off or running, and at speeds not exceeding 5 km/h.
For more detailed information, refer to the description below.
Checking the display of symbols
Press the control button twice with the ignition on to display all symbols in sequence. The system check can be performed with the engine off or running, and at speeds not exceeding 5 km/h.
If a first-priority malfunction (red symbol) is present, the display check is not possible.
Displaying driver instructions1)
When a first-priority symbol flashes, corresponding instructions may be shown on the display to assist the driver. For example: "STOP ENGINE, CHECK OIL LEVEL". 1) Only vehicles with a driver information system.
To display, press the control button. The display turns off approximately 5 seconds after the button is released.
Illumination of the trip meters and clock
With the ignition off, press the control button – the trip meters and clock are illuminated for approximately 15 seconds.
In addition, the illumination turns on and remains lit for 30 seconds after the driver's door is opened.
Clock setting button
Refer to the description below.
4 coolant temperature
The gauge operates with the ignition on.
Cold engine temperature range
While the needle is in the left part of the scale, avoid high engine speeds and engine load!
Normal operating temperature range
During normal driving, the temperature gauge needle should fluctuate within the middle part of the scale!
When the engine is under heavy load and the outside air temperature is high, the needle may move further to the right on the scale. This is not a reason for concern unless the coolant warning lamp is flashing.
Warning Lamp
A flashing coolant temperature / coolant level warning lamp while driving indicates that the coolant level has dropped or the engine is overheating.
Stop, switch off the engine and determine the cause of the malfunction.
5 Fuel reserve
The gauge operates with the ignition on.
The fuel tank capacity is 55 liters on front-wheel drive vehicles and 62 liters on all-wheel drive vehicles. When the needle reaches the reserve range, approximately 7 liters of fuel remain in the tank.
The fuel pump symbol on the instrument panel also reminds you that refueling is necessary. Never run the fuel tank completely empty.
CAUTION
To obtain a reliable fuel level indication, switch on the ignition while refueling.6 Display
– Service interval indicator; – Warning symbols; – Outside temperature; – Selector lever positions – refer to the Automatic Transmission subsection; – Driver information system*
7 Reset button
– trip odometer, – service interval indicator
8 Speedometer with odometers
Speedometer
The speedometer has a digital odometer for total mileage and a trip odometer that counts from the last reset.
During the break-in period and thereafter, follow the driving instructions given in the Break-in subsection.
Odometers
The lower odometer records the total mileage, and the upper (trip) odometer records the distance since the trip odometer was last reset.
The trip odometer reading has an accuracy of 100 m.
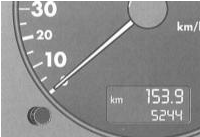 Trip odometer reset button
Press the button until the trip odometer reads zero.
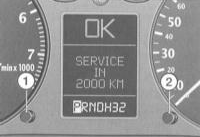 Service interval indicator
The illustration shows the instrument panel display with the distance remaining until the next service.
Distance remaining until service
With the ignition switched on, briefly press the check button (1) to display the number of kilometers remaining until the next service. The system can be checked with the engine off or running, at speeds not exceeding 5 km/h.
The distance remaining until service is updated every 500 km. On a new vehicle, and after service has been performed, the display always shows “SERVICE IN 15000 KM” during the first 500 km.
This also applies to vehicles with “Longlife” service.
If a priority 1 malfunction (red symbol) is present, the distance remaining until service cannot be displayed.
When the next service is approaching or due, the display shows “SERVICE IN 2000 KM” or “SERVICE!” after the ignition is switched on. After 5 seconds the display returns to normal mode.
Resetting the service interval indicator
The service interval indicator is reset at an Audi service station performing the service.
The indicator can be reset by the owner as follows:
Switch off the ignition. With button (2) pressed, switch on the ignition. The display shows “SERVICE!”
CAUTION
Reset the service interval indicator only in accordance with the maintenance intervals. Otherwise, the indication will be inaccurate. Service interval indicator data is retained when the battery is disconnected.Malfunction indication
If a malfunction is present, the message “dEF” appears in place of the trip odometer reading on the instrument panel. Have the malfunction corrected immediately at an Audi service station.
Indicator lamps
Electronic Power Control*1) EPC
(Electronic Power Control)
The warning lamp illuminates when the ignition is switched on. If there is no malfunction, it should go out after the engine starts.
1) Diesel engine glow plug system warning lamp
The warning lamp illuminates while driving if a malfunction occurs in the engine management system. The engine power control system automatically switches to emergency mode, and engine power is slightly reduced. Contact an Audi service station immediately.
 Glow plug system (diesel engines only)
When the ignition is switched on with a cold engine, the warning lamp illuminates. Illumination indicates that the engine glow plugs are switched on.
The lamp goes out when the glow plugs reach ignition temperature. Start the engine immediately after the lamp goes out – refer to the Ignition Switch and Engine Starting subsection.
When starting a warm engine, or when the outside temperature is above +8°C, the glow plug warning lamp illuminates for about one second – the engine can be started immediately.
If the warning lamp does not illuminate with a cold engine, there may be a malfunction in the glow plug system. In this case, seek qualified assistance.
If a malfunction occurs in the engine management system while driving, the warning lamp starts to flash. Engine control automatically switches to emergency mode, and engine power is slightly reduced. Contact an Audi service station immediately.

When towing a trailer, the warning lamp* flashes in unison with the turn signals.
If a turn signal lamp on the vehicle or trailer is faulty, the warning lamp does not flash.
Parking lights / headlights

The warning lamp illuminates when the parking lights and headlights are switched on.
Anti-slip regulation (ASR)*1)

The warning lamp illuminates when the ignition is switched on and should go out after approximately two seconds.
The lamp flashes while driving when ASR is active.
If the system is switched off or a malfunction is present, the warning lamp remains illuminated continuously.
Since ASR operates together with ABS, the ASR warning lamp also illuminates if the ABS fails.
For more detailed information, refer to the Switches subsection.
1) ESP warning lamp on vehicles equipped with Electronic Stabilization Program.
Electronic Stabilization Program (ESP)
The warning lamp illuminates when the ignition is switched on and should go out after approximately 2 seconds.
The lamp flashes while driving when ESP is active.
If the system is switched off or a malfunction is present, the warning lamp remains illuminated continuously.
Since ESP operates together with ABS, the ESP warning lamp also illuminates if the ABS fails.
CAUTION
If the ESP warning lamp comes on immediately after starting the engine, the ESP may have been switched off by the system's protective function. In this case, you can re-enable ESP by switching the ignition off and back on. The warning lamp goes out and the system is fully operational. For more detailed information, refer to the subsection Switches and Controls.Electronic Immobilizer

When the ignition is switched on, the vehicle key data is requested. A positive result of the data exchange is confirmed by the indicator lamp lighting briefly.
If an uncoded key (for example, a duplicate) is used, the indicator lamp starts flashing continuously. In this case, the engine cannot be started. See also the subsection Keys, Central Locking and Anti-Theft Alarm System.
High beam

The indicator lamp lights when the high beam is switched on or when the headlamp flasher is used. Refer to the subsection Switches and Controls.
Turn signals

The indicator lamp flashes in unison with the turn signals. If one of the turn signals fails, the indicator lamp flashes twice as fast. This does not apply when driving with a trailer.
For more detailed information, refer to the Switches subsection.
When the hazard warning lights are switched on, both turn signal indicator lamps flash in unison.
Engine Electronics*

The indicator lamp signals a malfunction of the engine electronics. Contact an Audi service center immediately and eliminate the cause of the malfunction.
AIRBAG System
The airbag and belt tensioner indicator lamp should light up after the ignition is switched on and go out after a few seconds.
When the front passenger airbag is deactivated, the indicator lamp first lights continuously for 4 seconds, then flashes for 15 seconds, and then goes out. This signals that the front passenger airbag is deactivated. See also the subsection Safety Systems, Transporting Children.
The system is faulty if the indicator lamp: · does not light up when the ignition is switched on, · does not go out after the ignition is switched on, or · lights up while driving.
A malfunction is indicated by the indicator lamp remaining on continuously.
CAUTION
If the system malfunctions, have it checked at the earliest opportunity at an Audi service station. Otherwise, there is a risk that the airbags or pyrotechnic belt tensioners will not deploy correctly in an accident.Anti-Lock Brake System (ABS)

The indicator lamp monitors the operation of the ABS.
ABS
The readiness of the main electrical components of the ABS is checked by the electronic control system before the start of driving and during driving.
The warning lamp illuminates when the ignition is switched on and should go out after approximately 2 seconds.
If the ABS indicator lamp does not go out or lights up while driving, the system is faulty. In this case, the vehicle can only be braked using the conventional brake system.
If the brake system indicator lamp also lights up when the ABS is faulty, note the following:
CAUTION
If the ABS control function fails during braking, the rear wheels may lock relatively quickly. Under certain conditions, this may cause the vehicle to skid. In this case, carefully drive to the nearest Audi service station and have the malfunction rectified.If the ABS fails on vehicles with Anti-Slip Regulation / Electronic Stabilization Program, the ASR / ESP indicator lamp also lights up. For more detailed information, refer to the subsections Switches and Controls and Driving Characteristics and Assist Systems (ABS, EDS, ASR, ESP).
Electronic Differential Lock (EDS)*
EDS operates together with the ABS.
If the ABS fails, the EDS also does not function.

Parking Brake
The indicator lamp lights up when the parking brake is applied and the ignition is switched on. It should go out after the parking brake is released.

Battery Discharge
The indicator lamp lights up when the ignition is switched on and should go out after the engine is started.
If the lamp does not go out or lights up while driving, it is usually still possible to reach the nearest Audi service center. However, since the battery is discharging continuously, switch off all electrical consumers except those that are essential.
Vehicles with a driver information system have an additional battery voltage control lamp.

Seat Belt Reminder*
The indicator lamp lights up for several seconds after the ignition is switched on to remind you to fasten your seat belts.
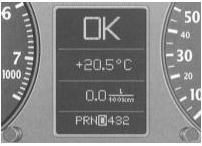
Warning Symbols (Standard Version)
When the ignition is switched on and while driving, vehicles without a driver information system (FIS) continuously monitor the functions and technical condition of the vehicle systems listed below.
The system notifies you of malfunctions or of the need for urgent maintenance work by an audible signal, accompanied by red and yellow warning symbols on the instrument panel, depending on the priority level.
If the monitored functions are in order, the letters "OK" are displayed for a few seconds.
Red Symbols (Priority 1)

Brake System Fault

Coolant level below normal or coolant overheating

Oil pressure below normal
When a flashing red symbol appears, three consecutive warning signals sound. The symbols indicate a hazard. Stop, switch off the engine, check the failed system and eliminate the malfunction. Qualified assistance may be required for this.
If several priority 1 malfunctions occur at the same time, the symbols appear one after another, each displayed for 2 seconds. The symbols continue to flash until the malfunction is eliminated.
Yellow Symbols (Priority 2)

Fuel reserve

Brake pad wear

Check engine oil level*

Engine oil level sensor malfunction
When a yellow symbol appears, one warning signal sounds. The display of symbols is a warning signal. Check the corresponding function display as soon as possible. If several warnings are displayed at the same time, the symbols appear one after another, each for approximately 2 seconds.

Door / Luggage Compartment Open Warning
When the ignition is switched on, the digital display symbol indicates open doors and luggage compartment. Regardless of which door is open, the pictogram always shows the driver's door as open. The luggage compartment shown in the pictogram flashes when its lid is open.
After all doors and the luggage compartment are closed correctly, this symbol goes out.

Brake System
The symbol flashes when the brake fluid level is too low or when the ABS is faulty.
In this case, stop and check the brake fluid level.
If the brake fluid level in the reservoir drops below the "Min" mark, drive carefully to the nearest Audi service center, top up the brake fluid and determine the cause of the level drop. If the ABS fails, rear axle brake force is not regulated. As a result, the rear wheels are more prone to locking.
CAUTION
A brake fluid level below normal and increased brake pedal travel may be caused by failure of one circuit of the dual-circuit brake hydraulic system. In this case, you may carefully drive to the nearest Audi service station, but keep in mind that braking distance and pedal effort will increase. If the brake fluid level is normal, the cause may be a malfunction of the ABS. If the ABS control function fails during braking, the rear wheels may lock relatively quickly. Under certain circumstances, this may cause the rear axle of the vehicle to skid. Carefully drive to the nearest Audi service station and have the malfunction rectified.
Coolant temperature / level
If the symbol flashes while driving, the coolant is overheating or the coolant level has dropped below normal. Stop, switch off the engine and check the coolant level. If necessary, top up the coolant.
CAUTION
Be careful when opening the coolant expansion tank cap! The cooling system of a hot engine is under pressure – risk of scalding from ejected fluid! Therefore, allow the engine to cool before removing the cap. Do not put your hands near the cooling fan! If the coolant level is normal, overheating may be caused by a failure of the cooling fan.Do not continue driving if the warning lamp does not go out. Seek qualified assistance.

Engine oil pressure
If this warning symbol flashes, switch off the engine, check the oil level and top up if necessary.
If the symbol flashes and the oil level is normal, do not continue driving. Do not run the engine at idle. Seek qualified assistance.
CAUTION
The oil pressure warning symbol is not an indicator of the oil level in the lubrication system! Therefore, check the oil level regularly, preferably when refueling.
Fuel reserve
Refuel the vehicle without delay.

Front brake pad wear
Have the front brake pads and, additionally, the rear brake pads checked at an Audi service center.

Check engine oil level*
If this symbol appears, check the oil level as soon as possible and top up the oil.

Engine oil sensor malfunction*
Have the oil level sensor checked at an Audi service center.
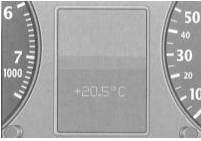
Outside temperature display (standard version)
The outside temperature display appears when the ignition is switched on.
At temperatures from +5°C to –5°C, a snowflake symbol appears to the left of the temperature display.
The snowflake symbol warns the driver to take special care due to the danger of black ice.
When the vehicle is stationary or moving at very low speed, the display may read slightly higher than the actual temperature due to heat radiated by the engine.
On vehicles with air conditioning, when the display is switched to Fahrenheit (°F), the outside temperature reading changes accordingly.
Driver information system (FIS)*
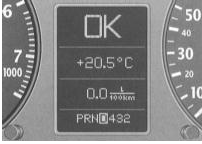
Display
The driver information system (FIS) display can show the following: · Door / trunk open warning · Radio frequency display · Outside temperature display · Malfunction information system · Speed warning · Trip computer · Selector lever position (automatic transmission)* · Navigation system data* (refer to the separate owner's manual for operation of the navigation system).
CAUTION
On vehicles with automatic transmission, the indication is shown on the display only after the driving mode is switched on.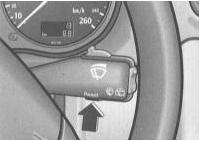
Pressing the "Reset" button in sequence activates the following modes:
– Outside temperature / trip computer / malfunction information system, or – Navigation system display* – Display off
Malfunction information system messages are also displayed when the display is switched off.
The Audi navigation system can only be used when the display is switched on.
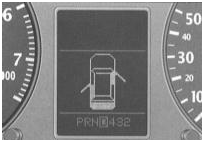
Door / trunk open warning 1)
When the ignition is on, the digital display symbol indicates open doors and trunk. The illustration shows, as an example, the front passenger door open, the rear left door and the trunk. The trunk symbol in the pictogram flashes when the trunk is open. 1) On vehicles with driver information system (FIS).
After all doors and the trunk are fully closed, this warning goes out and the driver information system functions are shown on the display again.
Radio display 1)
If there are no second-priority malfunction messages and the radio is on (depending on radio equipment), after the letters "OK" go out, the radio station name or radio frequency with additional information appears on the display.
This display is additional information from the radio display.
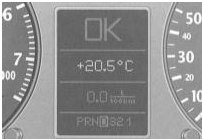
Outside temperature display 1)
The outside temperature display appears when the ignition is switched on. On vehicles with automatic transmission, the display appears only after a driving range is selected.
At temperatures from +5°C to –5°C, a snowflake symbol appears to the left of the temperature display. 1) On vehicles with driver information system (FIS).
The snowflake symbol warns the driver to take special care due to the danger of black ice.
When the vehicle is stationary or moving at very low speed, the display may read slightly higher than the actual temperature due to heat radiated by the engine.
On vehicles with air conditioning, when the display is switched to Fahrenheit (°F), the outside temperature reading changes accordingly.
Vehicle malfunction information system 1)
When the ignition is on and while driving, the automatic malfunction information system continuously monitors certain functions and the condition of vehicle systems.
The system alerts the driver to malfunctions or to the need for urgent maintenance with an audible signal, accompanied by red and yellow symbols on the instrument panel, depending on priority. In addition, to assist the driver, instructions may appear on the display together with some red symbols.
The following warnings and malfunction signals may be displayed:
1) On vehicles with driver information system (FIS).
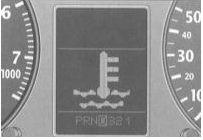
Red Symbols (Priority 1)

Brake System Fault

Coolant level below normal or coolant overheating

Oil pressure below normal
When a flashing red symbol appears, three warning tones sound in succession. The symbols indicate danger. Stop, switch off the engine, check the faulty system and correct the malfunction. Qualified assistance may be required.
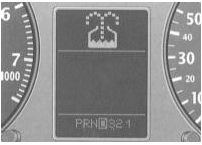
If several first-priority malfunctions occur at the same time, the symbols appear in sequence, each displayed for 2 seconds. The symbols continue to flash until the malfunction is corrected.
CAUTION
If a malfunction occurs while the navigation system* is switched on, the 1st-priority warning symbol appears in the navigation display area for a few seconds. It then moves up to the 2nd-priority display field, and the navigation indication reappears in its place. If a 1st-priority malfunction is present, the 2nd-priority indication is not shown.Yellow Symbols (Priority 2)

Brake light malfunction 2)
BREMSLICHT

Low beam or reverse light bulb failure

Washer fluid level below normal

Fuel reserve

Battery voltage outside normal range

Check engine oil level*

Engine oil level sensor malfunction*

Speed warning

Dynamic headlight range control malfunction*
2) Depending on country – symbol or text.
When a yellow symbol appears, one warning signal sounds. The display of symbols is a warning signal. Check the corresponding function display as soon as possible. If several warnings are displayed at the same time, the symbols appear one after another, each for approximately 2 seconds.
Check button
The control button has the following functions:
Symbol display check.
Briefly pressing the control button with the ignition on sequentially displays all symbols. The system check can be performed with the engine off or running, and at speeds not exceeding 5 km/h.
If a first-priority malfunction (red symbol) is present, the display check is not possible.
Display of driver instructions
When any priority level 1 symbol flashes, corresponding instructions may be shown on the display to assist the driver.
For example: "SWITCH OFF ENGINE, CHECK OIL LEVEL". To display, press the control button. The message goes off approximately 5 seconds after the button is released.
Odometer illumination
With the ignition off, press the control button. The odometer display lights up for approximately 15 seconds.
System check
After the ignition is switched on, the vehicle fault monitoring system performs an automatic function check.
Vehicles with manual transmission – MT
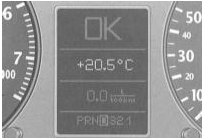
If the functions checked by the fault monitoring system are in order, the letters "OK" light up for several seconds.
If faults are present, their indication appears after the ignition is switched on (instead of "OK"). At the same time an audible warning signal sounds (if priority level 1 and 2 faults appear simultaneously, three warning signals sound).
If no fault indication and no "OK" are shown on the display, the system must be checked.
Vehicles with automatic transmission
After the ignition is switched on (selector lever in "P" or "N"), the following instruction appears on the display: "WHEN ENGAGING A DRIVE RANGE, DEPRESS BRAKE PEDAL" (to engage a drive position with the vehicle stationary, press the brake pedal).
When a drive position ("R", "D", etc.) is selected, the driver instruction goes out, and after the brake pedal is pressed the automatic function check is performed.
If the monitored functions are in order, the letters "OK" light up for several seconds. If one or more faults are present, approximately 15 seconds after the engine is started, the driver instruction is replaced by the corresponding fault symbols.
Malfunction indication
If the functions monitored by the fault monitoring system are violated, an audible warning signal sounds. At the same time the following symbols may appear:

Brake System
The warning lamp flashes when the brake fluid level falls below the normal level or when there is an ABS fault. Stop and check the brake fluid level. If the brake fluid level falls below the "Min" mark, you may carefully drive to the nearest Audi service station to top up the fluid and determine the cause of the leak. If ABS fails, brake force on the rear axle is not regulated, so the rear wheels are more prone to locking.
CAUTION
A drop in the fluid level in the reservoir below normal, accompanied by increased brake pedal free travel, may indicate a failure of one of the two circuits of the dual-circuit brake hydraulic system. In this case, you may carefully drive to the nearest Audi service station, but keep in mind that braking distance and pedal effort will increase. If the brake fluid level is normal, the cause may be a malfunction of the ABS. If the ABS control function fails, the rear wheels may lock relatively quickly during braking. Under certain circumstances, this may lead to the rear axle of the vehicle sliding.Carefully drive to the nearest Audi service station and rectify the fault.

Coolant temperature / level
Flashing of the lamp while driving may be caused by overheating or a low coolant level. Stop, switch off the engine, check the coolant level and top up if necessary.
CAUTION
Be careful when opening the coolant expansion tank cap! The cooling system of a warm engine is under pressure. Risk of scalding from ejected fluid! Therefore, before removing the cap, allow the engine to cool down.Do not place your hands near the fan!
If the coolant level is normal, overheating may be caused by a failure of the cooling fan.
If the warning lamp does not go out, do not continue driving. Seek qualified assistance.

Engine oil pressure
If this symbol flashes, stop, switch off the engine, check the oil level and top up if necessary.
Do not continue driving if the symbol flashes with the oil level normal. Do not let the engine run at idle – seek qualified assistance.
CAUTION
The oil pressure warning lamp is not an indicator of the oil level in the lubrication system! Therefore, check the oil level regularly, preferably at every refueling.
BRAKE LIGHT or
If the message or symbol lights up, the following must be checked and, if necessary, replaced or repaired at an Audi service station:
– brake lights, – fuses, – wiring connections, – brake light switch (only if complaints arise during the function check).

Low beam or reversing light bulb failure
The fault may be caused by the following:
– bulbs burnt out, – fuses, and – faulty wiring connections.
Replace faulty bulbs / fuses yourself or at an Audi service station.
The low beam or reversing light failure check is performed only with the lights switched on.

Washer fluid
Top up washer fluid in the windscreen and headlight washer reservoir*

Fuel reserve
Refuel the vehicle without delay.

Battery voltage outside normal range
Contact an Audi service station and check the V-belt tension and the regulator / battery condition.
Battery discharge warning lamp

Check engine oil level*
If this symbol appears, check the oil level as soon as possible and top up the oil.

Engine oil level sensor malfunction*
Have the oil level sensor checked at an Audi service center.

Dynamic headlight range control malfunction*
Contact an Audi service station for repair of the headlight levelling control.
Speed warning system 1)
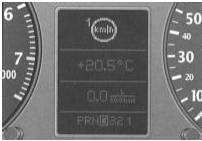
The speed warning system allows a speed limit to be set. When this limit is exceeded by approximately 10 km/h, a warning signal sounds. At the same time the warning symbol "km/h" appears on the display.
CAUTION
Regardless of whether a speed warning device is installed, monitor the maximum speed permitted by traffic regulations using the speedometer.1) On vehicles with driver information system (FIS).
The following describes how to program the speed for warning levels 1 and 2 and how to cancel them.

Warning level 1
The warning symbol goes out when speed drops below the programmed limit. The symbol also goes out when speed exceeds the programmed limit by approximately 40 km/h for at least 10 seconds. However, the stored speed limit is not erased.
Speed programming
When the required speed is shown on the speedometer, press and release the fault monitoring control button. Storage is confirmed by the speed limit warning symbol lighting up when the button is released.
The programmed speed value remains in memory until the button is pressed again at a different speed or the memory is reset.
Cancelling the speed limit
At speeds above 5 km/h, press and hold the control button for more than one second. Cancellation is confirmed by a crossed-out warning symbol.
When the ignition is switched off, the memory data is erased automatically.

Warning level 2
With the ignition switched off, the driver can program a continuous warning threshold.
The warning indicator is shown on the display. Unlike the warning level, the warning symbol goes out only when the speed drops below the programmed value.
Programming this warning is recommended when it is necessary to remind the driver to maintain a certain speed, as a supplement to the warning level.
1. (For example, when driving in a country with a speed limit, maximum speed when driving with winter tires, etc.).
Speed programming
With the ignition switched off, press and release the control button. The odometer display is shown.
Press and hold the control button again for at least 2 seconds. The current speed limit threshold value appears on the display.
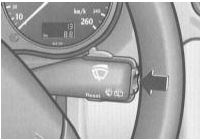
To change the speed, press the upper or lower side of the function switch (arrow) on the trip computer. The values increase or decrease in steps (one step 10 km/h).
A few seconds after programming is completed, the display lighting switches off again.
The programmed speed value is stored in memory until the button is pressed again at a different speed, or until the memory is reset.
Cancelling the speed limit
With the ignition switched off, press and release the control button. The display lighting comes on. Press and hold the control button again for approximately 2 seconds. The set speed is displayed. Finally, press and hold the "Reset" button on the trip computer until the crossed-out warning symbol appears.
Test yourself
A quick Audi A3 quiz: every answer comes with an explanation and a link to the manual page.