Service Technology, Tools and Workshop Equipment
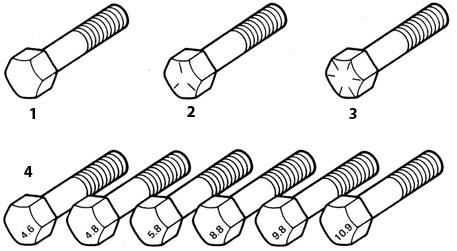 Bolt strength class markings (top - standard /SAE/USS, bottom - metric) 1 – Strength class 1 or 2 2 – Strength class 5 3 – Strength class 8 4 – Metric bolt strength class marking
Strength class markings for standard hexagon nuts
 Three marks – class 5
 Six marks – class 8
 Arabic 9 – Hexagon nut, strength class 9
 Arabic 10 – Hexagon nut, strength class 10
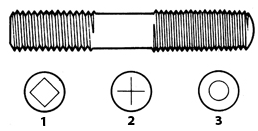 Metric Stud Strength Class Markings 1 – Strength Class 10.9 2 – Strength Class 9.8 3 – Strength Class 8.8
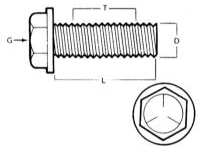 Standard (SAE and USS) Bolt Size/Strength Class Markings G – strength class marking L – length (in inches) T – thread pitch (number of threads per inch) D – nominal diameter (in inches)
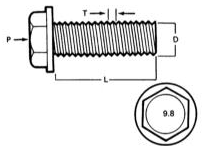 Metric Bolt Size/Strength Class Markings P – strength class L – length (in mm) T – thread pitch (distance between adjacent threads in mm) D – nominal diameter (in mm)
Maintenance Technique
There are several methods for performing vehicle maintenance and repair procedures, to which the reader will find references in the text of this manual. Following them will make the work of the home mechanic more efficient, allow various technical procedures to be organized and performed with quality, and ensure that all work is carried out thoroughly and completely.
Fasteners
Fasteners are nuts, bolts, studs and screws used to join two or more parts together. When working with fasteners, always keep certain things in mind. Virtually all fasteners use some type of locking or securing device. These may be lock washers, lock nuts, cotter pins or thread-locking compound. All threaded fasteners used must be perfectly clean and straight, with undamaged threads and undamaged hex head corners on which the wrench fits. Always replace damaged nuts and bolts with new ones. Special self-locking nuts with nylon or fiber inserts must not be reused, since after removal they lose their locking properties; they must always be replaced with new ones during installation.
Rusted bolts and nuts should be treated with a penetrating fluid before removal to make loosening easier and to prevent damage. Many mechanics prefer to use penetrating oil, which is conveniently applied from a small can with a long spout. After soaking the seized fastener with penetrating fluid, allow the fluid several minutes to thoroughly penetrate the corroded contact surface before attempting removal. Severely rusted fasteners may be cut off with a chisel, sawn off with a hacksaw, or removed with a special stud extractor.
If a bolt head is sheared off or a stud breaks during installation, the remaining threaded portion may be drilled out or removed using special tools. Most automotive repair shops can perform this, as well as other repair procedures (for example, repairing stripped threads in threaded holes).
Flat and lock washers must always be installed in the same order and in the same manner as before. Always replace damaged washers with new ones. Flat washers must always be installed between a lock washer and a soft metal surface (for example, aluminum), thin sheet metal, or plastic.
Fastener Sizes
For many reasons, vehicle manufacturers are increasingly using metric fasteners. However, it is important to know the difference between standard fasteners (also called US or SAE fasteners), which are still sometimes used, and metric fasteners, which are more common in the metric system, since despite their external similarity they are not interchangeable.
All bolts, both standard and metric, are classified by diameter, thread pitch and length. For example, a standard 1/2 – 13 x 1 bolt has a diameter of one-half inch, 13 threads per inch and a length of 1 inch. A metric M12 – 1.75 x 25 bolt has a diameter of 12 mm, a thread pitch of 1.75 mm (distance between adjacent threads) and a length of 25 mm. Both bolts look nearly identical, but they are not interchangeable.
In addition to the features listed above, both standard and metric bolts can be identified by inspecting the head. First, the distance across the flats of a metric bolt head is measured in mm, whereas for a standard bolt it is measured in inches (the same applies to nuts). As a result, a standard wrench is not suitable for use with metric fasteners, and vice versa. In addition, most standard bolt heads have radial marks indicating the maximum permissible tightening torque of the bolt (grade). The more marks there are, the higher the permissible torque (vehicles commonly use bolts with grades from 0 to 5). The strength class of metric bolts is indicated by a numeric code. The code digits are usually cast on the bolt head, as with standard bolts (vehicles commonly use bolts of strength classes 8.8, 9.8 and 10.9).
Standard nuts can also be distinguished from metric nuts by their strength markings. Standard nuts are identified by dot marks stamped on one of the end faces, while metric nuts are marked with numeric codes. The more dots there are, or the higher the numeric code value, the higher the permissible tightening torque of the nut.
The ends of metric studs are also marked according to their strength class. Large studs are marked with a numeric code, while smaller studs are marked with a geometric shape.
It should be noted that a significant portion of fasteners, especially those of strength grade 0 to 2, are not marked at all. In this case, the only way to distinguish a standard fastener from a metric one is to measure the thread pitch or compare the thread with a clearly identified one.
Standard fasteners are often also called, as opposed to metric, SAE fasteners; however, it should be remembered that only small fasteners fall under the SAE classification. Large fasteners with non-metric threads are US standard (USS) fasteners.
Since fasteners of the same nominal size (both standard and metric) may have different strength classes, when replacing bolts, nuts and studs on the vehicle, attention must be paid to the strength class and marking of the original fastener.
CAUTION
the strength class of the new fasteners being installed matches the strength class of the old ones.Procedure and Sequence for Tightening Threaded Connections
Most threaded fasteners must be tightened to the torque values specified in the Specifications at the beginning of each Chapter of this Manual. Tightening torque is the turning force applied to the fastener during tightening. Below, tightening torque is also referred to as fastener torque. Overtightening can damage the fastener, while undertightening results in an unreliable joint between the mating components. Bolts, screws, and studs usually have specific permissible torque values, depending on the material they are made from and the diameter of the threaded portion. Many of these values, as mentioned above, are given in the Specifications at the beginning of each Chapter. Strictly follow the torque recommendations for the fasteners used on the vehicle. For fasteners not listed in the Specifications, use the torque chart below. The values in the chart apply to fasteners of property class 2 and 3. Higher-class fasteners can be tightened to higher torques. The chart also assumes that dry (non-lubricated) fasteners are being tightened into a steel or cast iron (not aluminum) component.
Metric Thread Sizes
M–6 9 –12 N·m
M–8 19 – 28 N·m
M–10 38 – 54 N·m
M–12 68 – 96 N·m
M–14 109 – 154 N·m
Pipe Thread Sizes
1/8 7 –10 N·m
1/4 17 – 24 N·m
3/8 30 – 44 N·m
1/2 34 – 47 N·m
U.S. Standard Thread Sizes
1/4 – 20 9 – 12 N·m
5/16 – 18 17 – 24 N·m
5/16 – 24 19 – 27 N·m
3/8 – 16 30 – 43 N·m
3/8 – 24 37 – 51 N·m
7/16 – 24 55 – 74 N·m
7/16 – 20 55 – 81 N·m
1/2 – 13 75 – 108 N·m
Fasteners arranged around the perimeter of a component (such as cylinder head bolts, oil pan bolts, and various cover bolts) must be loosened and tightened in a specific sequence to prevent distortion of the component. The tightening and loosening sequence for these fasteners is given in the appropriate Chapters of this Manual. If no specific sequence is given, follow the procedure below to prevent the component from warping. In the first stage, hand-tighten all bolts or nuts. Next, tighten each one in turn by one full turn, moving from one bolt or nut to another in a diagonal (criss-cross) pattern. Then, return to the first bolt or nut and repeat the procedure in the same order, tightening each fastener by an additional half turn. Continue in the same manner, tightening each bolt or nut by a quarter turn per pass, until all of them are tightened to the specified torque. When loosening fasteners, follow the same procedure in reverse order.
Disassembly of Components
Disassemble all components so that each part can be reinstalled in its original position and in the correct orientation. Remember the characteristic features of each part's appearance. If necessary, mark the mating positions of parts that could be installed in more than one way (for example, a thrust washer with a groove on a shaft). It is a good idea to lay the removed parts out on a clean work surface in the order in which they were removed. Simple schematic sketches or step-by-step photographs of the component being removed are also useful.
When removing fasteners, mark their original positions on the assembly where possible. Often, reinstalling fasteners and washers in their original locations immediately after removing the component prevents confusion during assembly. If this is not possible, store all fasteners in a compartmented tray that is labeled for this purpose, or in individually labeled containers. This method is especially useful when working with components made up of many small parts, such as the carburetor, alternator, valve train, instrument panel, or interior trim.
When disconnecting electrical terminals and connectors, pay attention to
CAUTION
marking of wires or harnesses using insulating tape with a numeric or alphabetic code applied to it.Gasket Surfaces
On all vehicles, gaskets are used to seal the joint between the mating surfaces of two or more components. They prevent leaks of oil and fluids and maintain pressure or vacuum within the assembly. Gasket sealant in liquid or paste form is often applied to gaskets before installation. Over time, due to temperature or pressure, mating surfaces can stick together so firmly that separating the components becomes difficult. In many cases, tapping around the outside perimeter of the joint with a soft-faced hammer will help separate the assembly. A regular hammer may also be used, striking through a wooden or plastic block. Do not tap on cast housings or fragile components. If you encounter this kind of difficulty, always first check that all fasteners have been removed.
Do not use a screwdriver or pry bar inserted between the mating surfaces to separate components, as the sealing surfaces can easily be damaged, which may later cause leaks. If prying of stuck components cannot be avoided, use the handle of an old broom for this purpose. Remember that afterward, all resulting wood chips must be carefully removed from the mating surfaces and from inside the assembly.
After the parts are separated, their mating surfaces must be carefully cleaned, scraping off all traces of the old gasket material. Hardened fragments of the old gasket may be softened beforehand with a rust converter or a special chemical compound, after which they are removed from the mating surface with a scraper. A piece of copper tubing with a flattened and sharpened end can be used as a scraper in this case. Copper tubing is recommended for this purpose, since copper is usually softer than the materials used in the vehicle, which reduces the risk of damaging the mating surface. Some gaskets can be removed easily with a copper wire brush; however, regardless of the method used, the mating surfaces must be absolutely clean and smooth. If for any reason the mating surface has become scratched, fill the scratch with gasket sealant before assembling the components. In most cases, a non-hardening (or semi-hardening) sealant should be used.
Hose Removal Tips
CAUTION
If your vehicle is equipped with an air conditioning system, do not under any circumstances disconnect any hoses from air conditioning components until the system has been discharged at an AUDI dealership or by an air conditioning specialist at a service workshop.The precautions to observe when removing hoses are very similar to those for removing gaskets. Avoid damaging the surfaces of the connections and fittings onto which the hoses are fitted, as this may cause leaks. This applies especially to the removal of radiator hoses. Due to various chemical reactions, the rubber of the hoses may "stick" to the mating surfaces of the connections and fittings. To remove a hose, first loosen the clamp securing it to the fitting. Then, using slip-joint pliers, grip the hose near the clamp and begin twisting it left and right on the fitting/connecting pipe. Continue this procedure until the hose is fully freed, then remove the hose from the fitting. A small amount of silicone or other lubricant will make the procedure easier, if it can be introduced into the gap between the fitting and the hose. To make hose installation easier, lubricate the inner surface of the hose and the outer surface of the fitting.
As a last resort, or when replacing the hose with a new one is absolutely necessary, the end of the hose fitted onto the fitting may be cut with a knife and then separated from the fitting surface. When doing so, take care not to damage the metal of the fitting/connecting pipe with the knife.
If the hose clamp is damaged, replace it with a new one. Wrap-around (crimp-type) clamps tend to loosen over time, so regardless of their condition, it is better to replace them with screw-type clamps whenever possible.
Tools
Selecting good tools is one of the basic requirements for anyone planning to carry out vehicle maintenance or repair procedures themselves. At first glance, the cost of acquiring the required set of tools may seem too high; however, when compared with the expense of routine maintenance and simple repairs performed at a service station, it will prove quite reasonable.
To help the average vehicle owner select the tools needed for the various service procedures described in this Manual, lists of three tool sets are provided below, conditionally titled: Maintenance and Minor Repair Tool Set; General Repair and Major Repair Tool Set; and Special Tools. Vehicle owners without practical mechanical experience should begin by performing procedures limited to the use of tools from the first list, while improving their skills and gradually expanding the range of tools used. As experience is gained, more complex tasks can be undertaken, adding to the tools on hand. After some time, the skills acquired will allow you to perform more complex work requiring tools from the second list (General and Major Repair). When your skill level allows you to save considerable money by performing complex repair procedures yourself, you may consider acquiring special tools.
Maintenance and Minor Repair Tool Set
The list below includes the minimum tools required to perform routine maintenance and minor vehicle repair procedures. A set of combination wrenches (with an open-end head on one end and a box-end head on the other) is recommended. Despite the higher cost of such a set compared with a set of open-end wrenches, the expense is justified, since these wrenches combine the advantages of both types.
Combination wrench set (1/4 – 1 in.; 6 – 19 mm); Adjustable wrench; Spark plug wrench (with rubber insert); Spark plug gap adjusting tool; Feeler gauge set; Brake bleeder wrench; Screwdrivers: flat-blade (150 mm long and 8 mm in diameter), Phillips-head No. 2 x 6 in. (150 mm long); Combination pliers; Hacksaw with blade set; Tire pressure gauge; Grease gun (syringe); Oil drain pan; Fine sandpaper; Wire brush; Battery terminal and connector cleaning tool; Oil filter wrench; Funnel (medium size); Vehicle support stands, 2 pcs; Drain container
CAUTION
If routine maintenance procedures include basic adjustments, a good-quality stroboscope and a combined tachometer/dwell meter will also be required. Although these tools are included in the list of special tools, they are mentioned here because they are absolutely necessary for proper adjustment of engine ignition, which is part of the routine maintenance procedures of the vehicle.General and Major Repair Tool Set
This tool is required for any engine repair operation and is offered as a supplement to the first list. This list includes a complete set of interchangeable socket heads. Although expensive, a set of interchangeable sockets is extremely useful due to its versatility and ease of use, especially in combination with the various drives included in the set. It is recommended to use 1/2-inch drives (rather than 3/8-inch drives) because, although more expensive, they can be used with almost any type of torque wrench (ideally, a good mechanic should have both types of drives available). A less expensive alternative to a set of interchangeable socket heads is a set of box wrenches.
Set of interchangeable socket heads (including Torx® heads) (or box wrenches), sizes corresponding to the open-end wrenches in the previous list.
Ratchet reversible drive (for use with interchangeable socket heads) 250 mm breaker bar Universal joint (cardan type) (for use with socket heads) Torque wrench (with drive of the same size as for interchangeable socket heads) Ball-peen hammer – 8 oz (approx. 230 g) Soft-face hammer (plastic or rubber) Screwdrivers: Flat-blade (150 mm long and approx. 6.5 mm in diameter) Flat-blade (heavy duty No. 2, 8 mm) Phillips (No. 3 x 8 in. (203 mm)) Phillips (heavy duty No. 2) Locking pliers Pliers: Electrician's (with insulated handles) Needle-nose Snap ring (internal and external) Cold chisel – 1/2 in. (13 mm) Scraper (made from flattened and pointed copper tubing) Scriber Center punch Pin punches (1.6, 3.2, 4.8 mm) Steel rule/straightedge Allen key set (for socket head cap screws) File set Wire brush (large) Second set of stands Jack (hydraulic or scissor type)
CAUTION
Another tool that is constantly required is an electric drill with a 3/8 inch (up to 9.5 mm) chuck and a set of good-quality drill bits.Special Service Tools
This list includes tools that are relatively expensive, not required regularly, or that require following the manufacturer's instructions when used. If your work does not involve frequent performance of complex mechanical operations, purchasing such tools is a poor use of funds. It is reasonable to buy them jointly with friends or rent them from automotive repair shops.
This list includes only those tools that are available from retail suppliers or that are produced for distribution to the company's dealerships. Occasionally, you will find references to such special tools in the text of this manual. Usually, the authors try to also suggest an alternative method that avoids the mandatory use of a hard-to-obtain tool. If it is impossible to avoid using a special tool and obtaining it for use is problematic, it is better to entrust the corresponding work to automotive service specialists.
Valve spring compressor Piston ring groove cleaning tool Piston ring compressor Piston ring installer Compression tester (compression gauge) Cylinder bore chamfering tool (ridge reamer) Cylinder bore hone Cylinder bore gauge Micrometer(s) and/or dial caliper Hydraulic tappet removal tool Ball joint separator Universal puller Slide hammer Dial indicator set Strobe light (with inductive pickup) Hand vacuum/pressure pump Tachometer/dwell meter Universal electrical tester Lifting tackle Brake spring removal/installation tool Floor jack
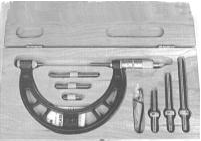 Micrometer with attachment set
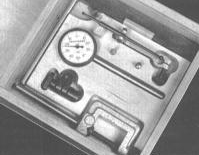 Dial indicator with holding fixtures and attachments
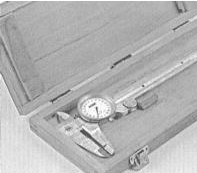 Dial/vernier caliper
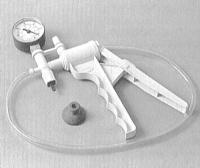 Hand-operated vacuum pump
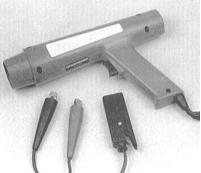 Strobe light
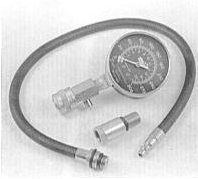 Compression gauge with adapter for installation in spark plug holes
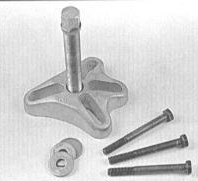 Damper/steering wheel puller
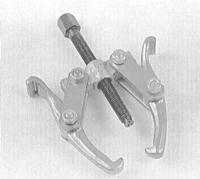 General-purpose puller
 Hydraulic tappet removal tool
 Valve spring compressor
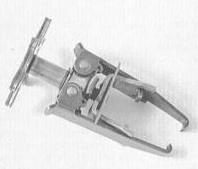 Valve spring compressor
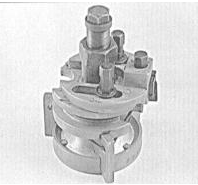 Cylinder ridge reamer
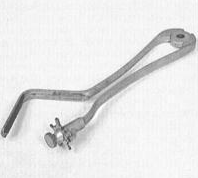 Piston ring groove cleaning tool
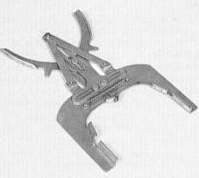 Piston ring removal/installation tool
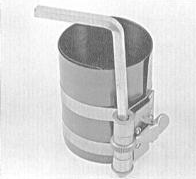 Piston ring compressor
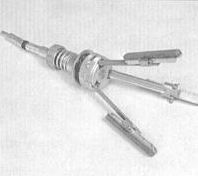 Cylinder bore hone
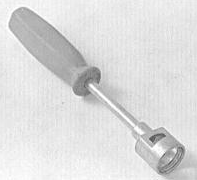 Brake shoe return spring cup removal tool
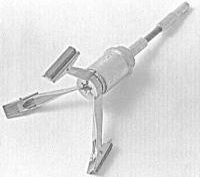 Brake cylinder hone
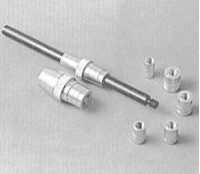 Clutch disc alignment tool
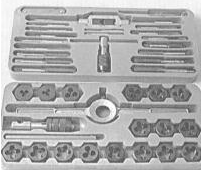 Tap and die set
Purchasing Tools
Several practical tips can be offered to novice mechanics on acquiring the tools necessary for routine maintenance and repair of the vehicle. When preparing to perform routine maintenance or minor repairs, it is reasonable to buy tools individually. On the other hand, if extensive work is planned, it is simpler and more reliable to buy a modern tool kit from a retail store. A kit usually costs somewhat less than buying individual tools and is often supplied with a tool box. Later, to expand your options, individual tools, additional sets, and a larger tool box can be purchased. Gradually expanding the tool set will spread out the costs and help you determine which tools are truly necessary.
Specialty tool stores are the only source for some special tools. However, regardless of the source, avoid cheap purchases, especially when selecting screwdrivers and socket bits, as their service life will certainly be short. The costs of replacing and repairing cheap tools will ultimately be far greater than the cost of buying quality goods once.
Tool Care and Storage
Good tools are a valuable investment, so it is wise to keep them clean and always ready for use. After using a tool, and before putting it away, always wipe its surface thoroughly with a clean, dry rag, removing any dirt, grease and metal particles. Never leave tools scattered around the work area. After completing work, carefully check the area under the hood and under the vehicle for forgotten tools.
A tool rack mounted on the garage wall in a convenient location is ideal for storing tools such as screwdrivers, pliers, and hammers. Sets of wrenches and socket sets should be stored in metal boxes. Measuring tools should be stored in dry, clean places, protected from corrosion.
Always pay attention to
CAUTION
the condition of the tool's working surfaces. The striking face of a hammer peen becomes mushroomed during use, and screwdrivers lose the sharpness of their tips over time. Do not hesitate to take a little time and care to remove burrs and restore the cutting edges with sandpaper or a file. Replace tools that are irreversibly worn or damaged.With proper care, your tools will serve you faithfully for a very long time.
Workshop Equipment
When discussing tools, one cannot overlook workshop equipment. If you are going to perform work more serious than routine maintenance, prepare a suitable work area.
It must be acknowledged that many vehicle owners are forced to perform engine removal and similar jobs far from a garage or workshop. In any case, however, a roof or canopy is an essential requirement.
Whenever possible, any disassembly of vehicle system components should be carried out on a clean, flat workbench or a sturdy table of convenient height. The workbench must be equipped with a vise. A vise with jaw opening up to 100 mm and soft jaw covers is sufficient.
As mentioned above, the work area must include a clean, dry place for storing tools, lubricants and cleaning fluids, fillers, paints and similar materials.
It should be noted that an electric drill is an absolutely essential tool, so the work area must be equipped with a power source for connecting it. A drill with a chuck up to 9.5 mm and a set of quality drill bits will greatly facilitate many procedures.
Finally, the work area should always have a sufficient supply of old newspapers and clean, lint-free rags for cleaning the work area, tools and vehicle parts.
Used oil must be taken to recycling centers in sealed containers.
Never perform any work on exposed painted vehicle surfaces. Use fender covers or, at the very least, cover polished surfaces with old blankets.
Test yourself
A quick Audi A3 quiz: every answer comes with an explanation and a link to the manual page.