Combination Switch Operational Check and Replacement
The vehicles covered by this Manual are equipped with a Supplemental Restraint System (SRS). Before performing any work near the airbag module, steering column or instrument panel, disconnect the SRS to avoid injury from accidental deployment (refer to Section Airbags - General Information). SRS circuit wiring is easily identified by its yellow insulation.
Combination Turn Signal/Headlamp Dimmer Switch
INSPECTION
PROCEDURE
1. The combination switch is located on the left side of the steering column and controls the turn signals/hazard warning lights, headlamps, dimmer and parking lamps.
2. Remove the switch.
3. Using an ohmmeter or a test lamp with its own power source, check the continuity between the switch terminals in each switch position. If any malfunction is found, replace the switch.
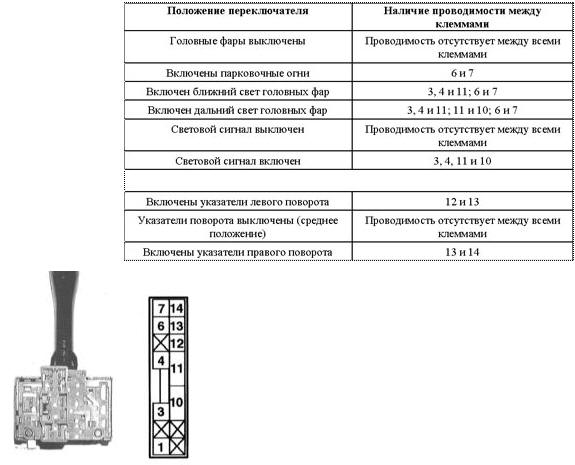
REPLACEMENT
PROCEDURE
1. Disconnect the negative battery cable and wait at least three minutes before starting removal of the trim.
If the vehicle's audio system is equipped with an anti-theft code, make sure you have the correct code to activate the audio system before disconnecting the battery!
2. Remove the knee bolster and steering column covers (refer to Body Section).
3. Remove the mounting screws, disconnect the electrical connectors and remove the switch assembly from the steering column.
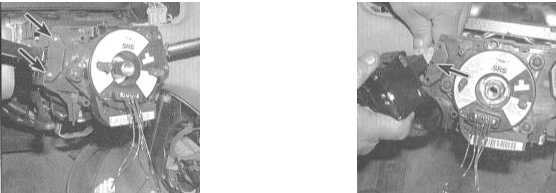
4. Installation is the reverse of removal.
Windshield Wiper/Washer Switch
INSPECTION
PROCEDURE
1. The switch is located under the steering wheel on the right side of the steering column.
2. Remove the switch.
3. Using an ohmmeter or a test lamp with its own power source, check the continuity between the switch terminals in each switch position. If any malfunction is found, replace the switch.
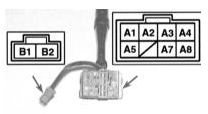
REPLACEMENT
PROCEDURE
1. Disconnect the negative battery cable and wait at least three minutes before starting removal of the trim.
If the vehicle's audio system is equipped with an anti-theft code, make sure you have the correct code to activate the audio system before disconnecting the battery!
2. Remove the knee bolster and steering column covers (refer to Body Section).
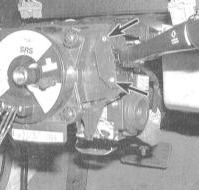
3. Remove the mounting screws, disconnect the electrical connectors and remove the switch assembly from the steering column.
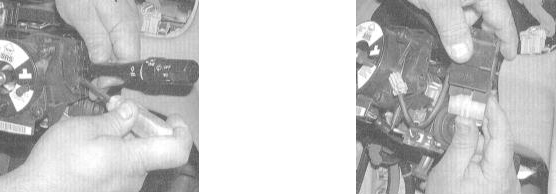
4. Installation is the reverse of removal.
Cruise Control Switch
INSPECTION
PROCEDURE
1. On the vehicles covered, the SET/RESUME cruise control switch is mounted in the steering column, while the main cruise control switch (ON/OFF) is located on the instrument panel, to the left of the steering wheel. For the procedures to check and replace the main switch, refer to the Section Instrument Panel Switch Inspection and Replacement.
2. Remove the SET/RESUME switch from the steering column.
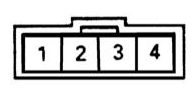
3. Using an ohmmeter or a test lamp with its own power source, check the continuity between the switch terminals in each switch position (refer to the accompanying illustration). Replace the assembly if necessary. If the switch checks good but does not function properly, check the condition of the wiring between the assembly and the control module located under the instrument panel.
REPLACEMENT
PROCEDURE
1. Disconnect the negative battery cable and wait at least three minutes before starting the procedure.
If the vehicle's audio system is equipped with an anti-theft code, make sure you have the correct code to activate the audio system before disconnecting the battery!
2. Remove the airbag module from the steering wheel (refer to Suspension and Steering Section).
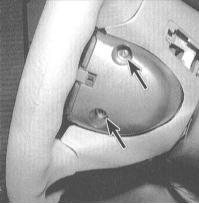
3. Remove the mounting screws, disconnect the electrical connectors and remove the switch from the steering wheel.
4. Installation is the reverse of removal.
Test yourself
A quick Honda Accord quiz: every answer comes with an explanation and a link to the manual page.