Headlamp Aim Adjustment
Incorrect headlamp aim may dazzle drivers of vehicles travelling in the opposite or same direction and cause an accident. Headlamp aim should be checked regularly every 12 months, and each time a headlamp assembly is replaced or front-end structural repairs are performed. Please note that the procedure described below should be considered only a preliminary adjustment. Final headlamp aiming must be performed at a qualified repair facility!
PROCEDURE
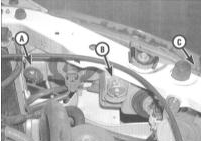
1. Each headlamp is equipped with two spring-loaded adjusting screws: inner and outer. Access to both screws is from the rear of the headlamp. The screws have Phillips heads; a Phillips screwdriver is required to turn them.
2. In addition to the adjusting screws, these models are equipped with headlamp level indicators, which greatly simplify aiming. If satisfactory results cannot be achieved by turning the adjusting screws (see below), mechanical deformation of the front body panels is present.
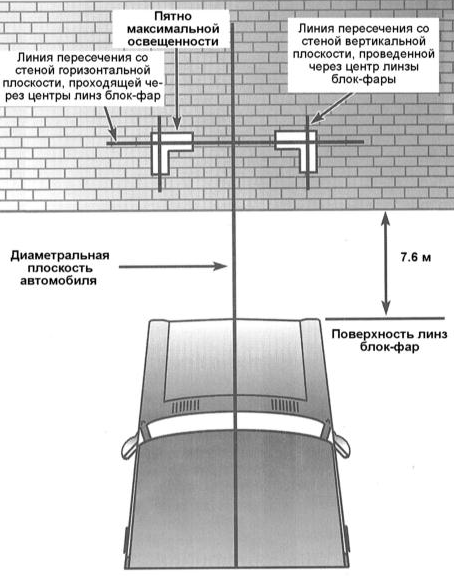
3. Position the vehicle front-first against a wall. Apply a strip of masking tape to the wall along a vertical line passing through the vehicle's centerline. Also apply vertical strips of tape along lines passing through the centers of the headlamp lens projections on the wall.
4. Apply a horizontal strip of tape to the wall along the line drawn through the centers of the headlamp lens projections on the wall surface.
This procedure is easier to perform by positioning the vehicle close to the wall.
5. To adjust headlamp aim, move the vehicle away from the wall to a distance of approximately 7.6 m (25 ft).
The vehicle must be on a level, horizontal surface, preferably paved. The fuel tank should be half full, and all heavy items that affect vehicle balance must be removed from the passenger compartment and luggage compartment.
6. Begin with the low beam aim adjustment. Turn the headlamp adjusting screws until the zone of maximum light intensity is approximately 50 mm below the horizontal line and the same distance to the right of the vertical line.
7. After completing the first adjustment, turn on the high beam: the zones of maximum intensity should move toward the intersection of the vertical and horizontal lines, ending slightly below the horizontal line.
In practice, it is not possible to obtain identical centering of both low and high beams. Seek a compromise that takes vehicle use into account, with maximum driving safety as the priority.
8. At the first opportunity, take the vehicle to a service station to adjust headlamp aim using specialized equipment.
Test yourself
A quick Honda Accord quiz: every answer comes with an explanation and a link to the manual page.