Windshield Wiper Motor Circuit Inspection
Before starting the inspection, study the relevant wiring diagrams. Check for voltage at the connector terminals by probing them with a grounded 12 V test lamp. Illumination of the lamp confirms voltage at the terminal. If the cause of the malfunction cannot be identified by performing the checks described below, take the vehicle to a service station for more complete system diagnosis.
PROCEDURE
1. If the wipers operate too slowly, first check the battery state of charge (refer to Maintenance and Adjustments). If the battery is good, remove the wiper motor (see below) and move the wiper arms by hand, checking that they move freely. If necessary, repair the linkage and lubricate the pivot joints. Install the wiper motor, turn the ignition on and operate the wipers again. If wiper speed is still not normal after the repairs, check the condition of the circuit contacts and connector engagement, paying particular attention to the ground connections. If the circuit is good, replace the wiper motor.
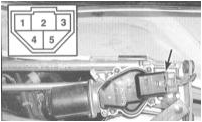
2. If the wipers do not activate, check the condition of the corresponding fuse. If the fuse is good, install a jumper wire between the ground terminal of the wiper motor and chassis ground. Repeat the check. If the wipers now operate normally, restore the integrity of the ground connections. If the motor still does not operate, set the wiper control switch to high speed (HI) and check for voltage at the connector of the wiring connected to the motor.
To access the connector, the front cowl panel (refer to Body) and the motor assembly must be removed.
If voltage is present, test the motor by connecting it directly to the battery using a jumper wire with a fuse. If the motor now operates, check the condition of the wiper linkage. If the motor does not run, replace it. If there is no voltage, check the power supply to the wiper relay. If voltage is present at the relay but not at the motor, check the switch operation (see Checking and Replacing Column Switches). If the switch is good, the built-in control unit has most likely failed; it must be diagnosed at a service station using special equipment.
3. If the wipers malfunction in intermittent mode, check the circuit between the switch and the built-in control unit. If the wiring is good, check the resistance of the intermittent delay control on the combination switch (see Checking and Replacing Column Switches). If the control is good, the built-in control unit must be diagnosed at a service station.
4. If the wipers stop in the position they occupy when the switch is set to OFF, check the power supply to the wiper motor limit switch. Voltage must be present on the corresponding motor connector wire with the switch in OFF and the ignition ON. If not, check the wiring between the motor and the fuse for an open circuit.
5. If the wipers stop only after the ignition is switched off, disconnect the wiring from the wiper control switch. If the wipers now stop, replace the switch. If the wipers continue to operate, the motor limit switch is faulty; replace the motor.
6. If the wiper arms do not return under the hood line when parked, check the drive linkage for foreign objects. If nothing prevents the wipers from returning to the park position, check the wiring between the switch and the motor for an open circuit. If there are no open circuits, replace the motor.
Test yourself
A quick Honda Accord quiz: every answer comes with an explanation and a link to the manual page.