Instrument Panel Switch Functional Check and Replacement
This vehicle is equipped with a Supplemental Restraint System (SRS). Before performing any work near the airbag module, steering column or instrument panel, disable the SRS to prevent injury from accidental deployment (refer to Airbags - General Information section). SRS wiring can be easily identified by its yellow insulation.
Main Cruise Control Switch
INSPECTION
PROCEDURE
1. Remove the switch from the vehicle for inspection.
2. Using an ohmmeter or a test lamp with its own power source, check for continuity between the switch terminals in both switch positions. Replace the assembly if necessary.
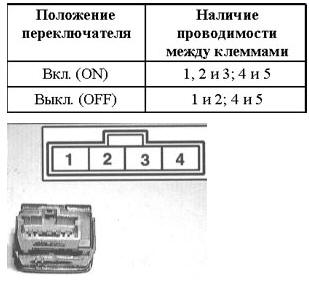
REPLACEMENT
PROCEDURE
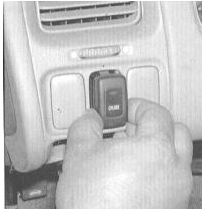
1. Pry the switch out of the instrument panel with a small screwdriver. Disconnect the electrical connector.
To prevent damage to the plastic, wrap the tip of the screwdriver with tape.
2. Disconnect the wiring and remove the switch assembly.
3. Install in the reverse order of removal.
Hazard Warning Switch
INSPECTION
PROCEDURE
1. To inspect, release the switch from the clock assembly trim.
2. Make sure there is correct continuity between the switch terminals in both switch positions. Replace the assembly if necessary.

REPLACEMENT
PROCEDURE
1. Carefully pry out the clock assembly with its housing from the center section of the instrument panel.
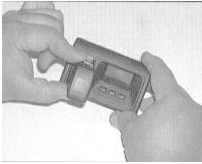
2. Disconnect the 10-pin connector from the rear of the switch. Depress the locking tab and release the switch assembly from the clock trim panel.
Rear Window Defogger Switch
INSPECTION
PROCEDURE
1. The switch is part of the heater/air conditioning control assembly. For removal and installation procedures, refer to the Heating and Cooling section.
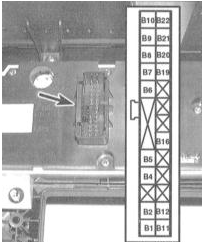
2. Using an ohmmeter or a test lamp with its own power source, check for continuity between terminals B4 and B9 of the 22-pin control panel connector. Continuity should exist only when the defogger is switched on (switch button depressed). Replace the switch if necessary.
REPLACEMENT
PROCEDURE
1. Remove the screws securing the front and rear sections of the control panel together. When removing the front panel, hold it face up.
Before disassembling the control panel, obtain a replacement switch, which may need to be ordered from a dealership service facility.
2. Remove the old switch and install the new one in its place. Then join the front and rear control panel sections and press them together by hand. Install and tighten the mounting screws.
3. Install the control panel assembly in its original location (refer to the Heating and Cooling section).
Test yourself
A quick Honda Accord quiz: every answer comes with an explanation and a link to the manual page.