Diagnostic Trouble Code Chart. Display does not Dim when Light Control Switch is Turned ON. Does not Play even after Bluetooth Audio Mode is Selected
Diagnostic Trouble Code Chart
DIAGNOSTIC TROUBLE CODE CHART
Navigation SystemDTC No. | Detection Item | Link |
|---|---|---|
B1324 |
Lost Communication with Meter |
 |
B1325 |
Lost Communication with HUD |
|
B153A |
GVIF Disconnected (from Extension Module to H/U) |
|
B1543 |
Extension Module Disconnected 2 |
|
B1551 |
HD Radio Tuner Malfunction |
|
B1556 |
Extension Module Malfunction 2 |
|
B1579 |
Voice Recognition Microphone Disconnected |
|
B1585 |
USB Device Malfunction |
|
B158D |
Video Signal Stoppage |
|
B158F |
AV Signal Stoppage (Low Battery Voltage) |
|
B15A0 |
LAN Master Malfunction |
|
B15A3 |
Stereo Component Amplifier Malfunction |
|
B15AD |
Navigation Processor Malfunction |
|
B15B0 |
Display Screen Malfunction |
|
B15B3 |
Radio Tuner Malfunction |
|
B15B7 |
Bluetooth Module Malfunction |
|
B15BA |
XM Tuner Malfunction |
|
B15C0 |
GPS Antenna Connection Malfunction(short) |
|
B15C1 |
GPS Antenna Connection Malfunction(break) |
|
B15C2 |
Speed Signal Malfunction |
|
B15C3 |
Speaker Output Short |
|
B15D3 |
Stereo Component Amplifier Disconnected |
|
B15DB |
Telematics Transceiver Disconnected |
|
B15F5 |
Air Conditioner ECU Vehicle Information Reading/Writing Processor Malfunction |
|
B15F6 |
Main Body ECU Vehicle Information Reading/Writing Process Malfunction |
|
B15F7 |
Certification ECU Vehicle Information Reading/Writing Process Malfunction |
|
B15F8 |
D-Seat ECU Vehicle Information Reading/Writing Process Malfunction |
|
B15F9 |
UART Communication Malfunction(for A/C) |
|
B15FE |
XM Tuner Antenna Disconnected |
|
B15FF |
XM Tuner Antenna Short |
|
C1610 |
Camera ECU Malfunction |
|
U0073 |
Sending Malfunction (Navigation to APGS) |
|
U0100 |
Engine ECU Communication |
|
U0129 |
VSC(ECB)ECU Communication |
|
U0140 |
Lost Communication with Body Control Module |
|
U0155 |
Meter ECU Communication |
|
U0164 |
Air Conditioner ECU Communication |
|
U0198 |
Lost Communication with Telematic Control Module |
|
U023B |
Lost Communication with Image Processing Module "B" |
|
U0265 |
Lost Communication with Image Processing Sensor A |
|
U1110 |
Clearance Sonar ECU Communication |
|
Display does not Dim when Light Control Switch is Turned ON
NOTICE:
- Depending on the parts that are replaced during vehicle inspection or maintenance, performing initialization, registration or calibration may be needed. Refer to Precaution for Navigation System.
Click here

- When replacing the radio and display receiver assembly, always replace it with a new one. If a radio and display receiver assembly which was installed to another vehicle is used, the following may occur:
- A communication malfunction DTC may be stored.
- The radio and display receiver assembly may not operate normally.
PROCEDURE
CHECK IMAGE QUALITY SETTING
(a) Turn the light control switch to the tail or head position.
(b) Check that the daytime screen setting on the display adjustment screen is set to on.
Result | Proceed to |
|---|---|
Daytime screen setting is set to on. |
A |
Daytime screen setting is set to off. |
B |
| A |  |
CHANGE DAYTIME SCREEN SETTING TO OFF |
|

CHECK VEHICLE SIGNAL (OPERATION CHECK)
(a) Enter the "Vehicle Signal Check Mode" screen. Refer to Check Vehicle Signal in Operation Check. Click here |
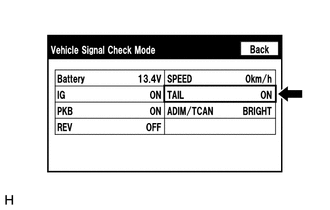 |
(b) Check that the display changes between ON and OFF according to the light control switch operation.
OK:
Light Control Switch | Display |
|---|---|
Tail or head |
ON |
Off or AUTO |
OFF |
HINT:
- The display is updated once per second. It is normal for the display to lag behind the actual switch operation.
- Make sure to move the vehicle to a bright area before performing an operation check with the light control switch in the AUTO position.
| OK | |
REPLACE RADIO AND DISPLAY RECEIVER ASSEMBLY |
| NG | |
PROCEED TO NEXT SUSPECTED AREA SHOWN IN PROBLEM SYMPTOMS TABLE |
Does not Play even after Bluetooth Audio Mode is Selected
NOTICE:
- Depending on the parts that are replaced during vehicle inspection or maintenance, performing initialization, registration or calibration may be needed. Refer to Precaution for Navigation System.
Click here

- When replacing the radio and display receiver assembly, always replace it with a new one. If a radio and display receiver assembly which was installed to another vehicle is used, the following may occur:
- A communication malfunction DTC may be stored.
- The radio and display receiver assembly may not operate normally.
HINT:
Even if the portable player can play audio content, it may not be able to play via the in-vehicle device. This does not necessarily indicate a malfunction of the in-vehicle device.
PROCEDURE
CHECK OPERATION
(a) Check if the portable player operates normally.
OK:
The portable player operates normally.
| NG |  |
MALFUNCTION IN PORTABLE PLAYER |
|

CHECK AUDIO SETTINGS
(a) Set volume, fader and balance to the initial values and check that the sound is normal.
OK:
Audio system returns to normal.
HINT:
Sound quality adjustment measures vary according to the type of amplifier.
| NG | |
REPLACE RADIO AND DISPLAY RECEIVER ASSEMBLY |
|
CHECK USING ANOTHER "Bluetooth" AUDIO COMPATIBLE VEHICLE OF SAME MODEL
(a) Check if the "Bluetooth" audio player plays normally on another "Bluetooth" audio compatible vehicle of the same model.
OK:
"Bluetooth" audio player plays normally.
| OK | |
PROCEED TO NEXT SUSPECTED AREA SHOWN IN PROBLEM SYMPTOMS TABLE |
| NG | |
MALFUNCTION IN PORTABLE PLAYER |