Telephone And Gps Antenna Cords
Components
COMPONENTS
ILLUSTRATION
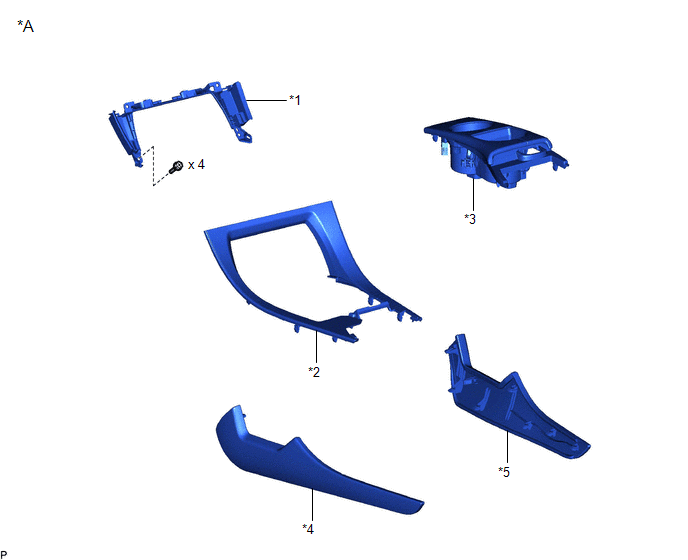
*A |
for Front Side |
- |
- |
*1 |
CENTER INSTRUMENT CLUSTER FINISH PANEL SUB-ASSEMBLY |
*2 |
CONSOLE BOX POCKET SUB-ASSEMBLY |
*3 |
FRONT CONSOLE UPPER PANEL GARNISH |
*4 |
LOWER INSTRUMENT PANEL FINISH PANEL LH |
*5 |
LOWER INSTRUMENT PANEL FINISH PANEL RH |
- |
- |
ILLUSTRATION
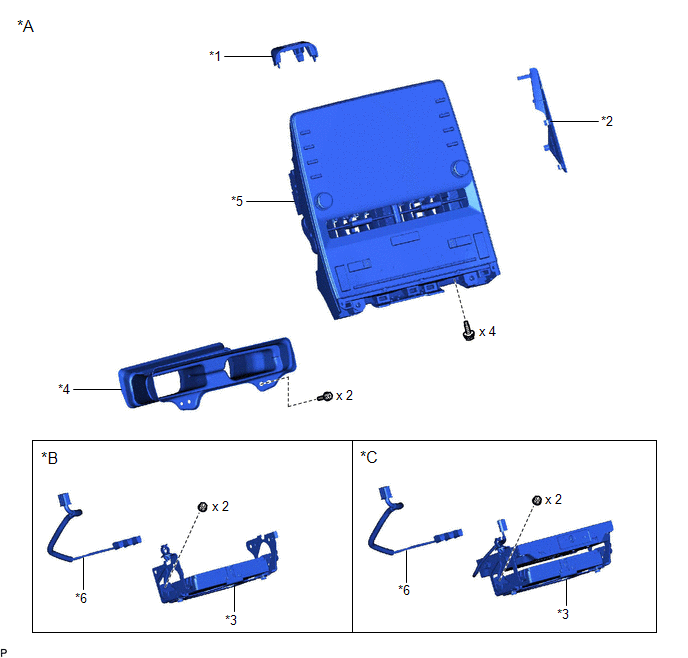
*A |
for Front Side |
*B |
w/o Navigation System |
*C |
w/ Navigation System |
- |
- |
*1 |
CENTER NO. 1 INSTRUMENT CLUSTER FINISH PANEL |
*2 |
CENTER NO. 2 INSTRUMENT CLUSTER FINISH PANEL |
*3 |
DCM (TELEMATICS TRANSCEIVER) WITH BRACKET |
*4 |
NO. 2 HEATER TO REGISTER DUCT SUB-ASSEMBLY |
*5 |
RADIO AND DISPLAY RECEIVER ASSEMBLY WITH BRACKET |
*6 |
TELEPHONE AND GPS ANTENNA CORD |
ILLUSTRATION
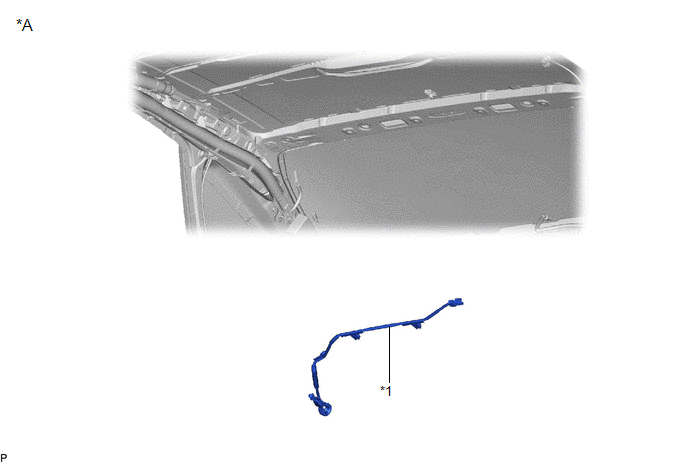
*A |
for Roof Side |
- |
- |
*1 |
TELEPHONE AND GPS ANTENNA CORD |
- |
- |
Installation
INSTALLATION
PROCEDURE
1. INSTALL TELEPHONE AND GPS ANTENNA CORD (for Front Side)
(a) Connect the 3 connectors to install the telephone and GPS antenna cord.
(b) Engage the clamp.
2. INSTALL DCM (TELEMATICS TRANSCEIVER) WITH BRACKET (for Front Side)
Click here 
3. INSTALL NO. 2 HEATER TO REGISTER DUCT SUB-ASSEMBLY (for Front Side)
Click here
4. INSTALL RADIO AND DISPLAY RECEIVER ASSEMBLY WITH BRACKET (for Front Side)
Click here
5. INSTALL CENTER NO. 2 INSTRUMENT CLUSTER FINISH PANEL (for Front Side)
Click here
6. INSTALL CENTER NO. 1 INSTRUMENT CLUSTER FINISH PANEL (for Front Side)
Click here
7. INSTALL CENTER INSTRUMENT CLUSTER FINISH PANEL SUB-ASSEMBLY (for Front Side)
Click here
8. INSTALL CONSOLE BOX POCKET SUB-ASSEMBLY (for Front Side)
Click here
9. INSTALL FRONT CONSOLE UPPER PANEL GARNISH (for Front Side)
Click here
10. INSTALL LOWER INSTRUMENT PANEL FINISH PANEL RH (for Front Side)
Click here
11. INSTALL LOWER INSTRUMENT PANEL FINISH PANEL LH (for Front Side)
Click here
12. INSTALL TELEPHONE AND GPS ANTENNA CORD (for Roof Side)
(a) Engage the 4 clamps.
(b) Connect the connector to install the telephone and GPS antenna cord.
13. INSTALL ROOF HEADLINING ASSEMBLY (for Roof Side)
Click here
Removal
REMOVAL
The necessary procedures (adjustment, calibration, initialization, or registration) that must be performed after parts are removed and installed, or replaced during telephone and GPS antenna cord removal/installation are shown below.
Necessary Procedure After Parts Removed/Installed/Replaced (for Gasoline Model)Replaced Part or Performed Procedure | Necessary Procedure | Effect/Inoperative Function When Necessary Procedures are not Performed | Link |
|---|---|---|---|
| *: When performing learning using the Techstream. Click here |
|||
Disconnect cable from negative battery terminal |
Perform steering sensor zero point calibration |
Lane Departure Alert System (w/ Steering Control) |
 |
Pre-collision System |
|||
Intelligent Clearance Sonar System* |
|||
Lighting System (for Gasoline Model with Cornering Light) |
|||
Memorize steering angle neutral point |
Parking Assist Monitor System |
|
|
Panoramic View Monitor System |
|
||
Front passenger seat |
Zero point calibration (Occupant classification system) |
|
|
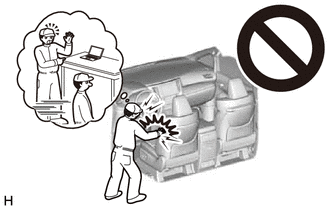
CAUTION:
Some of these service operations affect the SRS airbag system. Read the precautionary notices concerning the SRS airbag system before servicing.
Click here
 Necessary Procedure After Parts Removed/Installed/Replaced (for HV Model)
Replaced Part or Performed Procedure | Necessary Procedure | Effect/Inoperative Function When Necessary Procedures are not Performed | Link |
|---|---|---|---|
| *: When performing learning using the Techstream. Click here |
|||
Disconnect cable from negative auxiliary battery terminal |
Perform steering sensor zero point calibration |
Lane Departure Alert System (w/ Steering Control) |
|
Pre-collision System |
|||
Intelligent Clearance Sonar System* |
|||
Lighting System (for HV Model with Cornering Light) |
|||
Memorize steering angle neutral point |
Parking Assist Monitor System |
|
|
Panoramic View Monitor System |
|
||
Front passenger seat |
Zero point calibration (Occupant classification system) |
|
|
CAUTION:
Some of these service operations affect the SRS airbag system. Read the precautionary notices concerning the SRS airbag system before servicing.
Click here
PROCEDURE
1. REMOVE LOWER INSTRUMENT PANEL FINISH PANEL LH (for Front Side)
Click here
2. REMOVE LOWER INSTRUMENT PANEL FINISH PANEL RH (for Front Side)
Click here
3. REMOVE FRONT CONSOLE UPPER PANEL GARNISH (for Front Side)
Click here
4. REMOVE CONSOLE BOX POCKET SUB-ASSEMBLY (for Front Side)
Click here
5. REMOVE CENTER INSTRUMENT CLUSTER FINISH PANEL SUB-ASSEMBLY (for Front Side)
Click here
6. REMOVE CENTER NO. 1 INSTRUMENT CLUSTER FINISH PANEL (for Front Side)
Click here
7. REMOVE CENTER NO. 2 INSTRUMENT CLUSTER FINISH PANEL (for Front Side)
Click here
8. REMOVE RADIO AND DISPLAY RECEIVER ASSEMBLY WITH BRACKET (for Front Side)
Click here
9. REMOVE NO. 2 HEATER TO REGISTER DUCT SUB-ASSEMBLY (for Front Side)
Click here
10. REMOVE DCM (TELEMATICS TRANSCEIVER) WITH BRACKET (for Front Side)
Click here
11. REMOVE TELEPHONE AND GPS ANTENNA CORD (for Front Side)
(a) w/o Navigation System:
(1) Disengage the clamp. |
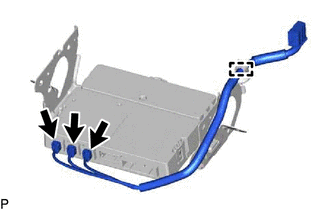 |
(2) Disconnect the 3 connectors to remove the telephone and GPS antenna cord.
(b) w/ Navigation System:
(1) Disengage the clamp. |
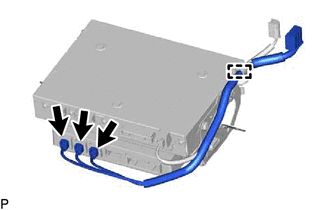 |
(2) Disconnect the 3 connectors to remove the telephone and GPS antenna cord.
12. REMOVE ROOF HEADLINING ASSEMBLY (for Roof Side)
Click here
13. REMOVE TELEPHONE AND GPS ANTENNA CORD (for Roof Side)
(a) Disconnect the connector. |
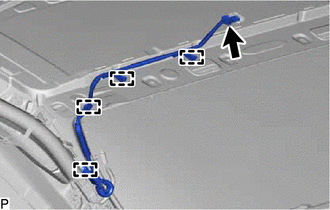 |
(b) Disengage the 4 clamps to remove the telephone and GPS antenna cord.