Front Door Speaker
Components
COMPONENTS
ILLUSTRATION
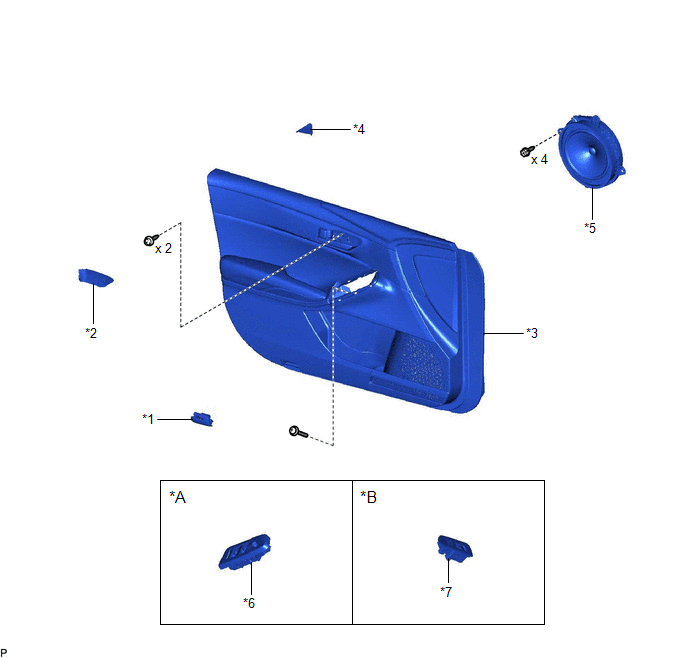
*A |
for Driver Side |
*B |
for Front Passenger Side |
*1 |
COURTESY LIGHT ASSEMBLY |
*2 |
FRONT DOOR ARMREST COVER SUB-ASSEMBLY |
*3 |
FRONT DOOR TRIM BOARD SUB-ASSEMBLY |
*4 |
FRONT DOOR TRIM POCKET COVER |
*5 |
FRONT NO. 1 SPEAKER ASSEMBLY |
*6 |
MULTIPLEX NETWORK MASTER SWITCH ASSEMBLY WITH FRONT DOOR UPPER ARMREST BASE PANEL |
*7 |
POWER WINDOW REGULATOR SWITCH ASSEMBLY WITH FRONT DOOR UPPER ARMREST BASE PANEL |
- |
- |
Inspection
INSPECTION
PROCEDURE
1. INSPECT FRONT NO. 1 SPEAKER ASSEMBLY
(a) With the speaker installed, check that there is no looseness or other abnormalities.
(b) Check that there is no foreign matter in the speaker, no tears on the speaker cone or other abnormalities.
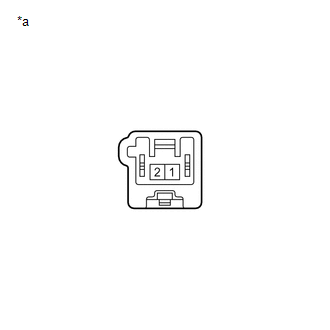
(c) Measure the resistance of the speaker. Standard Resistance: for 8 Speakers
If the result is not as specified, replace the speaker. |
|
Installation
INSTALLATION
HINT:
- Use the same procedure for the RH side and LH side.
- The following procedure is for the LH side.
PROCEDURE
1. INSTALL FRONT NO. 1 SPEAKER ASSEMBLY
NOTICE:
Do not touch the speaker cone.
(a) Connect the connector.
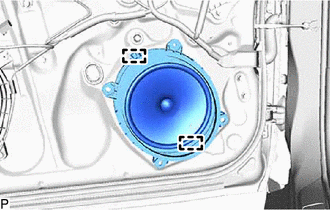
(b) Engage the 2 guides to temporarily install the front No. 1 speaker assembly.
(c) Install the front No. 1 speaker assembly with the 4 screws.
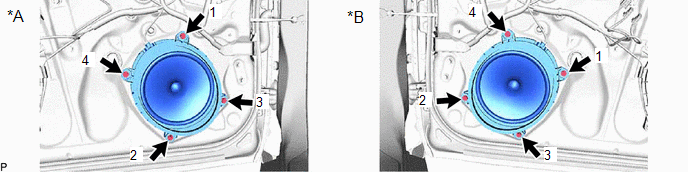
*A |
for LH Side |
*B |
for RH Side |
HINT:
Install the screws in the order shown in the illustration.
2. INSTALL FRONT DOOR TRIM BOARD SUB-ASSEMBLY
Click here 
3. INSTALL COURTESY LIGHT ASSEMBLY
Click here
4. INSTALL MULTIPLEX NETWORK MASTER SWITCH ASSEMBLY WITH FRONT DOOR UPPER ARMREST BASE PANEL (for Driver Side)
Click here
5. INSTALL POWER WINDOW REGULATOR SWITCH ASSEMBLY WITH FRONT DOOR UPPER ARMREST BASE PANEL (for Front Passenger Side)
Click here
6. INSTALL FRONT DOOR TRIM POCKET COVER
Click here
7. INSTALL FRONT DOOR ARMREST COVER SUB-ASSEMBLY
Click here
8. INSPECT POWER WINDOW OPERATION
for Gasoline Model: Click here
for HV Model: Click here
Removal
REMOVAL
HINT:
- Use the same procedure for the RH side and LH side.
- The following procedure is for the LH side.
PROCEDURE
1. REMOVE FRONT DOOR ARMREST COVER SUB-ASSEMBLY
Click here 
2. REMOVE FRONT DOOR TRIM POCKET COVER
Click here
3. REMOVE MULTIPLEX NETWORK MASTER SWITCH ASSEMBLY WITH FRONT DOOR UPPER ARMREST BASE PANEL (for Driver Side)
Click here
4. REMOVE POWER WINDOW REGULATOR SWITCH ASSEMBLY WITH FRONT DOOR UPPER ARMREST BASE PANEL (for Front Passenger Side)
Click here
5. REMOVE COURTESY LIGHT ASSEMBLY
Click here
6. REMOVE FRONT DOOR TRIM BOARD SUB-ASSEMBLY
Click here
7. REMOVE FRONT NO. 1 SPEAKER ASSEMBLY
NOTICE:
Do not touch the speaker cone.
(a) Disconnect the connector. |
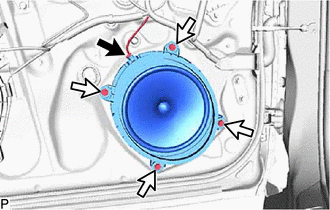 |
(b) Remove the 4 screws.
(c) Disengage the 2 guides to remove the front No. 1 speaker assembly. |
 |