Rack Plunger
GENERAL INFORMATION
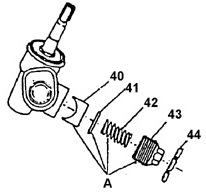
Rack Plunger Assembly A. BEFORE ASSEMBLY, APPLY A LAYER OF LITHIUM GREASE.
40. PLUNGER.
41. O-RING.
42. SPRING.
43. ADJUSTING PLUG.
44. LOCKNUT.
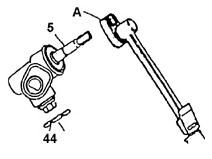
Rack Plunger Assembly A. BEFORE ASSEMBLY, APPLY A LAYER OF LITHIUM GREASE.
40. PLUNGER.
41. O-RING.
42. SPRING.
43. ADJUSTING PLUG.
44. LOCKNUT.
Remove or disconnect:
PROCEDURE.
1. Unscrew locknut.
44..
2. Unscrew adjusting plug.
43..
3. Remove spring.
42..
4. O-ring.
41..
5. Plunger.
40..
Installation
PROCEDURE.
1. Plunger.
40..
2. O-ring.
41..
3. Spring.
42..
4. Screw in the adjusting plug.
43..
5. Tighten the locknut.
44..
6. Set the rack to the middle position and tighten the adjusting plug to 11 N·m. Then back off plug 43 by 50–70 degrees. Check the rotational friction torque on the pinion shaft, which should be 1.2 N·m.
7. Screw on locknut 44 and tighten it to secure adjusting plug 43.
8. Tighten the adjusting plug locknut to 70 N·m.
Test yourself
A quick Daewoo Nexia quiz: every answer comes with an explanation and a link to the manual page.