Steering Column
GENERAL INFORMATION.
Warning.
The steering column must be removed only in the following cases.
– steering column requires replacement.
– steering column lock housing for ignition switch and steering shaft lock requires replacement.
– other repairs requiring removal of the steering column from the vehicle..
Remove or disconnect:
PROCEDURE.
1. Disconnect the negative battery cable.
2. Turn signal and wiper control levers..
3. Wiring harness..
4. Shift lock cable of the transmission range selector and ignition lock (automatic transmission models only)..
5. Set the steering wheel to the neutral position corresponding to
straight-ahead travel.
6. Remove the pinch bolt of the steering shaft coupling..
7. Remove the bolt securing the steering column bracket to the instrument panel..
8. Shear plates under the instrument panel.
8a. Center punch the head of the left shear bolt.
8b. Drill a hole with a special drill for bolt extraction (diameter
drill bit 1/8" – 3.175 mm).
8c. Insert Tool N1411 into the drilled hole and unscrew the shear bolt.
9. Remove the steering column and carefully place it on supports.
Install or connect

Steering Shaft Installation A. STEERING COLUMN COVER.
B. STEERING SHAFT.
C. CENTERING BUSHING.
D. COUPLING PINCH BOLT
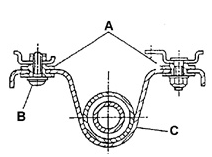
Shear Bolt Installation (Steering Column) A. SHEAR BOLT WASHER.
B. SHEAR BOLT.
C. STEERING COLUMN COVER BRACKET.
PROCEDURE.
1. Turn the steering wheel so that the spokes are symmetrical
about the vertical axis and point downward (steering wheel position for
straight-ahead driving).
2. Install the centering bushing into the steering column cover.
3. Set the steering gear rack to the center position corresponding to
straight-ahead travel.
4. Turn the steering shaft coupling so that the axis of the pinch bolt hole
is horizontal and on the top of the shaft.
5. Carefully insert the steering shaft end into the coupling hole.
Warning.
Support the steering column until it is secured
with the shear bolt. Do not leave the steering column unsupported.
6. Install (do not tighten) the following fasteners.
– shear plates to the instrument panel.
– steering column bracket cover-to-instrument panel bolt. Tighten the steering column bracket-to-instrument panel bolt to 22 N·m.
– coupling pinch bolt for the steering shaft. (The bolt must be
inserted into the smooth hole without threads.) Tighten the shear bolt located on the left of the steering column to the specified torque.
– new self-locking nut (with washer) located on the right of the steering
column. Tighten to the specified torque.
7. Pull the steering shaft up (until the ball bearing of the shaft stops). Tighten the steering shaft coupling pinch bolt to 25 N·m.
8. Remove the guide bushing from the column cover, leaving it on the steering shaft.
9. Connect the wiring.
10. Connect the ignition lock interlock cable and the
gear selector lever (for vehicles with automatic transmission only).
..
11. Install the turn signal and wiper control levers.
12. Check the steered wheel alignment in the straight-ahead position.
13. Connect the negative battery cable.
13. Negative battery cable.
Test yourself
A quick Daewoo Nexia quiz: every answer comes with an explanation and a link to the manual page.