Steering Gear Assembly with Power Steering
GENERAL INFORMATION

Rack and Pinion Steering Gear with Hydraulic Power Assist
1. COUPLING CLAMP BOLT.
2. COUPLING.
3. DASH PANEL HOLE SEAL BOOT.
4. SNAP RING.
5. SEAL (DUST BOOT), PINION SHAFT.
6. PINION SHAFT INNER SEAL.
7. BEARING IN BUSHING.
8. VALVE HOUSING SLEEVE O-RINGS.
9. SNAP RING.
10. VALVE ASSEMBLY.
11. PINION SHAFT SEAL.
12. PINION SHAFT UPPER BUSHING.
13. O-RING.
14. PLUNGER.
15. O-RING.
16. LOCKNUT.
17. ADJUSTING PLUG.
18. SPRING.
19. HOUSING PLUG (LEFT).
20. RUBBER MOUNTING BUSHING.
21. NUT.
22. BEARING ASSEMBLY.
23. SNAP RING.
24. COVER.
25. TOOTHED RACK.
26. BOOT CLAMP.
27. BOOT BUSHING.
28. RACK GUIDE PLATE.
29. WASHER
30. ADJUSTING SCREW.
31. TIE ROD END (LEFT).
32. SEALING BOOT.
33. NUT.
34. CLAMP BOLT.
35. TIE ROD (LEFT).
36. TIE ROD BALL JOINT BUSHING.
37. LOCKING PLATE.
38. BOLT.
39. SUPPORT PLATE.
40. TIE ROD (RIGHT).
41. TIE ROD END (RIGHT).
42. BOOT CLAMP.
43. BOOT BUSHING.
44. HOUSING COVER.
45. WASHER.
46. PISTON ROD SEAL.
47. PISTON.
48. O-RING.
49. NUT.
50. RUBBER MOUNTING BUSHING.
51. CYLINDER.
52. PISTON O-RING.
53. O-RING.
54. PISTON ROD GUIDE BUSHING.
55. STEERING GEAR HOUSING.
56. PIPE (LEFT TURN).
57. PIPE (RIGHT TURN).
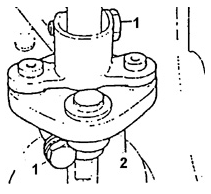
Steering Shaft Coupling
1. COUPLING CLAMP BOLT.
2. STEERING SHAFT COUPLING ASSEMBLY
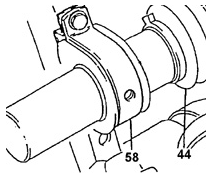
Steering Gear Mounting
44. HOUSING COVER.
58. CLAMP.
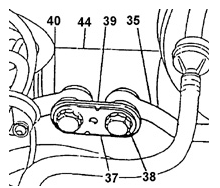
Inner Tie Rod Joint Mounting
35. TIE ROD (LEFT).
37. LOCKING PLATE.
38. BOLT.
39. SUPPORT PLATE.
40. TIE ROD (RIGHT).
44. HOUSING COVER
Remove or disconnect:
PROCEDURE.
1. Disconnect the negative battery cable.
2. Air cleaner.
3. Disconnect both tie rods 35 and 40 after removing the locking plate.
locking plate
37. Locking plate 37 must not be reused.
4. Disconnect both damper brackets from the steering gear housing.
5. Steering damper.
6. Unscrew the clamp bolts of the steering shaft coupling pinch joints.
7. Pull the flexible coupling up the steering shaft.
8. Disconnect the pressure and return lines from the valve housing.
9. Remove the steering gear through the opening in the front body panel.
Remove the seal of the front body panel opening from the steering gear.
10. Remove the steering gear through the right wheel well opening.
Warning.
If the studs were removed together with the mounting clamps, it is necessary to
screw the studs back in place and tighten to the specified torque.
Installation
PROCEDURE.
1. Install the steering gear assembly through the right wheel well opening.
2. Install the front body panel seal onto the steering gear housing.
3. Move the rack to the center position corresponding to straight-ahead driving, and install both mounting clamps securing the housing to the front
body panel. Install the self-locking nuts.
Warning.
The steering wheel spokes must be positioned symmetrically relative to the centerline.
vertical and must be directed downward..
4. Tighten the steering gear housing bracket nuts to torque 22 N·m.
5. Connect both tie rods to the rack..
Warning.
Use washers between the tie rod head and the guide plate. Use.
only a new locking plate..
6. Tighten the tie rod mounting bolts to torque 90 N·m..
7. Steering damper. Attach both damper brackets to the gear housing. Tighten the steering damper mounting bolts to torque 22.
N·m..
8. Lower the coupling onto the pinion shaft end and tighten the lower clamp bolt.
coupling. Tighten the steering shaft coupling clamp bolt to torque 22 N·m..
9. Pull the steering shaft up to the stop and tighten the upper coupling clamp bolt. Tighten the steering shaft coupling clamp bolt to torque 22 N·m..
10. Check that the steering rack remains in the center position.
11. Connect the negative battery cable..
12. Connect the pressure and return lines to the corresponding holes in the housing. Tighten the line union nuts to torque 27 N·m..
13. Air cleaner.
Test yourself
A quick Daewoo Nexia quiz: every answer comes with an explanation and a link to the manual page.