Speaker Circuit
DESCRIPTION
As a result, no sound is output from the speakers, even though there is no malfunction in the DCM (telematics transceiver) or the speakers.
WIRING DIAGRAM
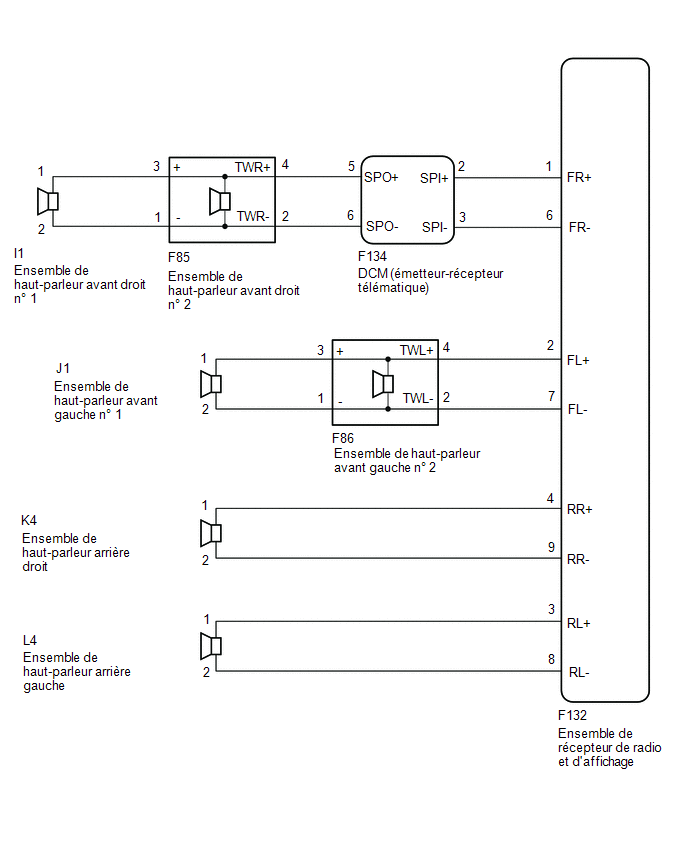
PRECAUTION / NOTICE / HINT
NOTICE:
- Depending on the parts replaced during vehicle inspection or maintenance, initialization, registration or calibration may be required. Refer to the precautions for the navigation system.
Click here

PROCEDURE
INSPECT SPEAKER (OPERATION CHECK)
(a) Select the "System Check Mode" screen. Refer to Speaker Check in the Operation Check. Click here |
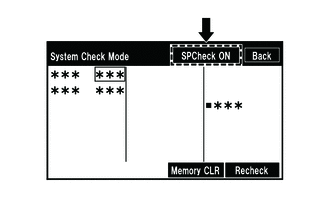 |
(b) Perform the operation check described above and identify the speaker that does not operate.
Result:
Speaker does not operate | Proceed to |
|---|---|
Front speaker assembly No. 1 or front speaker assembly No. 2 |
A |
Rear Speaker Assembly |
B |
HINT:
If no sound can be heard from the speakers, inspect all of them.
| B |  |
GO TO STEP 6 |
|

CHECK HARNESS AND CONNECTOR (RADIO AND DISPLAY RECEIVER ASSEMBLY - FRONT SPEAKER ASSEMBLY NO. 1 - FRONT SPEAKER ASSEMBLY NO. 2 - DCM (TELEMATICS TRANSCEIVER))
(a) Disconnect the F132 radio and display receiver assembly connector.
(b) Disconnect the I1 and J1 connectors from the Front Speaker Assembly No. 1.
(c) Disconnect the F85 and F86 connectors from the Front Speaker Assembly No. 2.
(d) Disconnect the F134 connector from the DCM (telematics transceiver).
(e) Measure the resistance according to the value(s) in the table below.
Standard resistance:
Tester Connection | Condition | Specified Condition |
|---|---|---|
F132-1 (FR+) - F134-2 (SPI+) |
Always |
Below 1 Ω |
F132-6 (FR-) - F134-3 (SPI-) |
Always |
Below 1 Ω |
F134-5 (SPO+) - F85-4 (TWR+) |
Always |
Below 1 Ω |
F134-6 (SPO-) - F85-2 (TWR-) |
Always |
Below 1 Ω |
F132-2 (FL+) - F86-4 (TWL+) |
Always |
Below 1 Ω |
F132-7 (FL-) - F86-2 (TWL-) |
Always |
Below 1 Ω |
I1-1 - F85-3 (+) |
Always |
Below 1 Ω |
I1-2 - F85-1 (-) |
Always |
Below 1 Ω |
J1-1 - F86-3 (+) |
Always |
Below 1 Ω |
J1-2 - F86-1 (-) |
Always |
Below 1 Ω |
F132-1 (FR+) or F134-2 (SPI+) - Body ground |
Always |
10 kΩ minimum |
F132-6 (FR-) or F134-3 (SPI-) - Body ground |
Always |
10 kΩ minimum |
F134-5 (SPO+) or F85-4 (TWR+) - Body ground |
Always |
10 kΩ minimum |
F134-6 (SPO-) or F85-2 (TWR-) - Body ground |
Always |
10 kΩ minimum |
F132-2 (FL+) or F86-4 (TWL+) - Body ground |
Always |
10 kΩ minimum |
F132-7 (FL-) or F86-2 (TWL-) - Body ground |
Always |
10 kΩ minimum |
I1-1 or F85-3 (+) - Body ground |
Always |
10 kΩ minimum |
I1-2 or F85-1 (-) - Body ground |
Always |
10 kΩ minimum |
J1-1 or F86-3 (+) - Body ground |
Always |
10 kΩ minimum |
J1-2 or F86-1 (-) - Body ground |
Always |
10 kΩ minimum |
| NG | |
REPAIR OR REPLACE HARNESS OR CONNECTOR |
|
INSPECT NO. 1 FRONT SPEAKER ASSEMBLY
(a) Remove the No. 1 front speaker assembly.
Click here
(b) Inspect the No. 1 front speaker assembly.
Click here
| NG | |
REPLACE NO. 1 FRONT SPEAKER ASSEMBLY |
|
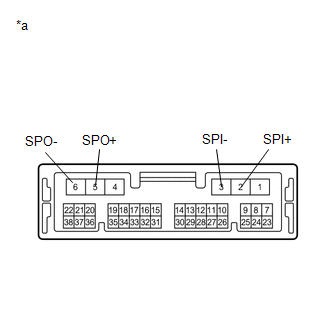
CHECK DCM (TELEMATICS TRANSCEIVER)
(a) Disconnect the DCM (telematics transceiver).
Click here
(b) Measure the resistance according to the value(s) in the table below. Standard resistance:
|
|
| NG | |
REPLACE DCM (DATA COMMUNICATION MODULE) |
|
REPLACE NO. 2 FRONT SPEAKER ASSEMBLY
(a) Remove the No. 2 front speaker assembly.
Click here
(b) Inspect the No. 2 front speaker assembly.
Click here
OK:
The malfunction disappears.
| OK | |
END |
| NG | |
GO TO APPLICABLE SYSTEM AS INDICATED IN THE PROBLEM SYMPTOMS TABLE |
INSPECT WIRE HARNESS AND CONNECTOR (RADIO AND DISPLAY RECEIVER ASSEMBLY - REAR SPEAKER ASSEMBLY)
(a) Disconnect the F132 radio and display receiver assembly connector.
(b) Disconnect the K4 and L4 connectors from the rear speaker assembly.
(c) Measure the resistance according to the value(s) in the table below.
Standard resistance:
Tester Connection | Condition | Specified Condition |
|---|---|---|
F132-4 (RR+) - K4-1 |
Always |
Below 1 Ω |
F132-9 (RR-) - K4-2 |
Always |
Below 1 Ω |
F132-3 (RL+) - L4-1 |
Always |
Below 1 Ω |
F132-8 (RL-) - L4-2 |
Always |
Below 1 Ω |
F132-4 (RR+) or K4-1 - Body ground |
Always |
10 kΩ minimum |
F132-9 (RR-) or K4-2 - Body ground |
Always |
10 kΩ minimum |
F132-3 (RL+) or L4-1 - Body ground |
Always |
10 kΩ minimum |
F132-8 (RL-) or L4-2 - Body ground |
Always |
10 kΩ minimum |
| NG | |
REPAIR OR REPLACE HARNESS OR CONNECTOR |
|
INSPECT REAR SPEAKER ASSEMBLY
(a) Remove the rear speaker assembly.
Click here
(b) Inspect the rear speaker assembly.
Click here
| OK | |
GO TO APPLICABLE SYSTEM AS INDICATED IN THE PROBLEM SYMPTOMS TABLE |
| NG | |
REPLACE REAR SPEAKER ASSEMBLY |