Telematics Transceiver Disconnected (B15DB)
DESCRIPTION
If the radio and display receiver assembly cannot detect the DCM (telematics transceiver) for a certain time (90 seconds) after the engine switch is turned to ON (ACC), the radio and display receiver assembly determines that the DCM (telematics transceiver) verification information (registered information) has been lost, and this DTC will be stored.
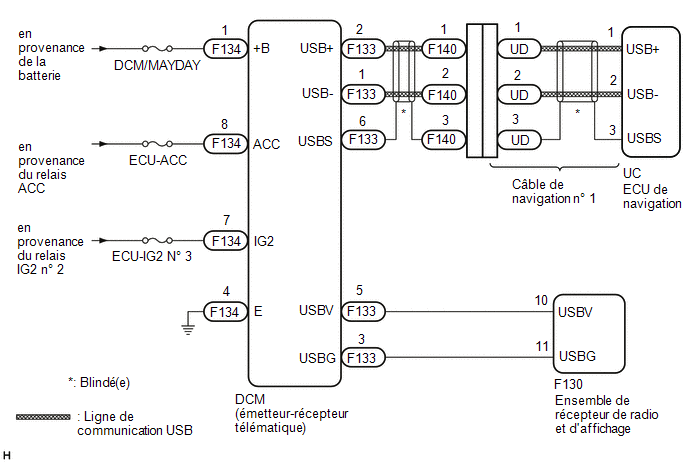
The telematics system uses USB communication between devices. If there is an open, short to +B or short to ground in the USB circuit, communication is interrupted and the telematics system will not operate normally.
DTC No. | Detection Item | DTC Detection Condition | Suspected Area |
|---|---|---|---|
B15DB |
Telematics Transceiver Disconnected |
DCM Disconnected (Telematics Transceiver) |
|
HINT:
This DTC may be stored due to environmental factors such as noise or interference, for example.
WIRING DIAGRAM
PRECAUTION / NOTICE / HINT
NOTICE:
- Depending on the parts replaced during vehicle inspection or maintenance, initialization, registration or calibration may be required. Refer to the precautions for the navigation system.
Click here

- When replacing the radio and display receiver assembly or the navigation ECU, always replace it with a new part. If a radio and display receiver assembly or navigation ECU previously installed on another vehicle is reused, the following may occur:
- A communication malfunction DTC may be stored.
- The radio and display receiver assembly or navigation ECU may not operate correctly.
- Check the fuses for the circuits related to this system before performing the following procedure.
PROCEDURE
CHECK DTCs
(a) Clear the DTCs.
Body Electrical > Navigation System > Clear DTCs(b) Turn the engine switch off.
(c) Turn the engine switch on (IG) and wait 90 seconds.
(d) Check the DTCs again and make sure no DTCs are output.
Body Electrical > Navigation System > Trouble CodesOK:
No DTC is output.
| OK |  |
USE SIMULATION METHOD TO CHECK |
|

CHECK HARNESS AND CONNECTOR (DCM (TELEMATICS TRANSCEIVER) POWER SOURCE)
(a) Disconnect the DCM (telematics transceiver) connector. |
|
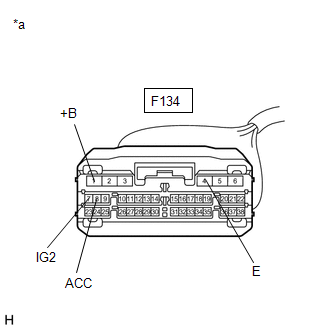
(b) Measure the resistance according to the value(s) in the table below.
Standard resistance:
Tester Connection | Condition | Specified Condition |
|---|---|---|
F134-4 (E) - Body ground |
Always |
Below 1 Ω |
(c) Measure the voltage according to the value(s) shown in the table below.
Standard voltage:
Tester Connection | Condition | Specified Condition |
|---|---|---|
F134-1 (+B) - F134-4 (E) |
Always |
11 à 14 V |
F134-8 (ACC) - F134-4 (E) |
Engine switch in ON (ACC) position |
11 à 14 V |
F134-7 (IG2) - F134-4 (E) |
Engine switch in ON (IG) position |
11 à 14 V |
| NG | |
REPAIR OR REPLACE HARNESS OR CONNECTOR |
|
CHECK HARNESS AND CONNECTOR (RADIO RECEIVER AND DISPLAY ASSEMBLY - DCM (TELEMATICS TRANSCEIVER))
(a) Disconnect the F130 radio receiver and display assembly connector.
(b) Disconnect the F133 DCM (telematics transceiver) connector.
(c) Measure the resistance according to the value(s) in the table below.
Standard resistance:
Tester Connection | Condition | Specified Condition |
|---|---|---|
F130-10 (USBV) - F133-5 (USBV) |
Always |
Below 1 Ω |
F130-11 (USBG) - F133-3 (USBG) |
Always |
Below 1 Ω |
F130-10 (USBV) or F133-5 (USBV) - Body ground |
Always |
10 kΩ minimum |
F130-11 (USBG) or F133-3 (USBG) - Body ground |
Always |
10 kΩ minimum |
| NG | |
REPAIR OR REPLACE HARNESS OR CONNECTOR |
|
CHECK RADIO AND DISPLAY RECEIVER ASSEMBLY
(a) Disconnect the radio receiver and display assembly connector.
(b) Measure the resistance according to the value(s) in the table below. Standard resistance:
|
|
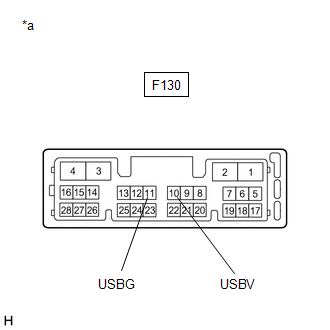
(c) Measure the voltage according to the value(s) shown in the table below.
Standard voltage:
Tester Connection | Condition | Specified Condition |
|---|---|---|
F130-10 (USBV) - F130-11 (USBG) |
Engine switch in ON (ACC) position |
4,75 à 5,25 V |
| NG | |
REPLACE RADIO AND DISPLAY RECEIVER ASSEMBLY |
|
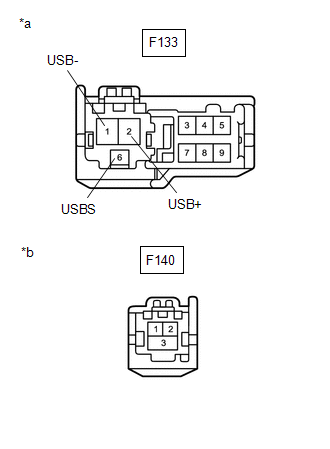
CHECK WIRE HARNESS AND CONNECTOR (DCM (TELEMATICS TRANSCEIVER) - NAVIGATION CABLE NO. 1)
(a) Disconnect the F133 DCM (telematics transceiver) connector.
(b) Disconnect the navigation cable No. 1 connector F140.
(c) Measure the resistance according to the value(s) in the table below. Standard resistance:
|
|
| NG | |
REPAIR OR REPLACE HARNESS OR CONNECTOR |
|
CHECK NAVIGATION SYSTEM WIRE HARNESS NO. 1
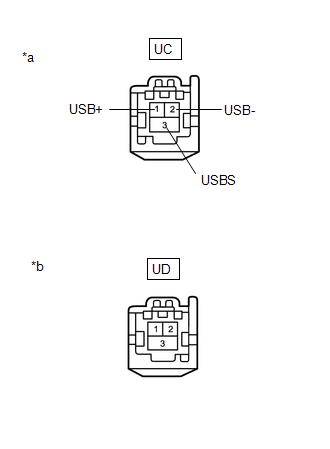
*a |
Front view of wire harness side connector (to navigation ECU) |
*b |
Front view of wire harness side connector (to instrument panel cable) |
(a) Disconnect the navigation system cable No. 1 connector from the navigation ECU.
(b) Disconnect the navigation cable No. 1 connector UD from the instrument panel cable.
(c) Measure the resistance according to the value(s) in the table below.
Standard resistance:
Tester Connection | Condition | Specified Condition |
|---|---|---|
(USB+) - UD-1 UC-1 |
Always |
Below 1 Ω |
(USB-) - UD-2 UC-2 |
Always |
Below 1 Ω |
(USBS) - UD-3 UC-3 |
Always |
Below 1 Ω |
UC-1 UD-1 (USB+) or - Body ground |
Always |
10 kΩ minimum |
UC-2 or UD-2 (USB-) - Body ground |
Always |
10 kΩ minimum |
UC-3 or UD-3 (USBS) - Body ground |
Always |
10 kΩ minimum |
| NG | |
REPAIR OR REPLACE HARNESS OR CONNECTOR |
|
CHECK DCM (TELEMATICS TRANSCEIVER)
(a) Replace the DCM (telematics transceiver) with a new one.
Click here
(b) Clear the DTCs.
Body Electrical > Navigation System > Clear DTCs(c) Turn the engine switch off.
(d) Turn the engine switch on (IG) and wait 90 seconds.
(e) Check the DTCs again and make sure no DTCs are output.
Body Electrical > Navigation System > Trouble CodesOK:
No DTC is output.
| OK | |
END (DCM (TELEMATICS TRANSCEIVER) IS FAULTY) |
|
CHECK NAVIGATION ECU
(a) Replace the navigation ECU with a new one.
Click here
(b) Clear the DTCs.
Body Electrical > Navigation System > Clear DTCs(c) Turn the engine switch off.
(d) Turn the engine switch on (IG) and wait 90 seconds.
(e) Check the DTCs again and make sure no DTCs are output.
Body Electrical > Navigation System > Trouble CodesOK:
No DTC is output.
| OK | |
END (NAVIGATION ECU IS FAULTY) |
| NG | |
REPLACE RADIO AND DISPLAY RECEIVER ASSEMBLY |