AM/FM Radio with Electronic Tuning

Radio 1. Power button and AM or FM reception selection button
2. Tuning down (lower frequency) button side
3. Station tuning button
4. Tuning up (higher frequency) button side
5. Station preset buttons
6. Tone or balance adjustment button
7. Tone or balance selection button
8. Display
9. NF button for automatic RDS search across the entire network broadcast band
10. Buttons for radio tuning and selection of IT mode (traffic information reception)
11. Volume control knob
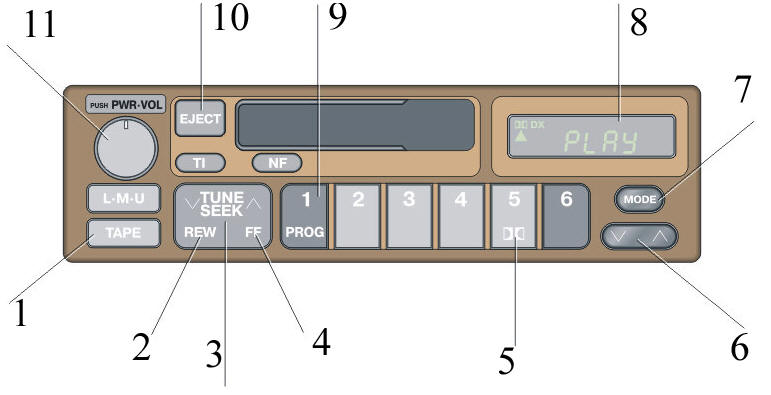
Cassette Player 1. Player power button
2. Rewind button side
3. Button for fast winding the tape in both directions
4. Fast-forward button side
5. Dolby noise reduction button
6. Tone or balance adjustment button
7. Tone or balance selection button
8. Display
9. Tape side selection button for playback
10. Button for stopping and ejecting the tape
11. Volume control knob
Using the Radio
PROCEDURE
1. Turn on the radio by pressing the L.M.U button, select stereo or monaural reception mode, or press the TI button to receive a traffic information station. The symbols L, M, or U will appear on the display. The radio can also be turned on by pressing the "PWR.VOL" knob.
2. Adjust the volume by turning the "PWR.VOL" knob.
3. Tune to the desired station. When tuned to an FM station, the radio automatically switches to stereo reception. The ST symbol will appear on the display. If the signal is weak, the reception bandwidth will automatically narrow to reduce noise. If the signal is very weak, the radio will automatically switch to monaural reception.
4. Adjust the tone and balance.
5. To turn off the radio, press the "PWR.VOL" knob.
Tuning to a Station
Tune to the desired station using one of the methods described below. The tuning frequency value will appear on the display.
PROCEDURE
Tuning in Preset Mode
1. Use preset mode to tune to a previously stored station.
2. Press the LMU button repeatedly until the desired information appears on the display.
3. Press the preset button to which the desired station was assigned. The radio tunes to the desired station, and the preset button number appears on the display.
Continuous Seek Mode
4. Press both sides of the TUNE SEEK button simultaneously and wait for a continuous audible signal. The radio will automatically search for the nearest station with a higher or lower frequency. After a clear reception is established, tuning stops. Each subsequent press of the button continues the search until the next station is received clearly.
5. If tuning is not possible after a single scan of the entire frequency range due to a very weak signal, the search continues at increased sensitivity, and the DX symbol appears on the display. After the station is received, tuning stops automatically.
Manual Tuning
6. Press both sides of the TUNE SEEK button simultaneously for no longer than 0.5 s. Each press jumps to the next frequency where broadcasting is possible.
Storing Preset Stations
PROCEDURE
1. Press the LMU button repeatedly until the selected band indicator L, M, or U appears on the display. You can store up to six stations in each selected band (on each preset button). When storing a station, check the bands where the desired station is already stored.
2. Tune to the desired station.
3. Press and hold one of the station preset buttons until an audible signal sounds. The station will then be stored on this button, and its number will appear on the display. To store another station, repeat the procedure above. Preset stations are erased when power is disconnected (battery disconnected, fuse blown, etc.).
Receiving Traffic Information from the RDS (Radio Data System)
PROCEDURE
1. The radio automatically switches to receive an RDS information station when switching to the FM band. The name of the corresponding radio station and the RDS symbol appear on the display.
2. If you tune to a new FM station broadcasting RDS information, the frequency value appears on the display, and after 5 s the name of the corresponding radio station appears. Tuning by preset, automatic seek, and manual tuning
3. The tuning procedure is described above. Scanning the entire band
4. When the TP (Traffic Program) symbol appears on the display, this means the station broadcasts traffic information and EON data.
5. The radio switches to the TI band by pressing the TI button. The TI symbol appears on the display. If the radio does not find a station within 20 s after pressing the TI button, a search begins based on the alternative frequency list (AF list), which ends when a station is found. The radio's switch to this mode is indicated by an audible signal and the SEARCH symbol on the display. If tuning to a station is not possible after a single scan of the entire band due to a weak signal, scanning is repeated at increased sensitivity, indicated by the DX symbol on the display. If the signal is too weak, the radio stops searching and NOTHING appears on the display for 2 s. If the radio does not tune to a TI-band station within another 20 s, scanning starts again. When TI appears on the display, the radio will receive a TI station only if tuning is performed by automatic seek.
6. If traffic information is required while the radio is tuned to a station broadcasting another program, press and hold the TI button until the TA (Traffic Announcement) symbol appears on the display. When this symbol appears, the radio stops receiving all programs except traffic information. If no traffic information is being broadcast at the moment and a cassette is loaded in the player, the player turns on and automatically turns off when a traffic announcement begins. After the announcement ends, or if the signal becomes weak, the previous program resumes.
7. To return from traffic information reception mode to normal mode, press and hold the TI button until the TA symbol disappears from the display.
Network Tracking Mode (IMF Mode) Setting
8. The Network Tracking Mode (IMF mode) is used to search for an RDS station across the entire frequency band. Press and hold the NF button for more than 2 seconds. The receiver will tune to an RDS station without interrupting the program being received. The NF symbol will appear on the display. If reception conditions deteriorate, the receiver will tune to a station broadcasting the same program based on the alternative frequency list received from the RDS station.
9. If the RDS station (with EON – Enhanced Other Network data) you are listening to does not transmit traffic information in TI and TA modes, the receiver will automatically switch to a program broadcasting traffic information based on the EON alternative frequency list. After the traffic announcement ends, the previous program is automatically restored. A beep sounds at the start and after switching.
10. To cancel NF mode, press and hold the NF button for at least 2 seconds. When the REGON symbol appears on the display, the receiver will tune to an RDS station with an identical Program Identification code (PI code). When the REG OFF symbol appears on the display, the receiver will tune to an RDS station with an identical three-digit PI code.
11. If the receiver does not detect an RDS station within 60 seconds, all programs are muted and the receiver starts searching for a station with the same PI code based on the alternative frequency list (AF list). If a station cannot be found due to weak signal, the search for all FM stations starts again. A beep and the SEARCH symbol on the display indicate that the receiver has switched to this mode. If tuning fails due to a very weak signal, the search stops and the NOTHING symbol appears on the display for 2 seconds.
12. To cancel NF mode, press the NF button twice. The NF symbol will disappear from the display.
Tone Adjustment
PROCEDURE
1. To adjust the low-frequency (bass) sound, press the MODE button repeatedly until BASS 0 appears on the display. Then press either side of the level button and set the desired tone. The adjustment range is from BASS –10 to BASS +10. The tone level is shown on the display.
2. To adjust the high-frequency (treble) sound, press the MODE button repeatedly until TREB 0 appears on the display. Then press either side of the level button and set the desired tone. The adjustment range is from TREB –10 to TREB +10. The tone level is shown on the display.
Balance Adjustment
PROCEDURE
Two Speakers
1. Press the MODE button repeatedly until BAL 0 appears on the display. Then press either side of the level button and set the desired balance. The balance adjustment range for the left and right speakers is from BAL L14 to BAL R14. The balance level is shown on the display.
Four Speakers
2. To adjust the balance between the left and right speakers, press the MODE button repeatedly until BAL 0 appears on the display. Then press either side of the level button and set the desired balance. The adjustment range is from BAL L14 to BAL R14. The balance level is shown on the display. To adjust the balance between the front and rear speakers, press the MODE button repeatedly until FADE 0 appears on the display. Then press either side of the level button and set the desired balance. The front and rear speaker balance adjustment range is from FADE F14 to FADE R14. The balance level is shown on the display.
Test yourself
A quick Toyota Corolla quiz: every answer comes with an explanation and a link to the manual page.