Alternator Disassembly and Assembly
PROCEDURE

Bosch alternator components 1 – slip ring end cover; 2 – rectifier assembly; 3 – stator; 4 – rear bearing; 5 – rotor; 6 – nut; 7 – spring washer; 8 – washer; 9 – pulley; 10 – washer; 11 – fan; 12 – through bolt; 13 – washer; 14 – drive end cover; 15 – front bearing; 16 – bearing cover; 17 – key; 18 – voltage regulator with brush holder; 19 – bolt
Floor cutting by diamond wire saw.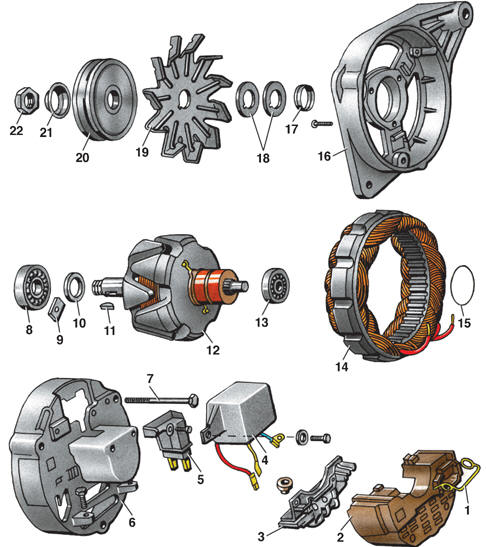
Motorola alternator components 1 – connector retaining spring; 2 – rectifier cover; 3 – rectifier assembly; 4 – voltage regulator; 5 – brush holder; 6 – slip ring end cover; 7 – through bolt; 8 – front bearing; 9 – bearing retaining plate; 10 – spacer washer; 11 – key; 12 – rotor; 13 – rear bearing; 14 – stator; 15 – O-ring; 16 – drive end cover; 17 – spacer washer; 18 – washer; 19 – fan; 20 – pulley; 21 – washer; 22 – nut
Disassembly Note: Vehicles may be equipped with either Bosch or Motorola alternators.
PROCEDURE 1. Hold the pulley and remove nut 6 (see figure Bosch alternator components). 2. Remove spring washer 7 and washer 8. 3. Remove pulley 9 from the rotor shaft. 4. Remove washer 10. 5. Remove fan 11. 6. Remove key 17 from the rotor shaft. 7. Remove voltage regulator 18 with brush holder. 8. Mark the position of the front cover relative to the alternator housing. 9. Remove through bolts 12. 10. Remove front cover 14. 11. Remove bearing cover 16 mounting bolts. 12. Remove bearing cover 16. 13. Remove bearing 15. 14. Remove the seal. 15. Remove rotor 5 from the cover. 16. Remove the rectifier assembly mounting bolts. 17. Remove rectifier assembly 2. Disassemble the Motorola alternator in the same way (see figure Motorola alternator components). Assembly Assemble the alternator in the reverse order of disassembly.
Test yourself
A quick Volkswagen Golf quiz: every answer comes with an explanation and a link to the manual page.