Starter Motor Disassembly
PROCEDURE
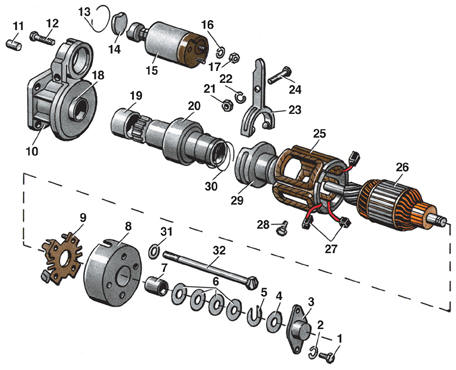
Starter motor components 1 – bolt; 2 – washer; 3 – bearing cover; 4 – washer; 5 – lock washer; 6 – adjusting washer; 7 – rear bearing; 8 – commutator end cover; 9 – brush holder; 10 – drive end cover; 11 – front bearing; 12 – bolt; 13 – snap ring; 14 – stop; 15 – solenoid switch; 16 – washer; 17 – nut; 18 – support ring; 19 – bushing; 20 – drive; 21 – nut; 22 – spring washer; 23 – drive lever; 24 – lever axle; 25 – stator winding; 26 – rotor; 27 – brush; 28 – pole retaining screw; 29 – drive engagement bushing; 30 – spring; 31 – washer; 32 – through bolt

Rotor removal 1 – protective ring; 2 – snap ring; 3 – rotor shaft; 4 – drive end cover
PROCEDURE 1. Disconnect the field winding lead from solenoid switch 15 (see illustration Starter motor components). 2. Remove bolts 12 and remove solenoid switch 15, disengaging lever 23. 3. Remove bolts 1, then remove cover 3 and washer 4. 4. Remove lock washer 5 and adjusting washers 6. 5. Remove bolts 32 and remove cover 8. 6. Pull brushes 27 out of brush holder 9 and remove the brush holder. 7. Remove the starter housing with windings 25. 8. Lower the vehicle.
9. Unscrew nut 21, remove pin 24 of the lever, and remove lever 23. 10. To remove rotor 26 with drive 20 from cover 10, place the rotor with cover in a vertical position and, using a tube of suitable diameter as a mandrel, drive protective ring 1 (see illustration Removing the Rotor) off snap ring 2.
11. Remove snap ring 2 and pull the rotor out of cover 4. 12. Clamp rotor 26 (see illustration Starter Components) in a vise and remove drive 20 assembly from the rotor shaft. The drive is not serviceable. If it is faulty, replace it.
Test yourself
A quick Volkswagen Golf quiz: every answer comes with an explanation and a link to the manual page.