Drive Belt Replacement and Tension Adjustment
PROCEDURE

Alternator drive belt tension adjustment on models produced before 04.1985 1 – alternator drive belt; 2 – water pump pulley; 3 – crankshaft pulley; 4 – alternator pulley; 5 – adjusting bracket; 6 – adjusting bolt; 7 – alternator; M – point of force application on the belt
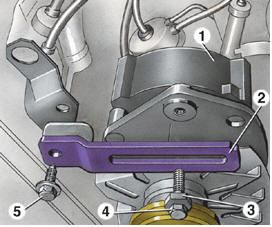
Alternator drive belt tension adjustment on models produced after 04.1985 1 – alternator; 2 – adjusting bracket; 3 – adjusting nut; 4 – adjusting nut bolt; 5 – adjusting bracket mounting bolt
The adjustment is the same for both mounting types. PROCEDURE On models before 03.1985: 1. Loosen the upper alternator mounting bolt 7 (see illustration Alternator mounting). 2. Loosen adjusting bolt 4. 3. Loosen bolt 3. 4. Pivot alternator 1 toward the engine. 5. Remove alternator drive belt 1 (see illustration Alternator drive belt tension adjustment on models produced before 04.1985). 6. Install a new alternator drive belt. 7. Lightly tighten adjusting bolt 6 so that the alternator does not pivot on its own. 8. Place a lever between the engine and the alternator and use it to pivot the alternator, thereby tensioning the drive belt. If the belt is correctly tensioned, it should deflect 5 mm under firm thumb pressure at point M on an used belt, and 2 mm on a new belt. 9. Tighten bolts 3, 4 and 7 (see illustration Alternator mounting). On models from April 1985: Warning: From 04.1985 the belt tensioning mechanism was changed. Instead of an adjusting bolt, a bolt and a toothed adjusting nut are fitted, and the adjusting bracket has a toothed rack. The belt is tensioned by turning the adjusting nut, which moves along the toothed rack. Depending on the alternator mounting type, the adjusting bracket is located either at the top or at the bottom.
10. Loosen the lower alternator mounting bolt. 11. Loosen bolt 5 (see illustration Alternator drive belt tension adjustment on models produced after 04.1985) securing the adjusting bracket. 12. Loosen adjusting nut bolt 4. 13. Turn the adjusting nut until the alternator pivots far enough to remove the drive belt. 14. Install a new belt. 15. Tighten adjusting nut 3 to a torque of 4 N·m for an used belt and 8 N·m for a new belt. This sets the correct alternator drive belt tension. 16. Tighten bolt 4 to a torque of 35 N·m, while holding the adjusting nut. 17. Tighten bolt 5 to a torque of 20 N·m. 18. Tighten the lower alternator mounting bolt.
Starter Motor - Removal
PROCEDURE 1. Disconnect the negative battery cable. Manual transmission 2. Disconnect the wires from the starter motor, labeling them, for example with colored insulating tape. 3. Remove the three starter mounting bolts using a splined wrench. 4. Remove the starter motor. Automatic transmission 5. Remove the upper bracket mounting bolts. 6. Apply the parking brake. 7. Raise the front of the vehicle and support it on stands. 8. Disconnect the driveshaft from the starter side flange (see subsection 7.2). 9. Remove the heat shield mounting nuts. 10. Remove the lower heat shield bolt, then slide the heat shield back and remove it. 11. Disconnect the wires from starter terminals 30 and 50. 12. Turn the steering wheel to the right. 13. Disconnect the heat shield bracket from the starter, move the driveshaft back and remove the bracket upward. 14. Turn the starter with the pinion facing up and remove it from below, between the engine and the driveshaft.
Test yourself
A quick Volkswagen Golf quiz: every answer comes with an explanation and a link to the manual page.