Removal and Installation of Hood Latch and Release Cable
The vehicles covered by this Manual are equipped with a Supplemental Restraint System (SRS). Before performing any work near the airbag module, steering column or instrument panel, disable the SRS to avoid injury from accidental deployment (see Chapter Body Electrical System). The SRS wiring can be easily identified by its yellow insulation.
If the installed audio system is equipped with an anti-theft code, make sure you have the correct code to activate the audio system before disconnecting the battery!
Hood Latch
PROCEDURE
1. Outline the latch assembly with a marker or scriber to ensure correct alignment during installation. Release the retainers and remove the plastic latch cover. Remove the mounting bolts from the radiator support panel and remove the latch.
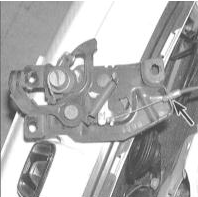
2. Disconnect the hood release cable from the latch assembly.
3. Install in the reverse order of removal.
Adjust the latch position so that the hood is securely held by the latch in the closed position - the rubber mounts should be slightly compressed.
Release Cable
PROCEDURE
1. Disconnect the hood release cable from the latch assembly.
2. Tie a piece of string to the end of the released cable and pull the cable out of the intermediate retainers and guides.
3. Remove the wheel arch splash shield (see Section Front Fender Removal and Installation).

4. Inside the vehicle, remove the main and front sections of the driver's door sill trim.
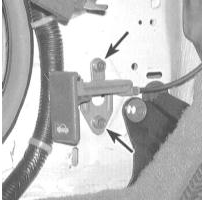
5. Remove the two mounting bolts and detach the hood release lever from the bulkhead. Disconnect the cable from the lever.
6. Push the rubber grommet through the bulkhead and pull the cable assembly into the passenger compartment. Make sure the new cable assembly is equipped with a grommet. Untie the old cable from the string and tie the new cable in its place.
7. Pull the new cable assembly through the bulkhead into the engine compartment using the wire.
8. Connect the new cable to the release lever, making sure it is securely held in the support bracket.
9. Carry out the remaining installation in the reverse order of removal.
Firmly push the cable grommet into the engine compartment bulkhead (from the passenger compartment side) by hand - make sure the grommet is seated correctly in the bulkhead.
Test yourself
A quick Honda Accord quiz: every answer comes with an explanation and a link to the manual page.