Battery Condition Inspection and Charging
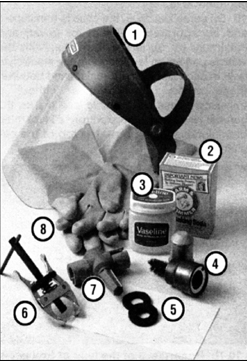
Materials and Tools for Battery Service
1. Protective mask. Protects the eyes from possible contact with acid-soaked particles when cleaning corroded areas with a brush.
2. Baking soda. Used as a water solution to neutralize acid.
3. Petroleum jelly. Used to lubricate battery terminals to protect them from corrosion.
4. Battery terminal and post cleaner. Wire brush designed for thorough cleaning of battery terminals and posts.
5. Acid-resistant washers. Installed on the battery posts under the cable terminals to protect the terminals from corrosion.
6. Terminal puller. Used to disconnect cable terminals from the battery posts after the nuts and bolts are loosened if the terminals are difficult to remove.
Use of the terminal puller allows removal of the terminals without damaging the posts.
7. Battery terminal and post cleaner. Same purpose as tool No. 4, but with a modified design.
8. Rubber gloves. Another protective item, used to protect the hands from acid burns during battery service.
General Inspection Procedure
PROCEDURE
1. The main purpose of battery maintenance is fast and reliable engine starting. However, before starting battery service, make sure you have all the equipment needed to work safely near the battery (see illustration Materials and Tools for Battery Service).
2. Always observe safety precautions when servicing the battery. Before starting work, stop the engine and disconnect the battery from ground.
3. The battery releases hydrogen, which is an explosive and flammable gas. Therefore, do not use open flame near the battery (smoking, checking spark plugs, etc.). The battery must be charged in a ventilated area.
4. The electrolyte contains poisonous and corrosive sulfuric acid. Do not allow acid to contact the eyes, skin, mouth, or clothing. Wear a protective mask when working near the battery. Keep children away from the battery.
5. Check the battery condition by visual inspection. Check the condition of the protective rubber boot on the positive battery post (if equipped). The boot must fully cover the post and terminal.
Check for signs of corrosion at the battery connections, cracks in the case and cover, and make sure the terminals are securely attached. Inspect the battery cables along their full length for cracks and signs of chafing in the insulation.
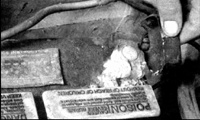
6. If corrosion is found in the form of white flaky deposits, especially around the posts, remove the battery for cleaning.
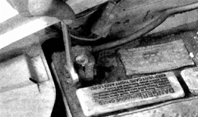
7. Using a wrench, loosen the terminal bolts, disconnecting the ground cable first, then remove the terminals. If the nut flats are damaged by corrosion, use special pliers for removal. Always disconnect the negative cable first and connect it last.
8. Then unscrew the battery hold-down clamp bolt, remove the clamp, and lift the battery out of the engine compartment.
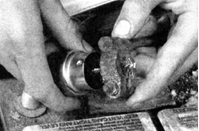
9. Thoroughly clean the cable terminals of corrosion using the special terminal and post cleaning brush, and rinse with a warm baking soda solution (the inner hole of the terminal is conical for a tight fit on the battery post, so do not remove excess material). Rinse the battery posts with the same solution, but make sure the solution does not get inside the battery.
10. When cleaning terminals, posts, and the battery cover, always wear gloves and a protective mask to avoid any solution contacting your hands and eyes. Wear old clothing, since even diluted sulfuric acid will inevitably burn fabric.
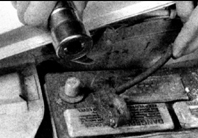
11. If the posts are heavily corroded, clean them with the cleaning tool. Thoroughly rinse all cleaned areas with distilled water. After cleaning, the posts must be completely clean and shiny, regardless of the cleaning method used.
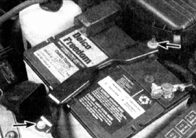
12. Make sure the battery tray is clean and the battery hold-down bolt and nut are undamaged. Check that the battery hold-down bolt and nut are securely tightened (indicated by arrows). If the battery was removed, make sure there are no foreign objects on the tray before installing it. Do not overtighten the battery hold-down clamp bolt or nut.
Electrolyte Level Inspection
PROCEDURE
1. On batteries with removable cell caps, the electrolyte level must be checked (and restored if necessary) at the specified intervals. If the vehicle is operated at high ambient temperatures, check the electrolyte level more often. Maintenance-free batteries (these usually have a marking on the top cover) do not require electrolyte level adjustment; the battery is of sealed construction.
2. The case of some batteries is made of transparent material. Two marks are applied to the case corresponding to the minimum and maximum permissible electrolyte levels. If the vehicle is on level ground, the electrolyte level in each cell must always be between these marks. On batteries with an opaque case, the electrolyte level must be slightly above the protective grid of the cell.
3. If topping up is required, proceed as follows. Remove the cell caps and carefully add distilled or deionized water to each cell up to the normal level. Overfilling is not permitted. After restoring the level, reinstall the cell caps.
Cleaning
PROCEDURE
1. Corrosion on the battery hold-down parts, battery case, and adjacent areas can be removed with a water solution of baking soda, followed by thorough rinsing with distilled water.
2. All metal body parts affected by corrosion must be painted with zinc primer and enamel.
Charging
PROCEDURE
1. If the battery is discharged to the point that it cannot crank the engine, the best way to restore it is charging at a low current. If short trips are made, i.e. the intervals between engine starts are short, it is recommended to keep the battery charged. Battery charging is especially necessary in winter, when starting conditions worsen and the load on the battery increases due to more frequent use of various electrical consumers.
2. For charging the battery, it is most advisable to use a low-output charger (1–2 A), sometimes called a "trickle" charger. These
chargers are the most reliable and almost never harm the battery, and they are also inexpensive. For fast charging, a high-current charger may be used; however, the charging current must not exceed 1/10 of the battery capacity expressed in ampere-hours. Fast charging is used to quickly bring the battery to a state ready for starting the engine (in 1–2 hours). However, fast charging may damage a battery that is otherwise serviceable, so this mode should be used only for starting the engine in an emergency.
3. The optimal charging time for the battery should be specified in the charger instructions. The approximate charging time with a "trickle" charger is 12–16 hours.
Test yourself
A quick Toyota Corolla quiz: every answer comes with an explanation and a link to the manual page.