Fluid Level Check
Fluids are used in the lubrication, cooling, brake and other systems and are an integral working component. Because fluid is gradually consumed and/or contaminated during driving, even with normal engine operation, the fluid level must be topped up periodically. Before restoring the fluid level in any system, select the correct type of fresh fluid (see "Recommended Lubricants and Fluids").
* Before checking fluid levels, park the vehicle on level ground.
Engine Oil Level

Oil Level Marks
1. Minimum oil level mark
2. Maximum oil level mark
3. Add oil
4. Normal level
5. Overfilled
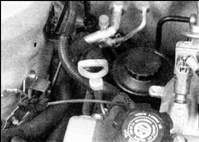
1. Remove the carpet cover over the spare wheel in the luggage compartment. Unscrew the spare wheel holder. The oil dipstick is located on the right side at the rear of the engine.
2. Check the engine oil level with the engine cold and not running, or about 15 minutes after the engine has been shut off. If the oil level is checked immediately after driving, some of the oil will remain in the upper part of the engine and the reading will be inaccurate.
3. Pull the dipstick out of the tube and wipe it clean with a lint-free cloth or paper towel. Reinsert the clean dipstick into the tube and pull it out again. Check the level by the oil film. The oil level must be between the L and F marks on the dipstick. If it is not, add enough oil to bring the level up to the F mark (see Figure: Oil Level Marks).
4. To raise the level from the L mark to the F mark, add approximately 1 L of oil. Do not allow the level to fall below the L mark, as this will cause engine damage. If the oil level is above the normal range (above the F mark), it will cause spark plug fouling, oil leaks, or failure of the seal.
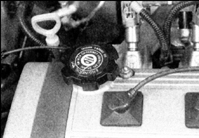
5. To add oil, remove the filler cap from the oil filler neck on the cylinder block cover. Use a funnel to avoid spilling oil. After adding oil, tighten the oil filler cap by hand. Start the engine and carefully check for any leaks at the oil filter or the oil pan drain plug.
6. Stop the engine and wait for the oil to drain back into the pan from the upper part of the cylinder block and cylinder head, then check the oil level again. The oil filler cap for the oil filter is located on the cylinder head cover. Before removing the cap, make sure the surrounding area is clean to prevent dirt from entering the engine.
7. Checking the oil level is an important preventive maintenance measure. If the oil level constantly drops, the cause may be oil leakage through a damaged seal, loose connections, or through the piston rings or valve guides. If the oil takes on a milky appearance, or water droplets are present in the oil, the cylinder head gasket seal may be compromised. All of these conditions require immediate engine inspection. The condition of the oil should also be checked regularly. Each time you check the oil level, before wiping the dipstick, pinch the dipstick between two fingers and slide them up its length. If dirt residue or fine metal particles are visible between your fingers and the dipstick, the oil must be changed. See Subsection 2.5.2.
Coolant
PROCEDURE
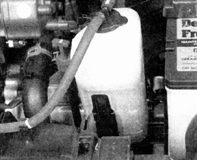
1. All vehicles covered in this Manual have a closed, pressurized cooling system. The white coolant reservoir, installed in the front left corner of the engine compartment, is connected by a hose to the base of the radiator filler cap.
2. As the coolant heats up during engine operation, coolant is forced through the sealed radiator filler cap and connecting hose into the coolant reservoir. As the engine cools, coolant flows back into the cooling system, maintaining the required level. The coolant reservoir is located next to the battery.
3. The coolant level must be checked regularly. The level must be between the Full and Low marks on the reservoir. The level will change depending on engine temperature. With a cold engine, the coolant level should be slightly above the Low mark. With a warm engine, the level should match or be near the Full mark. If the level does not match these specifications, allow the coolant to cool, remove the cap, and add coolant up to the Full mark. Only ethylene glycol and water coolant should be added. Do not add anti-corrosion additives yourself. If only a small amount is needed to restore the level, distilled water may be added. However, frequent addition of water will dilute the original antifreeze and water mixture prepared in the recommended ratio. To maintain the correct antifreeze-to-water ratio, it is recommended to add a mixture of the correct composition. The recommended coolant composition is specified in the vehicle owner's manual.
4. If the coolant level drops shortly after topping up, the system may be leaking. Check the radiator, hoses, filler cap, drain plug tightness, and water pump. If no obvious signs of leakage are found, have the radiator cap checked at an automotive service shop.
5. If it is necessary to open the radiator filler cap, wait until the system has cooled completely, then wrap the cap in a thick layer of rags and turn it to the first stop. If steam is released, wait until the coolant has cooled completely, then remove the cap.
6. Always check the condition of the coolant when checking its level. It should be relatively clear. If the coolant has turned brown or rust-colored, it must be replaced after flushing the cooling system.
Anti-corrosion properties are depleted over time, even though the coolant may still look acceptable. For this reason, the coolant must be replaced at specified intervals.
7. Do not allow antifreeze to contact skin or painted surfaces of the vehicle. If contact occurs, rinse immediately with plenty of water.
Windshield Washer Fluid
PROCEDURE
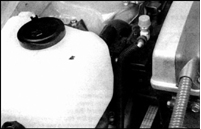
1. The windshield washer fluid is stored in a plastic reservoir located on the right side of the engine compartment. In a temperate climate the washer reservoir may be filled to the top with clean water, however during long-term storage it should be filled no more than two-thirds full to allow the water to expand when it freezes.
2. If the vehicle is operated in a cold climate, fill the washer reservoir with a solution of special washer fluid with a lowered freezing point. Such fluid is available from a dealer or from auto parts stores. Mix the fluid with water in the proportion specified by the manufacturer on the container. Do not fill the washer reservoir with antifreeze from the cooling system. This will damage the vehicle paint.
Battery electrolyte
PROCEDURE
To check the electrolyte level (except on vehicles equipped with maintenance-free batteries), remove the cap. The level should be between the upper and lower level marks. If the level is near the lower mark, add distilled water. Install and securely tighten the cap.
Brake and Clutch Hydraulic Fluid
PROCEDURE
1. The brake master cylinder is mounted on the vacuum booster inside the engine compartment. The clutch master cylinder, provided on vehicles with a manual transmission, is located next to the brake master cylinder.

2. The fluid level in the brake master cylinder reservoir or the clutch master cylinder reservoir is checked against the Min and Max marks. The fluid level in both reservoirs should be near the Max mark.
3. If the fluid level in both reservoirs is below normal, remove the caps from the reservoirs, first wiping the reservoir surfaces with a clean rag to prevent contamination of the brake or clutch hydraulic system.
4. Add only specified fluid to the brake and clutch master cylinder reservoirs (the fluid grade is indicated at the beginning of this chapter in the section "Recommended Lubricants and Fluids" or in your vehicle owner's manual). Mixing fluids of different types is not permitted, as this may damage the system. Fill the brake hydraulic reservoir only to the dashed line; the correct level will be established after the cap is installed.
5. After removing the reservoir cap, check the inside of the reservoir for contamination. If sediment, dirt particles or water droplets are present, the fluid must be drained and replaced with new fluid (for the procedure for replacing fluid in the clutch and brake hydraulic systems, see subsection 8.2.5 and subsection 9.12).
6. After restoring the fluid level in the reservoirs, make sure the caps are securely installed to prevent fluid leakage and/or loss of pressure in the system.
7. The brake fluid level will drop as the brake pads wear naturally. Frequent topping up of the brake master cylinder reservoir indicates a leak in the brake system; the cause must be found and corrected immediately. Check all connections and the condition of the brake circuit lines and hoses, as well as the wheel cylinders and the vacuum booster (see subsection 2.7).
8. If the brake master cylinder reservoir is found to be empty (or nearly empty) during the fluid level check, immediate inspection of the brake system is required (see subsection 9.12).
Test yourself
A quick Toyota Corolla quiz: every answer comes with an explanation and a link to the manual page.