Brake Inspection
In addition to periodic brake inspection, inspect the brakes each time a wheel is removed or if abnormal operation is suspected. Any of the following symptoms may indicate a possible brake malfunction:
– vehicle pulls to one side when the brake pedal is depressed;
– squealing or grinding noise when braking;
– stopping distance exceeds specification;
– pulsation felt in the brake pedal;
– brake fluid leakage (fluid traces on the inner surface of the tire).
PROCEDURE
1. Disc brake pads are equipped with built-in wear indicators. When the friction material wears down to the limit, the indicators produce a squealing or scraping noise. If this noise is heard during braking, replace the pads immediately, otherwise the expensive brake disc will be damaged.
2. Loosen the front wheel nuts.
3. Raise the front of the vehicle and support it on safety stands.
4. Remove the front wheels.
Disc Brakes
PROCEDURE
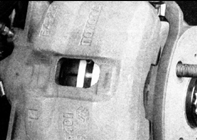
1. Each brake caliper has two pads – inner and outer. The front brake pads can be seen through the inspection window in the caliper. Place a steel rule against the window to measure the remaining thickness.
2. Check the thickness of each pad by looking at it from above and below the caliper and through the inspection window in the caliper. If the pad thickness is less than specified, replace the pads.
* Note that the thickness of the pad backing plate, to which the friction material is riveted or bonded, is not included in the pad thickness.
3. If the remaining thickness of the friction material cannot be determined through the inspection window, or if the general condition of the pads is to be checked, remove the caliper and pads for further inspection (see Sub-section 9.3 and Sub-section 9.4).
4. After removing the pads, clean them with brake system cleaner and measure the friction material thickness with a short steel rule or vernier calipers.
5. Measure the brake disc thickness and make sure the disc is still serviceable. If the thickness of any disc is less than the minimum allowable (see Sub-section 9.1), replace the disc (see Sub-section 9.7). Check the condition of the disc regardless of its remaining thickness. If scoring, deep wear or signs of severe overheating are found, remove the disc and resurface it (see Sub-section 9.7).
6. Before installing the wheel, check the condition of all brake hydraulic hoses and lines for cracks, corrosion, fluid leakage, twisting or kinks, especially at the points where the rubber hoses connect to the caliper cylinders. Make sure the hoses and lines are kept well away from sharp edges, moving parts and exhaust pipes. If the hoses and lines are routed too close to these parts, bend the brake lines away or replace them, and also inspect and, if necessary, replace the connection parts (see Sub-section 9.11).
Rear Drum Brakes
PROCEDURE
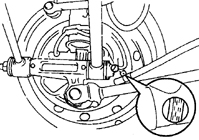
1. It is not necessary to remove the brake drums to check the thickness of the rear brake shoe linings. Remove the rubber plugs from the brake backing plate and, using a flashlight, check the lining thickness. For a more thorough inspection of the rear brake linings, proceed as follows.
2. Remove the brake drums (see Sub-section 9.8).

3. Check the thickness of the rear brake shoe linings and check for contamination with brake fluid or grease. If the lining is bonded, measure the thickness from the surface of the shoe to the lining as shown in the illustration. If the lining is riveted to the shoe, the determining dimension is the distance from the linings to the rivet heads.
4. If the thickness of bonded linings is less than 1.5 mm (or the distance from the linings to the rivet heads is less than 1.5 mm), replace the linings. Linings must also be replaced if cracks, glazing, or contamination with brake fluid or grease is found. The replacement procedure is described in Sub-section 9.8.
5. Check the condition of the upper and lower shoe return springs and make sure they are installed correctly. If a spring is stretched or deformed, replace it, otherwise the shoes will not retract sufficiently from the drums and will wear rapidly.
6. Check for traces of brake fluid leakage at the wheel cylinders by carefully prying and pulling back the outer cylinder boot. If traces of brake fluid are found under the boot, replace the cylinder (see Sub-section 9.9).
7. Check the brake drums for deep wear, cracks, grooves and chipped areas. If the defects cannot be removed with sandpaper, remove the drums and have them turned at an automotive workshop (the repair procedure is described in more detail in Sub-section 9.8).
8. Install the brake drums (see Sub-section 9.8).
9. Install the wheels and tighten the nuts.
10. Remove the safety stands and lower the vehicle.
11. Tighten the wheel nuts to the torque specified in Sub-section 9.1.
Vacuum Brake Booster Check
PROCEDURE
1. Sit in the driver's seat and perform the following steps.
2. Switch off the engine and depress the brake pedal several times. The brake pedal travel must not change.
3. Depress the brake pedal and start the engine – the brake pedal should noticeably move downward ("drop").
4. Depress the pedal and stop the engine. Hold the pedal for 30 seconds – the pedal must neither sink nor rise.
5. Start the engine again, and after 2 minutes switch it off. Then depress the brake pedal several times – the pedal travel should decrease after each press.
6. If brake behavior differs from the above, the vacuum booster requires either repair or replacement. The removal procedure for the vacuum booster is described in Sub-section 9.13.
Parking Brake
PROCEDURE
1. Slowly pull the parking brake lever up to its full travel and count the number of clicks. If the number of clicks is within specification, the parking brake is adjusted correctly. Otherwise, adjust the parking brake (see subsection 9.14).
2. The parking brake can also be checked by parking the vehicle on a steep incline, applying the parking brake and shifting the transmission shift lever to Neutral. If the vehicle starts to roll, adjust the parking brake (see subsection 9.14).
Test yourself
A quick Toyota Corolla quiz: every answer comes with an explanation and a link to the manual page.