Spark Plug Wires, Distributor Cap and Rotor
PROCEDURE
1. The condition of the spark plug wires must always be checked when replacing spark plugs with new ones.
2. Begin with a visual inspection of the spark plug wires with the engine running. Start the engine in a dark garage (make sure there is ventilation) and observe the wires. Be careful not to touch rotating parts. A glow around the wire or sparks indicate wire breakdown. If a glow is observed, the wires must be replaced. Stop the engine and check the condition of the distributor cap and rotor.
3. Inspect the spark plug wires one at a time to avoid mixing up their connection order. Each wire must be numbered to make it easier to identify the cylinder it belongs to. If there are no numbers, attach tags with numbers by wrapping adhesive tape around the wire.
4. Disconnect the wires from the spark plugs. You may use a special tool, or grasp the boot, not the wire. Twist the boot half a turn while pulling upward, and remove the wire.
5. Inspect the inside of the boot and check for signs of corrosion in the form of a light powdery deposit.
6. Reinstall the boot onto the spark plug. The boot must fit tightly on the spark plug. If the boot fits loosely, remove it and bend the metal terminal inside the boot with pliers until it fits tightly onto the spark plug electrode.
7. Wipe the wire along its entire length with a clean rag, removing all dirt and oil deposits. Check the clean wire for signs of burning, cracks, and other damage. Do not bend or straighten the wire excessively, as this may cause the conductor to break.
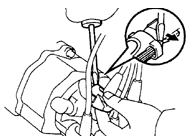
8. Disconnect the other end of the wire from the distributor cap by bending back the retaining tab with a small screwdriver. Check for corrosion and make sure the wire fits tightly. Replace the terminal in the distributor cap.
9. Check the condition of each of the remaining wires. When finished, reliably reconnect the wires, making sure they are secure in the distributor cap and on the spark plug.
10. If replacement is necessary, purchase a set of high-tension wires matching the engine type. Ready-made wires of the correct length with installed terminals are available. Replace the wires one at a time so as not to mix up the firing order on the engine.

11. Remove the distributor cap by unscrewing the two screws (indicated by arrows).
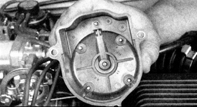
12. Inspect the inside of the cap for cracks, signs of arcing (thin burnt tracks), burning or erosion of the electrodes, as well as wear, burning, or loosening of the contacts. If the condition of the cap is in doubt, replace the cap.
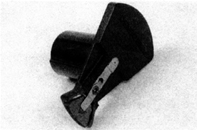
13. Remove the rotor from the distributor shaft. Inspect the rotor and check for cracks and signs of arcing. If any defects are found, replace the cap or the rotor.

14. The cap and rotor are usually also replaced when the high-tension wires are replaced. If you decide to keep the cap, check the resistance of the wires inserted into the distributor cap. If the resistance between the cap contact and the spark plug contact exceeds the value specified in subsection 2.1, replace the cap and/or the wire.
15. When replacing the distributor cap, remove the wires from the old cap one at a time and insert them one at a time into the new cap, in exactly the same order. Do not remove all the wires at once, otherwise the firing order, which must match the engine operating order, may be disturbed.
Test yourself
A quick Toyota Corolla quiz: every answer comes with an explanation and a link to the manual page.