Maintenance every 5000 km or 3 months
Fluid Level Inspection and Replenishment
Power Steering Hydraulic System
PROCEDURE
1. Unlike a purely mechanical steering system, a power steering system uses fluid, the level of which must be checked periodically.
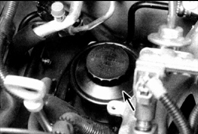
2. The power steering pump reservoir is located either on the right side of the engine compartment, behind the washer fluid reservoir, or in the rear right corner of the engine compartment (indicated by the arrow), next to the engine oil level dipstick.
3. Check the fluid level with the engine off and the front wheels in the straight-ahead position.
4. Wipe the reservoir and reservoir cap with a clean rag. This is necessary to prevent dirt or foreign objects from entering the reservoir during the check.
5. Remove the cap and, dipping a finger into the fluid, check the fluid temperature.
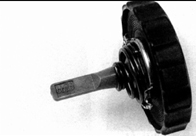
6. Depending on the reservoir type, the fluid level check is performed in one of two ways. If the power steering pump reservoir is mounted on the right side wall of the engine compartment, the fluid level can be observed through the transparent wall of the reservoir, which has level marks. On vehicles where the reservoir is mounted directly on the engine, a dipstick is built into the reservoir cap to check the fluid level.
7. To check the fluid level, remove the reservoir cap together with the built-in dipstick, wipe the dipstick with a clean rag, and reinstall the cap. Then remove the cap again and check the level at the edge of the fluid film on the dipstick. On both types of reservoirs, the fluid level should be in the upper part of the range marked Hot (if the fluid feels warm to the touch), or in the upper part of the range marked Cold (if the fluid feels cold to the touch). Note that the Hot and Cold marks are located on opposite sides of the reservoir or dipstick. The fluid level must not be below the lower mark for the corresponding fluid temperature. The fluid level changes significantly with temperature, so it should be checked when the fluid is hot or cold.
8. If necessary, add fluid to the reservoir filler neck using a funnel.
9. Frequent fluid top-ups indicate a leak in the power steering hoses, hose fittings, power steering pump, or steering gear, which requires careful inspection and repair.
Automatic Transmission
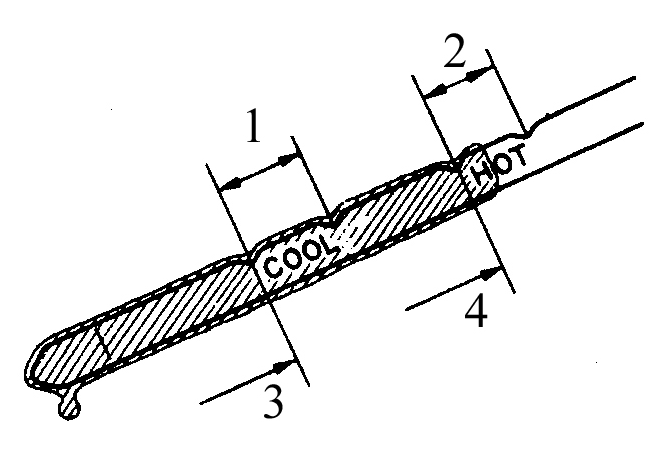
Transmission fluid level dipstick marks
1. Normal level (for cold fluid)
2. Add fluid if the level was checked on cold fluid
3. Normal level (for hot fluid)
4. Add fluid if the level was checked on hot fluid
PROCEDURE
1. The automatic transmission fluid level should be checked and maintained regularly. Insufficient fluid level causes transmission components to slip and reduces driving performance. Excessive fluid level causes foaming, which leads to fluid loss and transmission failure.
2. Check the automatic transmission fluid level after the fluid has warmed up to operating temperature. The fluid is considered warm after driving under normal conditions for 16 km (or 24 km in cold weather), and the fluid temperature is 70 to 80 °C.
3. Park the vehicle on a level, horizontal surface, apply the parking brake, start the engine and let it idle. Depress the brake pedal and move the selector lever from P through the entire range to the extreme position, then return it to P.
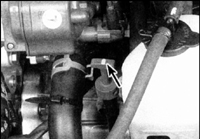
4. Remove the dipstick (indicated by arrow) from the tube that leads from the transmission case toward the radiator (engine keeps idling), check the fluid level and note it.
5. If the level is checked on cold fluid, it should be between the lower marks. If the fluid is hot, the level should be between the upper marks (see figure: Transmission fluid level marks on dipstick).
6. Wipe the dipstick with a clean rag and reinsert it into the tube until it stops.
7. Remove the dipstick again and check the fluid level. If checked on cold fluid, the level should be between the Cold or Cool marks. If checked on hot fluid, the level should be between the Hot marks. If the level is near the lower marks, add recommended fluid through a funnel.
8. Add only the necessary amount of fluid and do not exceed the maximum level. To raise the level from the lower mark to the upper mark, approximately 0.5 L of fluid is required (if fluid is hot). Add fluid in very small portions, checking the level periodically.
9. When checking the level, also check the condition of the fluid. If the fluid is black or dark brown, or has a burnt smell, it must be replaced. If the condition is doubtful, buy a small amount of new transmission fluid and compare its color and smell with the used fluid.
Engine Oil and Oil Filter Replacement
Engine Oil and Filter Change Tool Kit
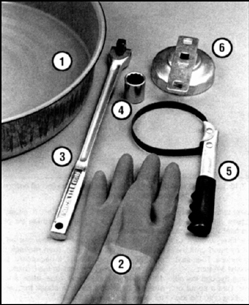
Engine Oil and Filter Change Tool Kit
1. Drain pan – should be shallow but wide enough to prevent oil spillage
2. Rubber gloves – must be worn before loosening the drain plug or filter to protect against burns in case hot oil contacts the hands
3. Extension bar for loosening the drain plug with the socket
4. Socket for loosening the oil pan drain plug
5. Strap wrench for loosening the oil filter. A gap between the wrench strap and the filter is required for effective gripping of the filter body
6. Filter wrench for loosening the oil filter. Fits over the hex at the end of the filter body and is turned with an extension bar (this wrench is selected for each filter type)
PROCEDURE
1. Timely oil changes are the most effective measure the owner can take to prevent premature engine wear caused by oil aging, thinning and contamination.
2. Before starting work, prepare all necessary tools and materials (see figure: Engine Oil and Filter Change Tool Kit). Also prepare a large quantity of clean rags and newspapers to absorb spilled oil.
3. To access the underside of the vehicle, place it on two stands with a crossbar, raise it with a hoist, or drive it onto a pit or lift.
4. If you are performing an oil change for the first time, first inspect the underside of the vehicle carefully and locate the engine oil pan drain plug. Oil should be changed on a warm engine, so while the engine and exhaust components are still cold, perform other tasks first.
5. Park the vehicle on a level surface. Start the engine and warm it up (the coolant temperature gauge pointer should be at least above the lowest mark). Oil is best changed on a warm engine because it drains faster and carries away more contaminants. After warming up, stop the engine and remove the oil filler cap from the cylinder head cover.
6. Raise the vehicle and place it on stands.
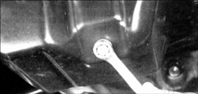
7. Carefully, avoiding contact with hot exhaust components, place the drain pan under the drain plug and loosen the plug.
8. If the engine is very hot, put on gloves a few turns before fully removing the plug. It is recommended to loosen the oil pan drain plug with an open-end wrench or socket to avoid rounding the plug flats.
9. Drain the oil into the drain pan. During draining, watch the stream so you can move the container in time. Check the drained oil for metal shavings and debris.
10. After the oil has drained, wipe the plug with a clean rag. Even the smallest metal particles stuck to the plug and not removed can quickly contaminate fresh oil.
11. Wipe the pan around the drain hole and reinstall the plug. Tighten the plug securely, taking care not to strip the threads.
12. Place the drain pan under the oil filter.
13. Remove all tools, rags and other foreign objects from under the vehicle (do not knock over the pan with the drained oil), then lower the vehicle.

14. Using the special wrench, loosen the oil filter (turn counterclockwise), then unscrew the filter by hand. Any standard oil filter wrench may be used for loosening (but tighten the filter by hand only). Immediately after loosening the filter, tilt it with the threaded end facing up to prevent the oil remaining in the filter from spilling.
* Be careful, as the exhaust manifold may still be hot.
15. Wipe the filter mounting surface on the cylinder block clean with a clean rag. If used oil remains at this location, it will smoke as the engine warms up. Also remove all remnants of the gasket material, scraping the surface if necessary.
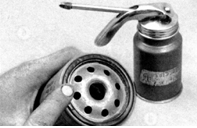
16. Make sure the type and dimensions of the new filter exactly match those of the old filter. Lightly lubricate the rubber gasket of the new filter with engine oil and screw the filter into place.
17. Tighten the filter by hand. Do not use a wrench to tighten the filter, to avoid damaging the rubber gasket. Tighten the filter until the gasket contacts the cylinder block surface. Then tighten the filter an additional 3/4 turn.
18. Fill with oil of the specified grade through the filler cap on the cylinder head cover. Pour oil through a funnel and avoid spilling oil on the upper part of the engine. First add approximately 0.8 L of oil, then wait a few minutes for all the oil to drain into the oil pan and check the oil level with the dipstick (see subsection 2.3). Continue adding oil in small portions until the level reaches the F mark on the dipstick, then close the filler cap and tighten it by hand. Start the engine so that oil fills all the lubrication passages.
19. With the engine running, check the oil drain plug and filter for leaks, observing these areas for one minute. If a leak appears, stop the engine and tighten the drain plug or filter.
20. Stop the engine and wait a few minutes for the oil to drain into the oil pan. Check the oil level with the dipstick again. If necessary, add oil up to the F mark on the dipstick.
21. During the first few trips after an oil change, check frequently for leaks and check the oil level.
22. Used oil must be disposed of, as it cannot be reused. Consult local waste disposal facilities regarding recycling of used oil. Do not pour used oil onto the ground. After it has cooled, drain the used oil into a container (a canister, bottle with a cap, etc.) for delivery to the nearest petroleum products collection point.
Test yourself
A quick Toyota Corolla quiz: every answer comes with an explanation and a link to the manual page.