Bleeding the brake system
After every brake repair in which the system has been opened, air may have entered the pressure lines. The brake system must then be bled. Air is also present in the lines if the brake pressure feels spongy when the brake pedal is pressed. In this case the leak must be eliminated and the brake system bled.
The brake system is bled by pumping the brake pedal; a second person is required for this. These instructions also apply to vehicles with ABS (anti-lock braking system).
Safety note, vehicles with ABS:The bleeding procedure is identical for vehicles with and without ABS. If the brake fluid level in the reservoir drops too low during bleeding, air will be drawn in and reach the hydraulic pump. The brake system must then be bled at a workshop.
When fitting a new brake hose, the system must also be bled at a workshop. The vehicle must not be driven until then.
If the entire system must be bled, bleed each wheel brake cylinder individually. This is always the case when air has entered each individual brake cylinder. If only one brake caliper has been replaced or overhauled, bleeding that cylinder is usually sufficient. Each brake circuit can also be bled individually.
When bleeding the entire system, start with one front brake caliper, then bleed the diagonally opposite rear wheel cylinder.
Caution: on vehicles with a brake force regulator, the vehicle must be standing on its wheels when bleeding the rear wheel cylinders, so that the brake force regulator does not operate.

Unscrew the cap from the brake fluid reservoir, holding the brake fluid level sensor with your finger.
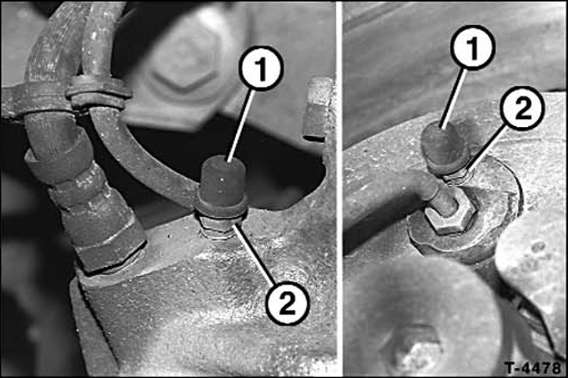
Remove the dust cap - 1 - from the bleeder screw - 2 - of the brake cylinder. Clean the bleeder screw and fit a clean bleeder hose.
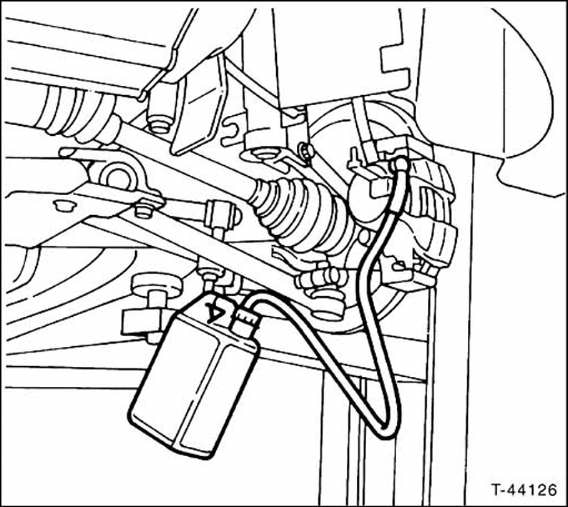
Insert the other end of the hose into a bottle half-filled with brake fluid. On older vehicles, carefully free the bleeder screw so it turns easily.
Have an assistant depress the brake pedal repeatedly ("pump") until pressure builds up in the brake system. This is felt as increasing resistance when the pedal is operated.
Once sufficient pressure is present, press the brake pedal fully down and keep your foot on the brake pedal.
Open the bleeder screw on the brake caliper by about half a turn with an ring spanner. Collect the escaping brake fluid in the bottle. Make sure the end of the hose remains constantly below the fluid level in the bottle.
As soon as the fluid pressure drops, close the bleeder valve immediately.
Repeat the pumping procedure until pressure builds up.
Press the brake pedal down, keep your foot on the brake pedal, open the bleeder screw until the pressure drops, then close the bleeder screw.
Repeat the bleeding procedure on one wheel cylinder until no more air bubbles appear in the brake fluid flowing into the bleeder bottle.
Then, with the brake pedal still depressed, carefully tighten the bleeder screw, max. 5 N·m.
Remove the hose from the bleeder screw, fit the dust cap onto the valve.
Bleed the other wheel cylinders in the same way.
Warning: While bleeding, check the brake fluid reservoir from time to time. The fluid level must not drop too far, otherwise air will be drawn into the system through the reservoir.
Always top up only with new brake fluid!If necessary, top up brake fluid to the “MAX” mark. Warning: with the reservoir cap removed, the brake fluid level must not be above the “MAX” mark.
Tighten the reservoir cap.
Warning, perform safety check:
Are the brake hose connections tightened?
Is the brake hose seated in the bracket?
Are the bleeder screws tightened?
Is there enough brake fluid in the reservoir?
With the engine running, carry out a leak check.
To do this, press the brake pedal with 200 to 300 N (equivalent to 20 to 30 kg) for about 10 seconds. The brake pedal must not sink. Check all connections for leaks.
Then carry out several braking tests on a road with light traffic.
Note: Brake fluid must be disposed of as hazardous waste.
Test yourself
A quick Fiat Bravo quiz: every answer comes with an explanation and a link to the manual page.