Remove and install rear disc brake pads
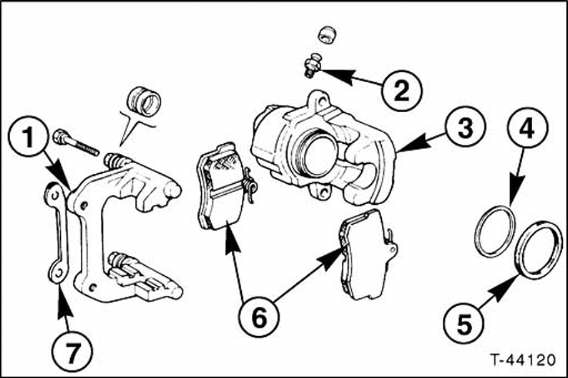
Brake carrier
Bleed screw
Brake caliper
Gasket
Protective cap
Brake pads
Shim plate
Caution: if the brake pads are to be reused, they must be marked during removal.
Brake pads must not be swapped from the right to the left wheel or vice versa. Swapping can lead to uneven braking. Only use genuine Fiat brake pads or brake pads approved by Fiat. Always replace all rear disc brake pads at the same time, even if only one pad has reached the wear limit.Mark the position of the rear wheels relative to the wheel hub with paint.
This allows the balanced wheel to be refitted in the same position. Loosen the wheel bolts. The vehicle must be standing on the ground.
Raise the vehicle at the rear and remove the rear wheels.
Release the handbrake lever. Loosen the adjusting nut for the handbrake cable.
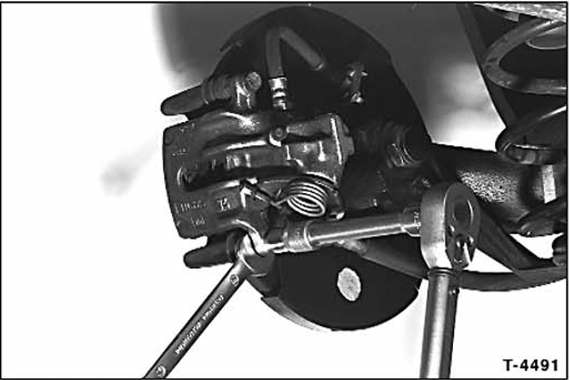
Unscrew both caliper mounting bolts, holding the guide pin with an open-end wrench.
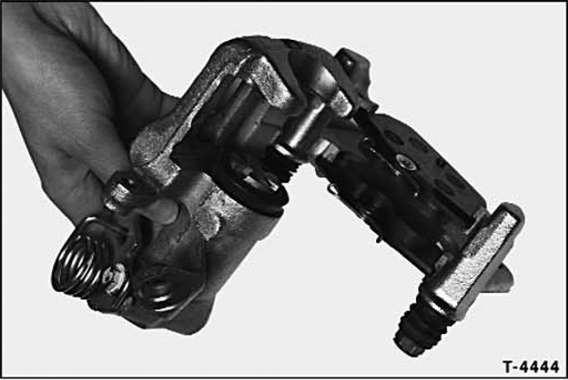
Remove the brake caliper and hang it with wire from the rear spring. The brake hose must not be under tension.
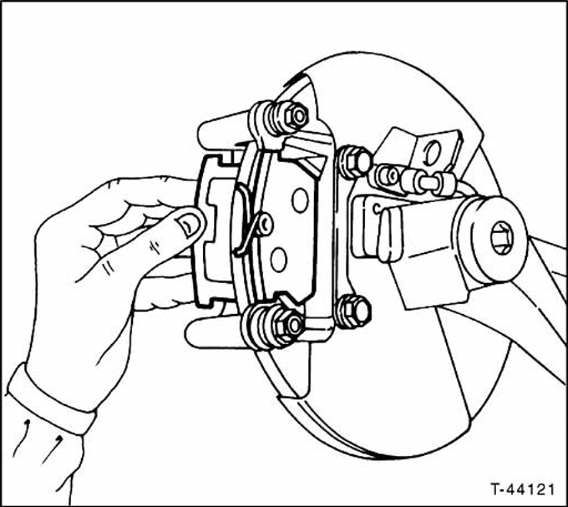
Remove the brake pads from the brake carrier.
Clean the guide surface and the seat of the pads in the caliper housing slot with a suitable soft wire brush and a vacuum cleaner, or wipe with a cloth and denatured alcohol.
Do not use mineral oil-based solvents or sharp-edged tools.
Before installing new pads, check the brake disc for grooves by running your fingers over the surface. Replace brake discs with deep grooves. Clean discs with grey or blue discoloration before installing new pads.
Measure brake disc thickness, see page 176.
Check the seal and protective cap for cracks. Have damaged parts replaced immediately, as dirt that gets in quickly causes the caliper to leak. The floating caliper must be removed and disassembled for this (workshop job).
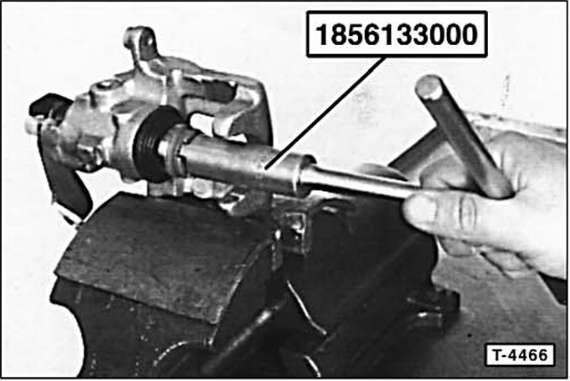
Turn the piston clockwise with special tool Fiat-1856133000 or Hazet-4960-1 and screw it in under firm pressure. If the special tool is not available, pass a flat steel bar through the 2 slots of the brake piston and turn the piston back.
Caution: the brake piston must not be pushed back with a piston reset tool or a hammer handle, otherwise the automatic adjuster in the brake caliper will be destroyed.
Caution: when the pistons are turned back, brake fluid is forced from the brake cylinders into the brake fluid reservoir.
Monitor the fluid in the reservoir; if necessary, extract brake fluid with a suction pump.Use a bleeder bottle or a plastic bottle that only comes into contact with brake fluid for suction. Do not use drinking bottles! Brake fluid is toxic and must under no circumstances be siphoned up through a hose with the mouth. Use a suction pump.
Even after replacing the brake pads, do not exceed the MAX mark on the brake fluid reservoir, as the fluid expands when heated.
Leaked brake fluid runs down the brake master cylinder, damages the paint and causes rust formation.
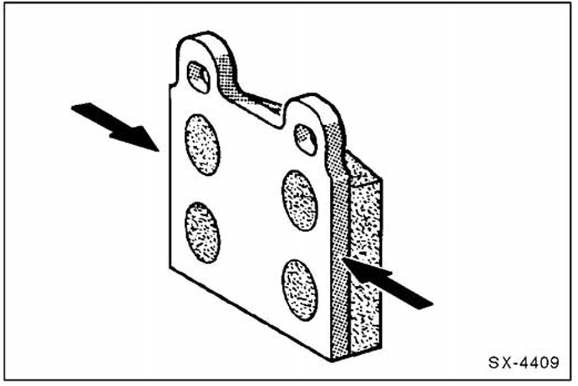
The following step is not absolutely necessary: to prevent disc brake squeal, the back of the brake pads and the side parts of the backing plate (arrows) can be thinly coated with lubricant (e.g. Plastilube, Tunap VC 582/S, Chevron SRJ/2, Liqui Moly LM-36 or LM-508-ASC). The paste must never get onto the brake pad friction material or the brake disc. If necessary, wipe off the paste immediately and clean the brake pad with denatured alcohol.
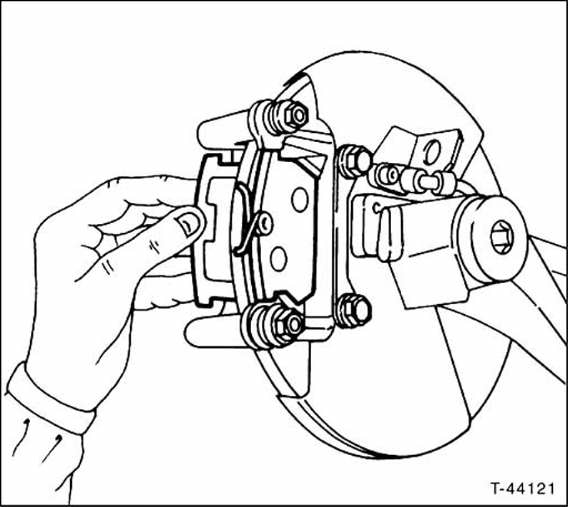
Insert both brake pads into the brake carrier. Make sure the compression springs are parallel to the upper edge of the pad.
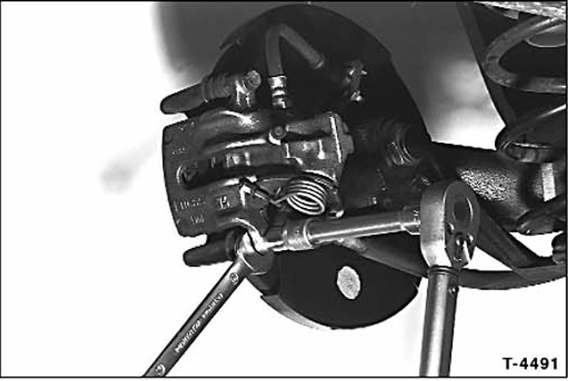
Position the brake caliper, press it on and bolt it to the brake carrier with new self-locking bolts and 50 N·m. Counter-hold the guide pin with an open-end wrench. Caution: self-locking mounting bolts must be replaced every time they are loosened or removed.
Fit the rear wheels so that the marks made during removal line up. Beforehand, lightly grease the centering seat of the rim on the wheel hub and the conical surface of the wheel bolts with wheel bearing grease. Do not grease or oil the threads of the wheel bolts. Install the wheels.
Lower the vehicle and tighten the wheel bolts crosswise to 90 N·m.
Adjust the parking brake.
Are the brake hose connections tightened?
Is the brake hose seated in the bracket?
Are the bleeder screws tightened?
Is there enough brake fluid in the reservoir?
With the engine running, carry out a leak check.
To do this, press the brake pedal with 200 to 300 N (equivalent to 20 to 30 kg) for about 10 seconds. The brake pedal must not sink. Check all connections for leaks.
Bed in new brake pads carefully: on a quiet road, brake several times from approx. 80 km/h to 40 km/h with light pedal pressure.
Let the brakes cool down somewhat between applications.
Note: brake pads must be disposed of as hazardous waste.
Local authorities can advise whether disposal with commercial waste similar to household waste is permitted.
Test yourself
A quick Fiat Bravo quiz: every answer comes with an explanation and a link to the manual page.