Removing and installing the camshaft
The removal procedure described is for the 1.4-L engine; observe the notes for the other engines where they differ.
Caution: if valve train parts are reused, they must be installed in the same position. To avoid mix-ups, it is recommended to make a suitable parts tray. RemovalRemove the cylinder head cover, see page 36.
Diesel engine: remove the vacuum pump, see page 58.
Remove the timing belt cover and turn the crankshaft to TDC for cylinder 1. Loosen the timing belt tension and remove it only from the top of the camshaft sprocket, see page 22.
Caution: do not change the engine position again.
Mark the position of the camshaft sprocket relative to the camshaft with a scribe or paint so that the sprocket is refitted in the same position.
Otherwise, precise adjustment of the engine timing is only possible with the Fiat special tools, see chapter "Timing belt removal". The camshaft sprocket sits on a taper and can be shifted freely.
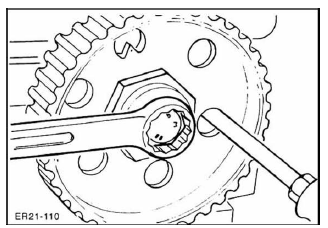
Hold the camshaft sprocket from the front with a screwdriver. Unscrew and remove the camshaft sprocket. If necessary, drive it off carefully with light blows from a rubber mallet.
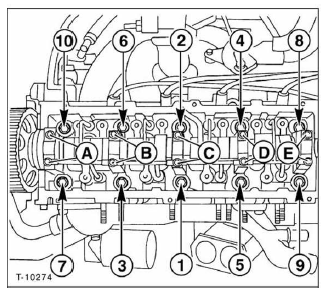
Mark the installed position of the bearing caps with paint for refitting. Remove bolts - b - and - d - and take off the bearing cap. Then unscrew the center bearing cap, bolts - c -. Finally, loosen bolts - a - and - e - alternately and crosswise, arrows. Caution: bolts marked with numbers do not need to be loosened.
Remove the oil feed pipe and take out the camshaft.
The surfaces of the cams and bearing journals must not show scuffing or scoring. Otherwise, replace the camshaft.
Reinstall the tappets in the same position with the adjusting shims. Lightly oil the tappets and do not tilt them when inserting.
Caution: the tappets must not be mixed up.
Always replace the seal ring on the timing belt side of the camshaft. Oil it before installation.
Oil the camshaft and install it. Caution: the cams for cylinder 1 must point upward.
Install the bearing caps according to the markings made earlier.
Place the oil feed pipe on bearing shells 1 to 5 as before removal. The oil feed nozzle on the oil pipe must engage the bore in the cylinder head.
Tighten bearing caps 1 and 5 alternately and crosswise to 15 N·m.
Install bearing cap 3 and tighten to 15 N·m.
Install bearing caps 2 and 4 and tighten to 15 N·m.
Fit the camshaft sprocket so that the mark aligns with the camshaft. Tighten the bolt to 80 N·m.
Hold the camshaft sprocket with a dowel pin while tightening. Caution: on the 1.8 L and 2.0 L engines, tighten the camshaft sprocket to 120 N·m.
Place the timing belt on the camshaft sprocket and tension it.
Make sure the crankshaft and camshaft are in the correct position, see page 22.
Install timing belt cover.
Diesel engine: adjust valve clearance, see page 55.
On the other engines, valve clearance is set automatically by the hydraulic valve lash adjusters. After installing the camshaft, do not start the engine for 30 minutes, otherwise the valves may contact the pistons. As a safety check that the engine turns freely, turn the engine by hand through 2 crankshaft revolutions. Turning the engine by hand, see page 22.
Install the cylinder head cover. See page 36.
Diesel engine: install the vacuum pump, see page 58.
Test yourself
A quick Fiat Bravo quiz: every answer comes with an explanation and a link to the manual page.