Checking/adjusting valve clearance (diesel engine)
A certain valve clearance must be present to compensate for different thermal expansion in the valve train.
If the clearance is too small, valve timing changes, compression is poor, engine power decreases and engine running becomes irregular. In extreme cases, valves may warp or valves or valve seats may burn.
If the clearance is too large, strong mechanical noises occur, valve timing changes, and the engine produces less power due to poor cylinder filling, and engine running becomes irregular.
Petrol engines have hydraulic valve lash adjusters that always keep the valve clearance at zero.
On diesel engines, valve clearance must be checked and corrected if necessary as part of maintenance every 40,000 km.
Valve clearance is checked or adjusted with the engine cold and stationary.
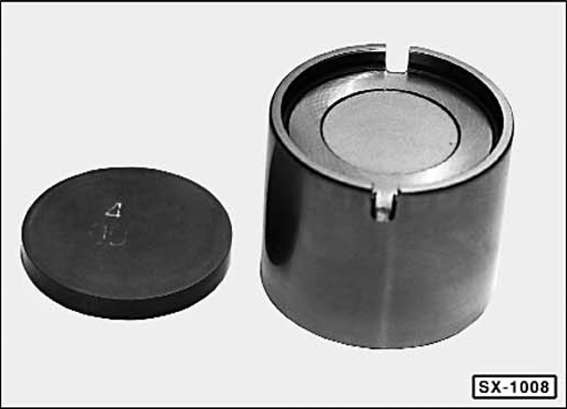
Valve clearance is adjusted using adjusting shims of different thicknesses. The adjusting shims are located on top of the bucket tappets. For adjusting valve clearance, Fiat spare part shims are available in thicknesses from 3.25 mm to 4.70 mm, in steps of 0.05 mm.
The thickness of the adjusting shims is stamped on the underside.
When installing, make sure this marking faces down, i.e. toward the bucket tappet.
Used adjusting shims may be reused if there is no mechanical damage.
The following are required for adjusting valve clearance: a tappet depressor for the bucket tappets and pliers for replacing the valve adjusting shims.
Remove the cylinder head cover, see page 36.
To adjust each valve, the engine must be turned further. The engine (crankshaft) can be turned in several ways:
Turn the crankshaft at the centre bolt of the crankshaft pulley. Beforehand, place the transmission in neutral and apply the parking brake.
Park the vehicle on a level surface. Engage fifth gear.
Push the vehicle forward, or have it pushed forward.
Raise the front of the vehicle on the side. Engage fifth gear and apply the parking brake. Turn the raised front wheel. This also turns the engine crankshaft.
An assistant is required to turn the wheel.
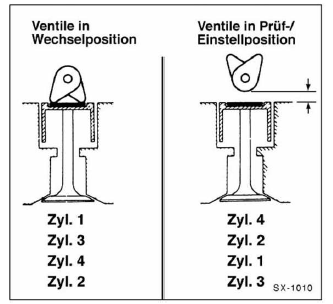
It is expedient to first position the engine so that the valves for cylinder 1 point evenly downward, see left part of the illustration. The intake and exhaust valves for cylinder 1 are then in the transition position.
Cylinder 1 is located opposite the transmission on the timing belt side of the engine, on the right when viewed in the direction of travel. Then turn the crankshaft half a revolution at a time and check valve clearance for the following cylinders in firing order 1-3-4-2.
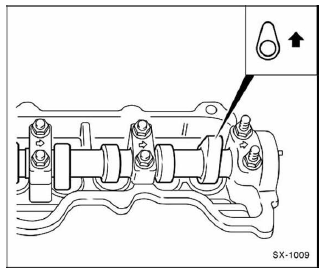
Another way to adjust the valves: position the camshaft by moving the vehicle so that on one valve the cam points away from the valve, i.e. upward. The base circle of the cam then does not rest on the bucket tappet, see drawing. Check the clearance in this position and correct it if necessary.
Mark the cam with a colored pencil.
Move the vehicle slightly again until the cam of another valve is not resting on its bucket tappet. The order of valve adjustment does not matter. The cams are marked so that it is known which valve clearance has already been checked.
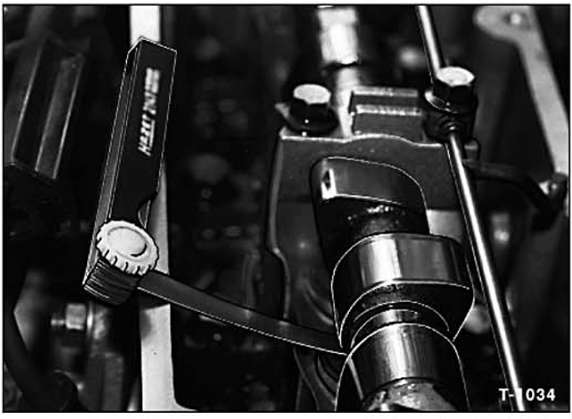
Measure valve clearance with a feeler gauge between the cam lobe and the bucket tappet.
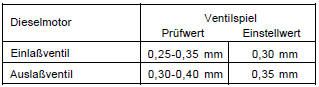
Valve clearance is correct when the feeler gauge can be pulled through with slight drag. If the nominal value is not reached, adjust the valve clearance of the relevant valve. Record the measured valve clearance of each valve.
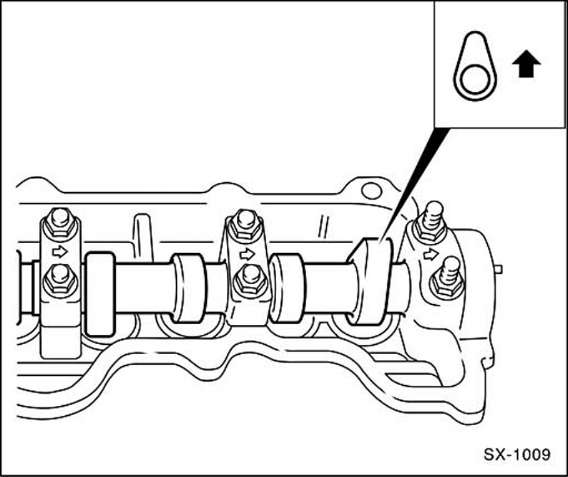
Caution: when adjusting valve clearance, i.e. when changing the valve adjusting shim, the cam must point upward.

Before inserting the depressor, turn the bucket tappet so that the tappet groove points forward.
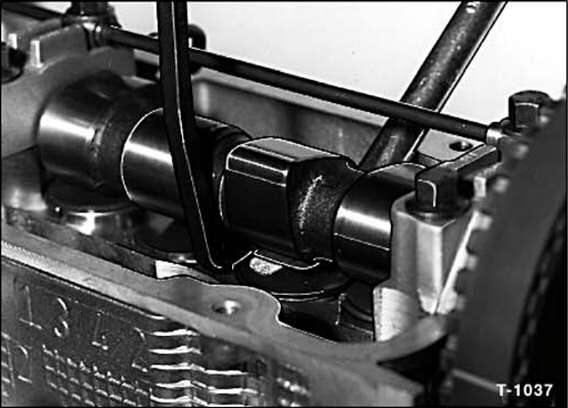
To correct valve clearance, Fiat workshops use the special tool shown (No. 1860443000 and 1860724000), which is offered in similar designs by various tool manufacturers. Valve adjustment is not possible without these tools.
The bucket tappet is depressed with the depressor.
The retaining tool is clamped between the tappet edge and the camshaft.
This allows the adjusting shim to be removed using pliers (for example Hazet, no. 2599) or a scribe.
Insert the required adjusting shim (see calculation example).
The marking must face downward. Coat the shim with engine oil beforehand.
Note: as mileage increases, valve seating and hardening reduce the valve clearance. This means the existing adjusting shim is then too thick and must be replaced with a thinner one.
Example for calculating shim thickness: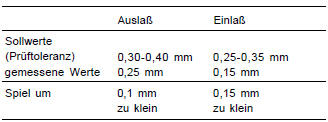
If the values are within tolerance, the adjusting shims do not need to be replaced. If the tolerance is exceeded, aim for the target setting, for example 0.30 mm, when adjusting.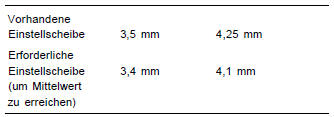
Check the valve clearance again, then turn the engine further.
Check or adjust the clearance on all remaining valves in the same way.
Install the cylinder head cover. See page 36.
Test yourself
A quick Fiat Bravo quiz: every answer comes with an explanation and a link to the manual page.