Remove and install cylinder head
Remove cylinder head only when the engine is cold.
Removal is described in detail for the 1.4/1.6/1.8 L engines; special notes are given for the other engine versions. Exhaust and intake manifolds with throttle body remain connected.
A defective cylinder head gasket can be recognized by the following symptoms:
Loss of power.
Coolant loss. White exhaust smoke when the engine is warm.
Oil loss.
Coolant in engine oil, oil level does not drop but rises. Gray color of engine oil, foam bubbles on dipstick, oil thin.
Engine oil in coolant.
Coolant bubbling strongly.
No compression in 2 adjacent cylinders.
Caution: Always disconnect the battery negative (-) cable before removing the cylinder head. This erases electronic memories, such as engine operating values.
Observe the notes in the chapter "Removing and installing the battery".
1.4 L engine RemovalDisconnect the lower coolant hose from the radiator and drain and catch the coolant, as it can be reused. See also page 71.
Disconnect the upper coolant hose from the radiator at the cylinder head. First loosen the hose clamp.
Disconnect the coolant hose to the cabin heater at the thermostat (cylinder head). Loosen the hose clamp first.
Remove the injection unit. See page 106.
Remove the cylinder head cover, see page 36.
Remove spark plugs, see page 298.
Unbolt the front exhaust pipe from the manifold. See page 120.
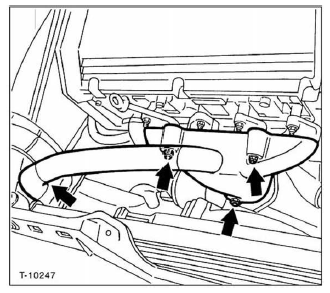
Unbolt the air preheating plate from the exhaust manifold,

Unbolt the exhaust manifold (arrows). Not all flange nuts are visible in the illustration.
Disconnect the reverse gear switch connector above the clutch lever on the transmission.
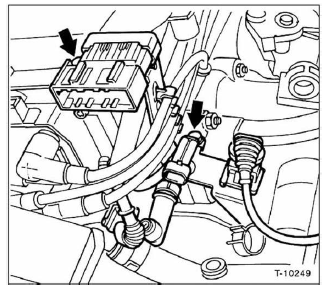
Disconnect the 2 connectors on the ignition coils. Separate the wide engine connector above the ignition coils. Unbolt the retaining bracket for the wide connector (arrows) and set it aside.
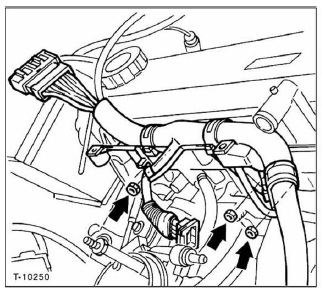
Unbolt the cable duct and the engine ground cable (arrows),
Disconnect the vacuum hose for the brake booster from the intake manifold.
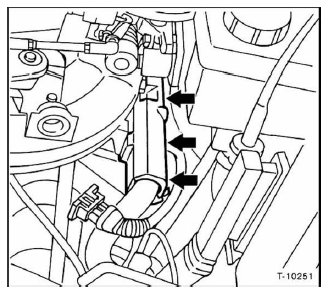
Open the cable duct below the intake manifold by hand (arrows) and set it aside outside the work area.
Do not reuse drained oil. Dispose of it in an environmentally responsible way.

Unbolt the oil dipstick tube from its bracket (arrow) and pull it out of the engine block from below.
Remove the timing belt cover. Turn the engine to TDC (top dead center) for cylinder 1 and remove the timing belt from the upper camshaft sprocket. See page 22.
Label all cables and hoses that still lead to the cylinder head with masking tape and disconnect them.
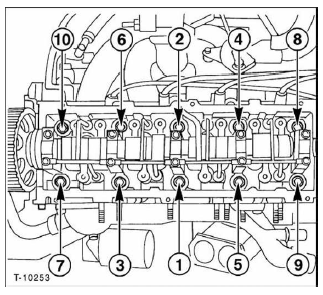
Loosen the cylinder head bolts in reverse order of numbering, i.e. from 10 to 1, using a long socket wrench for hex socket bolts.
Caution: Do not remove the bolts completely at once, to avoid distorting the cylinder head. Loosen all bolts in reverse order, first 1a, then by 1/4 turn.
Lift off the complete cylinder head with intake manifold.
Before installation, clean the gasket residue from the cylinder head and cylinder block using a suitable scraper. Make sure no gasket residue falls into the bores.
If necessary, close the bores beforehand with rags.
Check the cylinder head and engine block for warpage in longitudinal and transverse directions using a steel straightedge and feeler gauge. If necessary, rework (workshop task). Unevenness must not exceed 0.1 mm.
Check the cylinder head for cracks and the cylinder running surfaces for scoring.
Carefully clean the cylinder head bolt bores of oil and other residue. Caution: There must be no oil in the blind holes, otherwise the bolts will not apply full clamping force to the cylinder head even if tightened to the correct torque. The engine block may also crack.
For cleaning, use compressed air, or wrap a rag around a screwdriver and clean the bores with it.
Always replace the cylinder head gasket.
Caution: The cylinder head gasket is of the type "Astadur".
The special nature of the gasket causes it to polymerize, i.e. harden, during later engine operation. For polymerization to occur, the following conditions must be met:Store the gasket in its undamaged original packaging.
Do not remove the gasket from its packaging until shortly before installation.
Do not soil the gasket or wet it with oil.
Clean the engine block and cylinder head gasket surfaces free of oil and grease using a lint-free cloth and solvent (for example denatured alcohol).
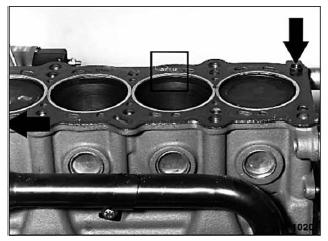
Place the new gasket without sealant so that no bores are covered. The marking "ALTO" on the cylinder head gasket must face up, see detail in the illustration. The two guide bushings (arrows) must also sit correctly in the engine block.
Before fitting the cylinder head, check that the camshaft and crankshaft are at TDC. See page 22.
Fit the cylinder head with an assistant.
Always replace the cylinder head bolts during repairs.
Clean the cylinder head bolts and washers and oil them with engine oil. After oiling, let the parts drain for at least 30 minutes.
Insert all cylinder head bolts and tighten them by hand.
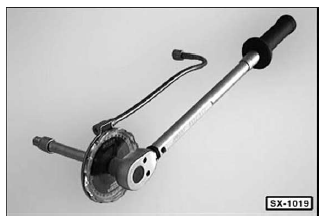
Caution: Tightening the cylinder head bolts must be carried out with the greatest care. Before tightening the bolts, the torque wrench should be checked for accuracy. Tightening the cylinder head bolts through the specified angles is made easier with an angle gauge, for example Hazet 6690. To avoid overloading the torque wrench, the angle gauge should only be used together with a rigid wrench.
Note: If no angle gauge is available, estimate the angle of rotation. To do this, fit a rigid wrench, mark the 90° position on the cylinder head with chalk, and turn the wrench arm until it reaches the mark.
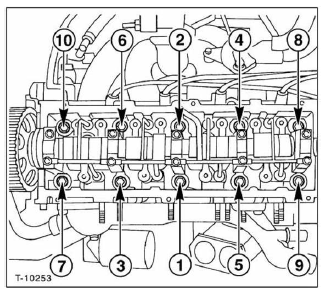
The cylinder head bolts are tightened in 3 stages.
In each stage, tighten the cylinder head bolts in sequence from 1 to 10.
Fit the timing belt onto the camshaft sprocket and tension it. See page 22.
Install the timing belt cover.
Install the cylinder head cover. See page 36.
Install the exhaust manifold. Carefully clean the sealing surfaces of soot using a wooden spatula. Place a new gasket between the exhaust manifold and cylinder head.
Use new self-locking special nuts for the exhaust manifold. Tighten the nuts crosswise, first by hand, then in the next pass to 25 N·m.
Bolt the air preheating plate to the exhaust manifold.
Install the exhaust pipe on the exhaust manifold. See page 121.
Insert the oil dipstick tube and bolt on the bracket. See illustration T-10252 under "Removal".
Insert the cable duct below the intake manifold and clip it in place.
Connect the vacuum hose for the brake booster to the intake manifold.
Bolt on the cable duct and engine ground cable. See "Removal".
Connect the ignition coil connectors. Bolt the wide engine connector to its bracket. Join the engine connector halves.
Connect the reverse gear switch connector to the transmission.
Fit the spark plugs, see page 298.
Install the injection unit. See page 106.
Connect the lower and upper coolant hoses to the radiator and tighten the hose clamps.
Connect the coolant hose to the cabin heater at the thermostat (cylinder head) and tighten the hose clamps.
Refill the coolant. See page 71.
Check the engine oil level and top up with oil if necessary.
If the cylinder head was removed due to a defective cylinder head gasket, an early oil change including an oil filter change is recommended, as the engine oil may contain coolant.
Disconnect the negative (-) battery terminal. Set the clock and enter the radio anti-theft code.
Test yourself
A quick Fiat Bravo quiz: every answer comes with an explanation and a link to the manual page.