ECU Terminals
ECU TERMINALS
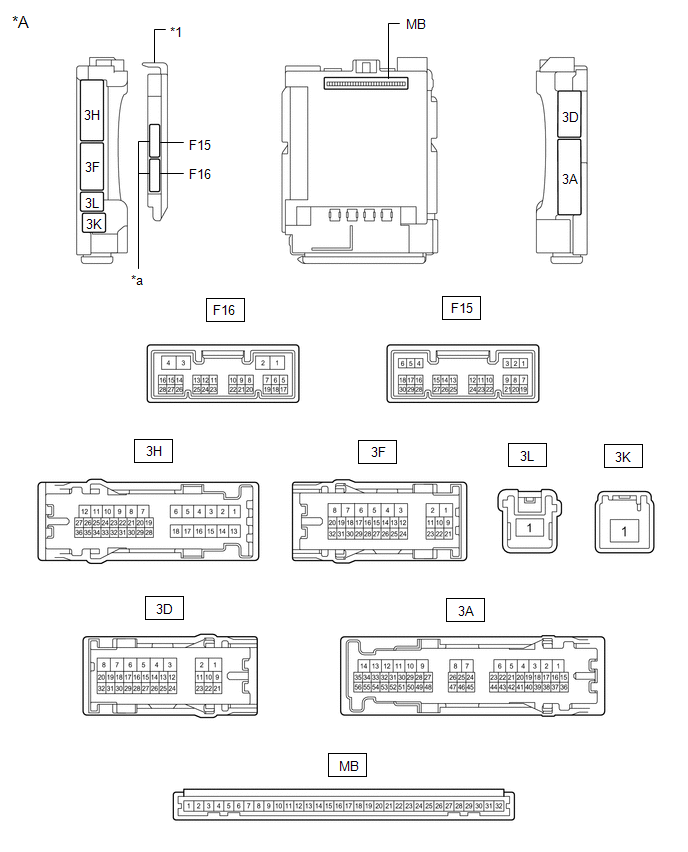
*A |
Main Body ECU (Multiplex Network Body ECU) with 2 connectors |
- |
- |
*1 |
Main Body ECU (Multiplex Network Body ECU) with 2 connectors |
- |
- |
*a |
2 connectors |
- |
- |
CHECK INSTRUMENT PANEL JUNCTION BLOCK ASSEMBLY AND MAIN BODY ECU (MULTIPLEX NETWORK BODY ECU)
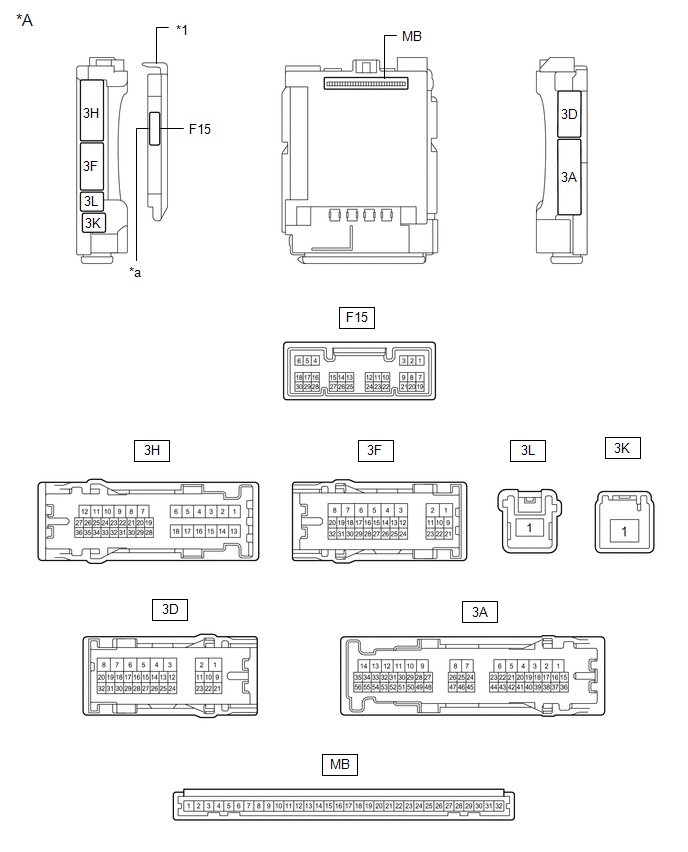
*A |
Main Body ECU (Multiplex Network Body ECU) with 1 connector |
- |
- |
*1 |
Main body ECU (multiplex network body ECU) |
- |
- |
*a |
Main body ECU (multiplex network body ECU) |
- |
- |
(a) Disconnect the connectors from the instrument panel junction block assembly and the main body ECU (multiplex network body ECU).
(b) Measure the voltage of the connector on the wire harness side according to the value(s) in the table below.
Terminal No. (Symbol) | Wire Color | Terminal Description | Condition | Specified Condition |
|---|---|---|---|---|
3F-1 - Body Ground |
W - Body Ground |
Battery power supply |
Always |
11 à 14 V |
3K-1 - Body Ground |
B-R - Body Ground |
Battery power supply |
Always |
11 à 14 V |
If the result is not as specified, there may be a malfunction in the wire harness.
(c) Measure the resistance of the connector on the wire harness side according to the value(s) in the table below.
Terminal No. (Symbol) | Wire Color | Terminal Description | Condition | Specified Condition |
|---|---|---|---|---|
3D-3 - Body Ground |
W-B - Body ground |
Ground |
Always |
Below 1 Ω |
If the result is not as specified, there may be a malfunction in the wire harness.
(d) Reconnect the connectors to the instrument panel junction block assembly and the main body ECU (multiplex network body ECU).
(e) Measure the voltage and check the pulses according to the value(s) in the table below.
Terminal No. (Symbol) | Wire Color | Terminal Description | Condition | Specified Condition |
|---|---|---|---|---|
3H-30 - Body Ground |
G - Body ground |
Tail Lights and License Plate Lights Emit Light While Driving |
Light control switch in TAIL or HEAD position |
11 à 14 V |
Light Control Switch in OFF position*1 |
Below 1 V |
|||
3A-52 - Body Ground*2 |
L - Body ground |
Front Fog Light Control Output |
Light Control Switch in TAIL or HEAD position, Fog Light Switch in front position |
Below 1 V |
Light Control Switch in TAIL or HEAD position, Fog Light Switch in OFF position |
11 à 14 V |
|||
3F-31 - Body Ground |
G - Body ground |
LH H-LP Relay Control Output |
Ignition Switch in OFF position |
11 à 14 V |
Ignition Switch in ON position |
Below 1 V |
|||
F15-1 (DIM) - Body Ground |
Y - Body Ground |
RH H-LP Relay Control Output |
Ignition Switch in OFF position |
11 à 14 V |
Ignition Switch in ON position |
Below 1 V |
|||
F15-8 (A) - Body Ground |
W - Body Ground |
Light Control Switch AUTO Position Signal Input |
Light Control Switch in AUTO position |
Below 1 V |
Light Control Switch is not in AUTO position |
Pulse generation |
|||
F15-10 (HF) - Body Ground |
LG - Body ground |
Headlight Dimmer Switch HIGH FLASH Position Signal Input |
Headlight Dimmer Switch in HIGH FLASH position |
Below 1 V |
Headlight Dimmer Switch in position other than HIGH FLASH |
Pulse generation |
|||
F15-12 (HEAD) - Body Ground |
L - Body ground |
Light Control Switch HEAD Position Input |
Light Control Switch in HEAD position |
Below 1 V |
Light Control Switch is not in HEAD position |
Pulse generation |
|||
F15-19 (CLTB) - F15-21 (CLTE) |
G - V |
Auto Light Control Sensor Power Supply Output |
Ignition Switch in OFF position |
Below 1 V |
Ignition Switch in ON position |
11 à 14 V |
|||
F15-20 (CLTS) - Body Ground |
BE - Body ground |
Automatic light control sensor signal input |
Ignition Switch in OFF position |
Below 1 V |
Automatic light control system operation |
Communication waveform generation (See waveform 1) |
|||
F15-22 (TAIL) - Body ground |
Y - Body Ground |
Light control switch TAIL position signal input |
Light control switch in TAIL or HEAD position |
Below 1 V |
Light control switch not in TAIL (parking lights) or HEAD (headlights) position |
Pulse generation |
|||
F15-24 (HU) - Body ground |
GR - Body ground |
High beam/low beam switch HIGH position signal input |
Dimmer switch in HIGH position |
Below 1 V |
High beam/low beam switch not in HIGH position |
Pulse generation |
|||
F15-26 (FFOG) - Body ground*2 |
R - Body ground |
Front fog light switch input in front position |
Fog Light Switch in FRONT Position |
Below 1 V |
Fog Light Switch in OFF Position |
Pulse generation |
|||
F16-4 (MILLE) - Body ground*3 |
R - Body ground |
Outside rear view mirror courtesy light control output |
Outside rear view mirror courtesy light comes on |
11 à 14 V |
Outside rear view mirror courtesy light off |
Below 3 V |
- *1: If the light switch does not have an OFF position, set the light switch to "Auto" with the low beams off. If the low beams are on, direct a fluorescent light or another light source at the light sensor to switch to daytime mode.
- *2: With fog light
- *3: With outside rear view mirror courtesy light
If the result does not conform to the specifications, there may be a malfunction in the main body ECU (multiplex network body ECU) or the instrument panel junction block assembly.
(1) Waveform 1
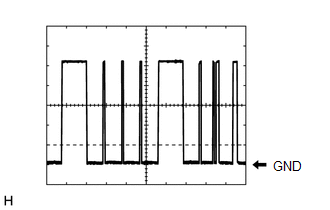
Item | Content |
|---|---|
Oscilloscope Setting |
2 V/DIV., 10 ms/DIV. |
HINT:
The communication waveform changes depending on the ambient brightness.
CHECK LH HEADLIGHT ECU SUB-ASSEMBLY (for LED headlights)
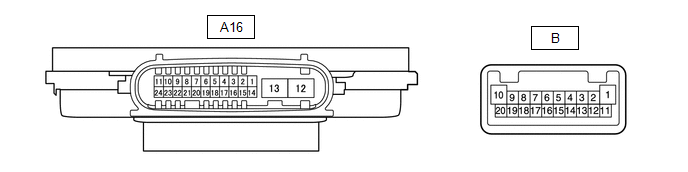
(a) Disconnect the A16 connector from the LH headlight ECU sub-assembly.
(b) Measure the resistance and voltage at the wire harness side connector according to the value(s) in the table below.
Terminal No. (Symbol) | Wire Color | Terminal Description | Condition | Specified Condition |
|---|---|---|---|---|
A16-4 (IG) - Body ground |
V - Body ground |
Ignition power supply |
Ignition Switch in OFF position |
Below 1 V |
Ignition Switch in ON position |
11 à 14 V |
|||
A16-13 (ECUB) - Body ground |
L - Body ground |
Battery power supply |
Light control switch in OFF position* |
Below 1 V |
Light control switch in TAIL or HEAD position |
11 à 14 V |
|||
A16-12 (GND) - Body ground |
W-B - Body ground |
Ground |
Always |
Below 1 Ω |
- *: If the light switch does not have an OFF position, set the light switch to "Auto" with the low beams off. If the low beams are on, direct a fluorescent light or another light source at the light sensor to switch to daytime mode.
(c) Reconnect the A16 connector to the LH headlight ECU sub-assembly.
HINT:
- Since the A16 connector of the LH headlight ECU sub-assembly is a waterproof type, voltage cannot be measured directly and pulses cannot be checked directly. The values shown are for reference only.
- Since the B connector of the LH headlight ECU sub-assembly is connected inside the headlight assembly, voltage cannot be measured directly and pulses cannot be checked directly. The values shown are for reference only.
(d) Measure the voltage and check the pulses according to the value(s) in the table below.
Terminal No. (Symbol) | Wire Color | Terminal Description | Condition | Specified Condition |
|---|---|---|---|---|
A16-11 (TNS) - Body ground |
W - Body Ground |
Left turn signal signal output |
Ignition switch ON, left turn signal off |
Below 1 V |
Ignition switch ON, left turn signal flashing |
11 to 14 V ←→ Below 1 V |
|||
A16-16 (SBR) - A16-15 (SGR) |
B - BE |
Left rear height control sensor sub-assembly power supply |
Ignition Switch in ON position |
4,75 à 5,25 V |
A16-17 (SHRL) - A16-15 (SGR) |
W - BE |
Left rear height control sensor sub-assembly signal input |
Ignition switch ON, vehicle unloaded, vehicle stopped |
Approx. 2.5 V (the value decreases as the front of the vehicle is raised) |
A16-20 (LINL) - Body ground |
P - Body ground |
LIN communication line |
Ignition Switch in OFF position |
Below 1 V |
Ignition Switch in ON position |
Pulse generation |
|||
B-20 (DRL+) - B-11 (DRL-) |
- |
High beam relay control output |
High beams off |
Below 1 V |
High beams on |
11 à 14 V |
|||
B-4 (LOLED2) - B-3 (LOLED0) |
- |
Low beam/high beam status signal output |
Low beams and high beams off |
Below 1 V |
Low beams or high beams on |
11,2 à 17,7 V |
|||
B-7 (ACTBI) - B-17 (ACTGI) |
- |
Headlight range adjustment motor power supply |
Ignition Switch in OFF position |
Below 1 V |
Ignition Switch in ON position |
11 à 14 V |
|||
B-8 (ACTSI) - B-17 (ACTGI) |
- |
Headlight range adjustment motor signal output |
Ignition switch ON, low beams on, vehicle height unchanged |
Below 1 V |
Ignition switch ON, low beams on, vehicle height changed and maintained for more than 3 seconds |
1,0 à 14 V |
|||
B-9 (TURN+) - B-13 (TURN-) |
- |
Left turn signal signal input |
Ignition switch ON, left turn signal off |
Below 1 V |
Ignition switch ON, left turn signal flashing |
11 to 14 V ←→ Below 1 V |
|||
B-16 (PWM1) - B-1 (HI-) |
- |
Daytime running light/position light control signal output |
Daytime running lights and position lights off |
Below 1 V |
Daytime running lights or position lights on |
Pulse generation |
|||
B-10 (HI+) - B-1 (HI-) |
- |
Daytime running light/position light power supply |
Daytime running lights and position lights off |
Below 1 V |
Daytime running lights or position lights on |
11 à 14 V |
CHECK RH HEADLIGHT ECU SUB-ASSEMBLY (for LED headlights)
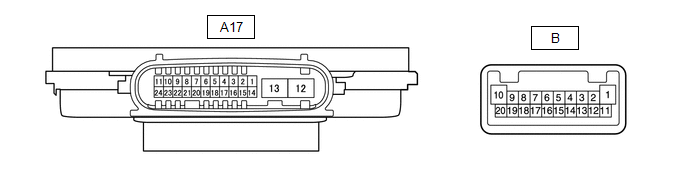
(a) Disconnect the A17 connector from the RH headlight ECU sub-assembly.
(b) Measure the resistance and voltage at the wire harness side connector according to the value(s) in the table below.
Terminal No. (Symbol) | Wire Color | Terminal Description | Condition | Specified Condition |
|---|---|---|---|---|
A17-4 (IG) - Body ground |
V - Body ground |
Ignition power supply |
Ignition Switch in OFF position |
Below 1 V |
Ignition Switch in ON position |
11 à 14 V |
|||
A17-13 (ECUB) - Body ground |
L - Body ground |
Battery power supply |
Light control switch in OFF position* |
Below 1 V |
Light control switch in TAIL or HEAD position |
11 à 14 V |
|||
A17-12 (GND) - Body ground |
W-B - Body ground |
Ground |
Always |
Below 1 Ω |
- *: If the light switch does not have an OFF position, set the light switch to "Auto" with the low beams off. If the low beams are on, direct a fluorescent light or another light source at the light sensor to switch to daytime mode.
(c) Reconnect connector A17 of the right headlight ECU sub-assembly.
HINT:
- Since connector A17 of the right headlight ECU sub-assembly is a waterproof type, voltage cannot be measured directly and pulses cannot be checked directly. The values shown are for reference only.
- Since connector B of the right headlight ECU sub-assembly is connected inside the headlight assembly, voltage cannot be measured directly and pulses cannot be checked directly. The values shown are for reference only.
(d) Measure the voltage and check the pulses according to the value(s) in the table below.
Terminal No. (Symbol) | Wire Color | Terminal Description | Condition | Specified Condition |
|---|---|---|---|---|
A17-11 (TNS) - Body ground |
B - Body ground |
Right turn signal input signal |
Ignition switch ON, right turn signal off |
Below 1 V |
Ignition switch ON, right turn signal flashing |
11 to 14 V ←→ Below 1 V |
|||
A17-20 (LINL) - Body ground |
P - Body ground |
LIN communication line |
Ignition Switch in OFF position |
Below 1 V |
Ignition Switch in ON position |
Pulse generation |
|||
B-20 (DRL+) - B-11 (DRL-) |
- |
High beam relay control output |
High beams off |
Below 1 V |
High beams on |
11 à 14 V |
|||
B-4 (LOLED2) - B-3 (LOLED0) |
- |
Low beam/high beam status signal output |
Low beams and high beams off |
Below 1 V |
Low beams or high beams on |
11,2 à 17,7 V |
|||
B-7 (ACTBI) - B-17 (ACTGI) |
- |
Headlight range adjustment motor power supply |
Ignition Switch in OFF position |
Below 1 V |
Ignition Switch in ON position |
11 à 14 V |
|||
B-8 (ACTSI) - B-17 (ACTGI) |
- |
Headlight range adjustment motor signal output |
Ignition switch ON, low beams on, vehicle height unchanged |
Below 1 V |
Ignition switch ON, low beams on, vehicle height changed and maintained for more than 3 seconds |
1,0 à 14 V |
|||
B-9 (TURN+) - B-13 (TURN-) |
- |
Right turn signal output signal |
Ignition switch ON, right turn signal off |
Below 1 V |
Ignition switch ON, right turn signal flashing |
11 to 14 V ←→ Below 1 V |
|||
B-16 (PWM1) - B-1 (HI-) |
- |
Daytime running light/position light control signal output |
Daytime running lights and position lights off |
Below 1 V |
Daytime running lights or position lights on |
Pulse generation |
|||
B-10 (HI+) - B-1 (HI-) |
- |
Daytime running light/position light power supply |
Daytime running lights and position lights off |
Below 1 V |
Daytime running lights or position lights on |
11 à 14 V |
CHECK COMBINATION METER ASSEMBLY
Click here