Floor Light Circuit
DESCRIPTION
The main body ECU (multiplex network body ECU) controls the outside rear view mirror puddle lights.
WIRING DIAGRAM
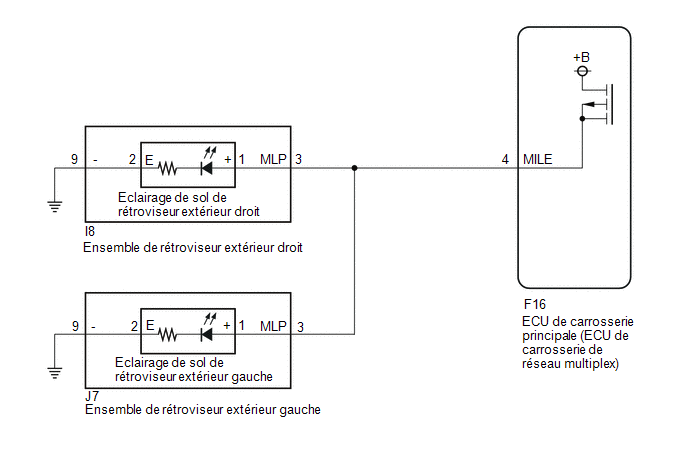
PROCEDURE
PERFORM ACTIVE TEST USING TECHSTREAM
(a) Connect the Techstream to the DLC3.
(b) Turn the ignition switch to ON.
(c) Turn on the Techstream.
(d) Select the following menu items: Body Electrical / Main Body / Active Test.
(e) Perform the Active Test by following the Techstream instructions.
Body Electrical > Main Body > Active TestTester display | Item | Control Range | Diagnostic Note |
|---|---|---|---|
Side Mirror Foot Light |
Side Mirror Foot Lights |
ON or OFF |
- |
Side Mirror Foot Light
OK:
The outside rear view mirror puddle light comes on.
Result:
Result | Proceed to |
|---|---|
OK |
A |
NG (for left side) |
B |
NG (for right side) |
C |
| A |  |
GO TO APPLICABLE SYSTEM AS INDICATED IN THE PROBLEM SYMPTOMS TABLE |
| C | |
GO TO STEP 5 |
|

CHECK LH OUTSIDE REAR VIEW MIRROR ASSEMBLY (POWER SOURCE)
(a) Disconnect the J7 connector from the left outer mirror assembly.
(b) Measure the voltage according to the value(s) in the table below.
Standard voltage:
Tester Connection | Condition | Specified Condition |
|---|---|---|
J7-3 (MLP) - Body ground |
The outside rear view mirror puddle light condition * is met |
11 à 14 V |
- *: Refer to the System Description section for the operating conditions of the outside rear view mirror light assembly.
Click here

| NG | |
REPAIR OR REPLACE HARNESS OR CONNECTOR |
|
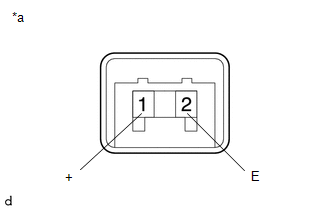
CHECK LH OUTSIDE REAR VIEW MIRROR PUDDLE LIGHT
(a) Remove the LH outside rear view mirror puddle light.
Click here
(b) Check the LH outside rear view mirror puddle light. (1) Apply battery voltage between the terminals of the LH outside rear view mirror puddle light and check that the LH outside rear view mirror puddle light illuminates. OK:
|
|
| NG | |
REPLACE LH OUTSIDE REAR VIEW MIRROR PUDDLE LIGHT |
|
CHECK WIRE HARNESS AND CONNECTOR (LH OUTSIDE REAR VIEW MIRROR ASSEMBLY - BODY GROUND)
(a) Disconnect connector J7 from the LH outside rear view mirror assembly.
(b) Measure the resistance according to the value(s) in the table below.
Standard resistance:
Tester Connection | Condition | Specified Condition |
|---|---|---|
J7-9 (-) - Body ground |
Always |
Below 1 Ω |
| OK | |
REPLACE LEFT OUTER MIRROR ASSEMBLY |
| NG | |
REPAIR OR REPLACE HARNESS OR CONNECTOR |
CHECK RH OUTSIDE REAR VIEW MIRROR ASSEMBLY (POWER SOURCE)
(a) Disconnect the I8 connector from the right outer mirror assembly.
(b) Measure the voltage according to the value(s) in the table below.
Standard voltage:
Tester Connection | Condition | Specified Condition |
|---|---|---|
I8-3 (MLP) - Body ground |
The outside rear view mirror puddle light condition * is met |
11 à 14 V |
- *: Refer to the System Description section for the operating conditions of the outside rear view mirror light assembly.
Click here
| NG | |
REPAIR OR REPLACE HARNESS OR CONNECTOR |
|
CHECK RH OUTSIDE REAR VIEW MIRROR PUDDLE LIGHT
(a) Remove the RH outside rear view mirror puddle light.
Click here
(b) Check the RH outside rear view mirror puddle light. (1) Apply battery voltage between the terminals of the RH outside rear view mirror puddle light and check that the RH outside rear view mirror puddle light illuminates. OK:
|
|
| NG | |
REPLACE RH OUTSIDE REAR VIEW MIRROR PUDDLE LIGHT |
|
CHECK WIRE HARNESS AND CONNECTOR (RH OUTSIDE REAR VIEW MIRROR ASSEMBLY - BODY GROUND)
(a) Disconnect the I8 connector from the right outer mirror assembly.
(b) Measure the resistance according to the value(s) in the table below.
Standard resistance:
Tester Connection | Condition | Specified Condition |
|---|---|---|
I8-9 (-) - Body ground |
Always |
Below 1 Ω |
| OK | |
REPLACE RIGHT OUTER MIRROR ASSEMBLY |
| NG | |
REPAIR OR REPLACE HARNESS OR CONNECTOR |