Power supply circuit
DESCRIPTION
When the ignition switch is in the ON position or the headlight operating conditions are met, the main body ECU (multiplex network body ECU) supplies power to the headlight ECU sub-assemblies via the No. 1 integration relay.
When the ignition switch is in the ON position, the main body ECU (multiplex network body ECU) supplies power to the headlight ECU sub-assemblies via the No. 1 IG1 relay.
WIRING DIAGRAM
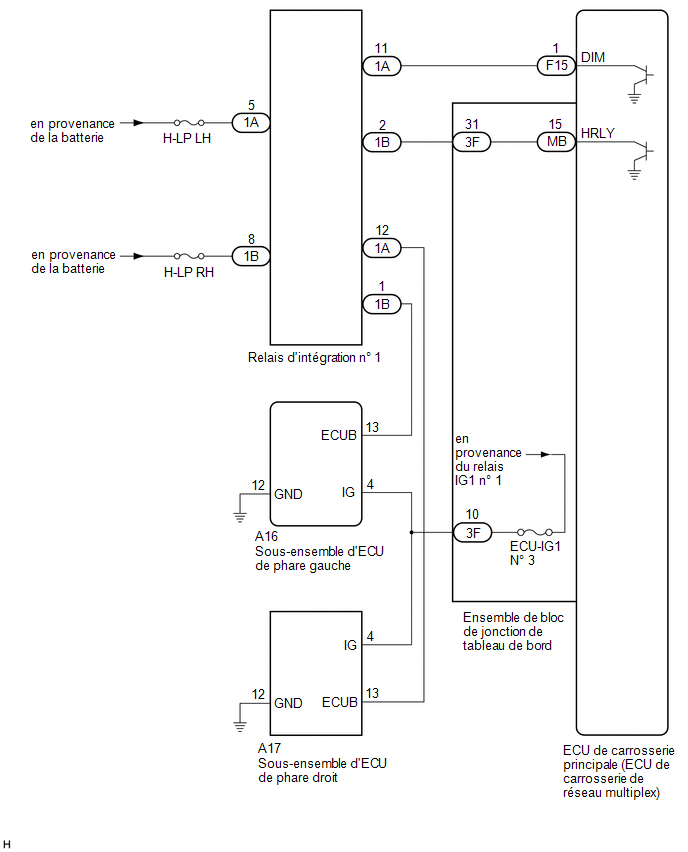
PRECAUTION / NOTICE / HINT
NOTICE:
- Check the fuses for the circuits related to this system before performing the following inspection procedure.
- Before replacing the main body ECU (multiplex network body ECU), refer to the registration section.*1
Click here

- *1: with Smart Key System
PROCEDURE
CHECK WIRE HARNESS AND CONNECTOR (HEADLIGHT ECU SUB-ASSEMBLY - POWER SOURCE AND BODY GROUND)
(a) Disconnect the A16 connector from the LH headlight ECU sub-assembly.
(b) Disconnect connector A17 from the right headlight ECU subassembly.
(c) Measure the voltage according to the value(s) shown in the table below.
Standard voltage:
LH HEADLIGHT ECU SUB-ASSEMBLYTester Connection | Ignition switch position | Specified Condition |
|---|---|---|
A16-13 (ECUB) - Body ground |
Ignition Switch in ON position |
11 à 14 V |
A16-4 (IG) - Body ground |
Ignition Switch in ON position |
11 à 14 V |
Tester Connection | Ignition switch position | Specified Condition |
|---|---|---|
A17-13 (ECUB) - Body ground |
Ignition Switch in ON position |
11 à 14 V |
A17-4 (IG) - Body ground |
Ignition Switch in ON position |
11 à 14 V |
(d) Measure the resistance according to the value(s) in the table below.
Standard resistance:
LH HEADLIGHT ECU SUB-ASSEMBLYTester Connection | Condition | Specified Condition |
|---|---|---|
A16-12 (GND) - Body ground |
Always |
Below 1 Ω |
Tester Connection | Condition | Specified Condition |
|---|---|---|
A17-12 (GND) - Body ground |
Always |
Below 1 Ω |
Result:
Result | Proceed to |
|---|---|
OK |
A |
NG (LH headlight ECU sub-assembly) |
B |
NG (RH headlight ECU assembly) |
C |
| A |  |
GO TO APPLICABLE SYSTEM AS INDICATED IN THE PROBLEM SYMPTOMS TABLE |
| C | |
GO TO STEP 6 |
|

CHECK INTEGRATION RELAY NO. 1 (LH HEADLIGHT RELAY)
(a) Remove integration relay No. 1 from the No. 1 engine room relay block.
Click here
(b) Inspect integration relay No. 1.
Click here
OK:
Integration relay No. 1 operates normally.
| NG | |
REPLACE INTEGRATION RELAY NO. 1 |
|
CHECK HARNESS AND CONNECTOR (INTEGRATION RELAY NO. 1 (LH HEADLIGHT RELAY) - BATTERY)
(a) Measure the voltage according to the value(s) shown in the table below.
Standard voltage:
Tester Connection | Condition | Specified Condition |
|---|---|---|
1A-5 - Body ground |
Always |
11 à 14 V |
| NG | |
REPAIR OR REPLACE HARNESS OR CONNECTOR |
|
INSPECT WIRE HARNESS AND CONNECTOR (INTEGRATION RELAY NO. 1 - INSTRUMENT PANEL JUNCTION BLOCK ASSEMBLY)
(a) Disconnect the 3F connector from the instrument panel junction block assembly.
(b) Measure the resistance according to the value(s) in the table below.
Standard resistance:
Tester Connection | Condition | Specified Condition |
|---|---|---|
1B-2 - 3F-31 |
Always |
Below 1 Ω |
1B-2 or 3F-31 - Body ground |
Always |
10 kΩ minimum |
| NG | |
REPAIR OR REPLACE HARNESS OR CONNECTOR |
|
INSPECT INSTRUMENT PANEL JUNCTION BLOCK ASSEMBLY
(a) Remove the instrument panel junction block assembly.
Click here
(b) Remove the main body ECU (multiplex network body ECU) from the instrument panel junction block assembly.
(c) Measure the resistance according to the value(s) in the table below.
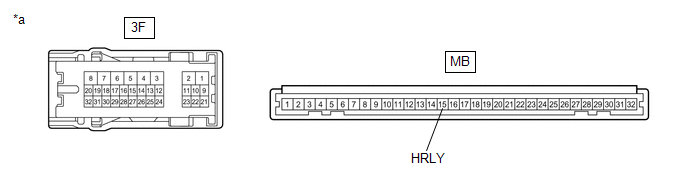
*a |
Component without wire harness connected (instrument panel junction block assembly) |
- |
- |
Standard resistance:
Tester Connection | Condition | Specified Condition |
|---|---|---|
3F-31 - MB-15 (HRLY) |
Always |
Below 1 Ω |
| OK | |
REPLACE MAIN BODY ECU (MULTIPLEX NETWORK BODY ECU) |
| NG | |
REPLACE INSTRUMENT PANEL JUNCTION BLOCK ASSEMBLY |
CHECK INTEGRATION RELAY NO. 1 (RH HEADLIGHT RELAY)
(a) Remove integration relay No. 1 from the No. 1 engine room relay block.
Click here
(b) Inspect integration relay No. 1.
Click here
OK:
Integration relay No. 1 operates normally.
| NG | |
REPLACE INTEGRATION RELAY NO. 1 |
|
CHECK HARNESS AND CONNECTOR (INTEGRATION RELAY NO. 1 (RH HEADLIGHT RELAY) - BATTERY)
(a) Measure the voltage according to the value(s) shown in the table below.
Standard voltage:
Tester Connection | Condition | Specified Condition |
|---|---|---|
1B-8 - Body ground |
Always |
11 à 14 V |
| NG | |
REPAIR OR REPLACE HARNESS OR CONNECTOR |
|
CHECK HARNESS AND CONNECTOR (INTEGRATION RELAY NO. 1 - MAIN BODY ECU (MULTIPLEX NETWORK BODY ECU))
(a) Disconnect the F15 connector from the main body ECU (multiplex network body ECU).
(b) Measure the resistance according to the value(s) in the table below.
Standard resistance:
Tester Connection | Condition | Specified Condition |
|---|---|---|
1A-11 - F15-1 (DIM) |
Always |
Below 1 Ω |
1A-11 or F15-1 (DIM) - Body ground |
Always |
10 kΩ minimum |
| OK | |
REPLACE MAIN BODY ECU (MULTIPLEX NETWORK BODY ECU) |
| NG | |
REPAIR OR REPLACE HARNESS OR CONNECTOR |