Light sensor circuit malfunction (B1244)
DESCRIPTION
The auto light control sensor detects the ambient brightness. The sensor generates an electrical signal based on the detected light intensity and sends a signal to the main body ECU (multiplex network body ECU). The main body ECU (multiplex network body ECU) turns the headlights and taillights on or off based on this signal.
DTC No. | Detection Item | DTC Detection Condition | Suspected Area | Note |
|---|---|---|---|---|
B1244 |
Light sensor circuit malfunction |
One of the following conditions is met
|
|
- |
Vehicle Operating Conditions |
||||
|---|---|---|---|---|
Sequence 1 | Sequence 2 | Sequence 3 |
||
Diagnostic Condition |
Ignition Switch in ON position |
○ |
○ |
○ |
Malfunction Status |
Auto light control sensor malfunction |
○ |
- |
- |
Auto light control sensor circuit open |
- |
○ |
- |
|
Auto light control sensor circuit short |
- |
- |
○ |
|
Detection Duration |
- |
- |
- |
|
Number of Trips |
1 trip(s) |
1 trip(s) |
1 trip(s) |
|
HINT:
The DTC is output when the conditions for any one of the sequences in the table above are met.
WIRING DIAGRAM
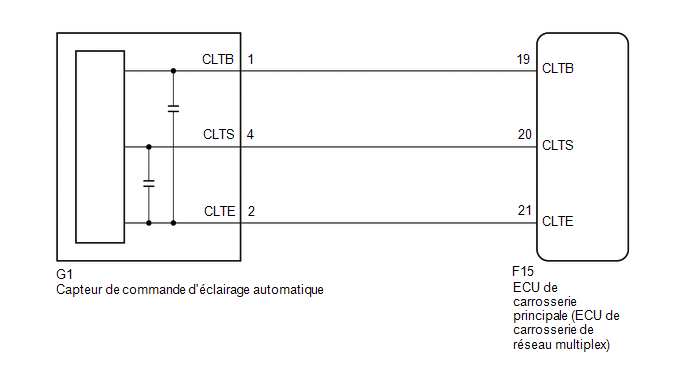
PRECAUTION / NOTICE / HINT
NOTICE:
Before replacing the main body ECU (multiplex network body ECU), refer to the registration section.*1
Click here
- *1: with Smart Key System
PROCEDURE
CHECK VALUE USING TECHSTREAM
(a) Connect the Techstream to the DLC3.
(b) Turn the ignition switch to ON.
(c) Turn on the Techstream.
(d) Select the following menus: Body Electrical / Main Body / Data List.
(e) Read the Data List by following the instructions on the Techstream.
Body Electrical > Main Body > Data ListTester display | Item | Range | Normal Condition | Diagnostic Note |
|---|---|---|---|---|
Light Sensor Illuminance |
Light control sensor illuminance |
0 to 8,191 lx |
The value is output according to the ambient brightness level |
- |
Light Sensor Illuminance
OK:
The normal condition shown above is displayed.
| OK |  |
REPLACE MAIN BODY ECU (MULTIPLEX NETWORK BODY ECU) |
|

CHECK WIRE HARNESS AND CONNECTOR (MAIN BODY ECU (MULTIPLEX NETWORK BODY ECU) - AUTO LIGHT CONTROL SENSOR)
(a) Disconnect the G1 connector from the auto light control sensor.
(b) Disconnect the F15 connector from the main body ECU (multiplex network body ECU).
(c) Measure the resistance according to the value(s) in the table below.
Standard resistance:
Tester Connection | Condition | Specified Condition |
|---|---|---|
F15-21 (CLTE) - G1-2 (CLTE) |
Always |
Below 1 Ω |
F15-20 (CLTS) - G1-4 (CLTS) |
Always |
Below 1 Ω |
F15-19 (CLTB) - G1-1 (CLTB) |
Always |
Below 1 Ω |
F15-21 (CLTE) or G1-2 (CLTE) - Body ground |
Always |
10 kΩ minimum |
F15-20 (CLTS) or G1-4 (CLTS) - Body ground |
Always |
10 kΩ minimum |
F15-19 (CLTB) or G1-1 (CLTB) - Body ground |
Always |
10 kΩ minimum |
| NG | |
REPAIR OR REPLACE HARNESS OR CONNECTOR |
|
CHECK MAIN BODY ECU (MULTIPLEX NETWORK BODY ECU)
(a) Reconnect the F15 connector to the main body ECU (multiplex network body ECU). |
|
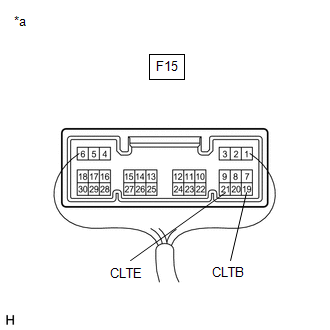
(b) Measure the voltage according to the value(s) in the table below.
Standard voltage:
Tester Connection | Ignition switch position | Specified Condition |
|---|---|---|
F15-19 (CLTB) - F15-21 (CLTE) |
Ignition Switch in OFF position |
Below 1 V |
Ignition Switch in ON position |
11 à 14 V |
| NG | |
REPLACE MAIN BODY ECU (MULTIPLEX NETWORK BODY ECU) |
|
CHECK AUTO LIGHT CONTROL SENSOR
(a) Reconnect the G1 connector to the auto light control sensor. |
|
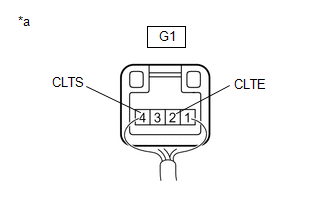
(b) Connect an oscilloscope to the automatic light control sensor connector.
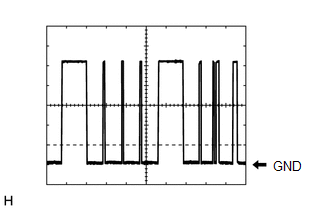
(c) Check the waveform. OK:
HINT: The communication waveform changes depending on the ambient brightness. |
 |
| OK | |
REPLACE MAIN BODY ECU (MULTIPLEX NETWORK BODY ECU) |
| NG | |
REPLACE AUTOMATIC LIGHT CONTROL SENSOR |