High/low beam changeover switch circuit
DESCRIPTION
The main body ECU (multiplex network body ECU) receives the following information from the switches:
- Light control switch in TAIL, HEAD or AUTO position
- Headlight dimmer switch is in HIGH, LOW or HIGH FLASH position
- Front fog light switch in OFF or ON*1 position
- *1: with fog light
WIRING DIAGRAM
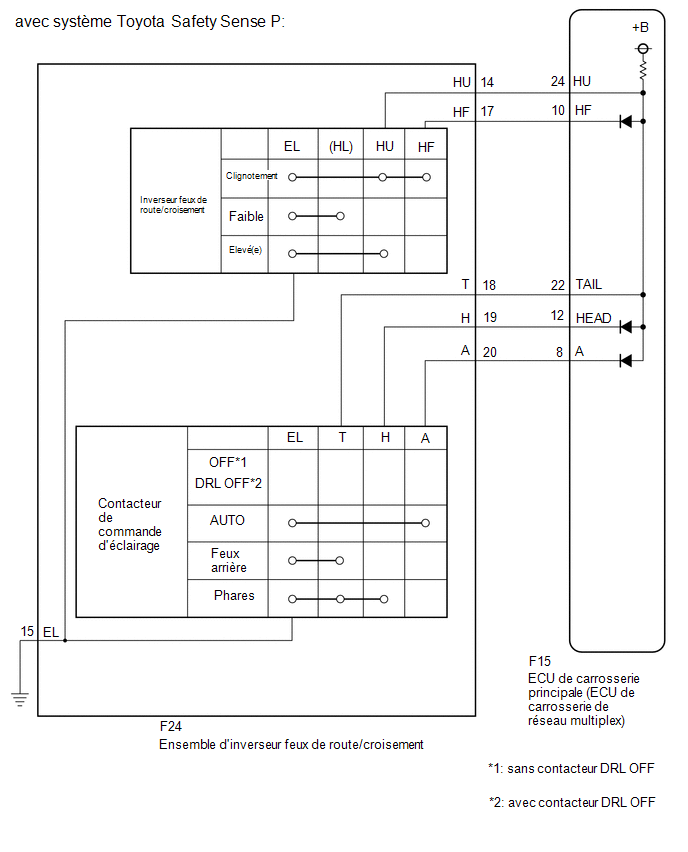
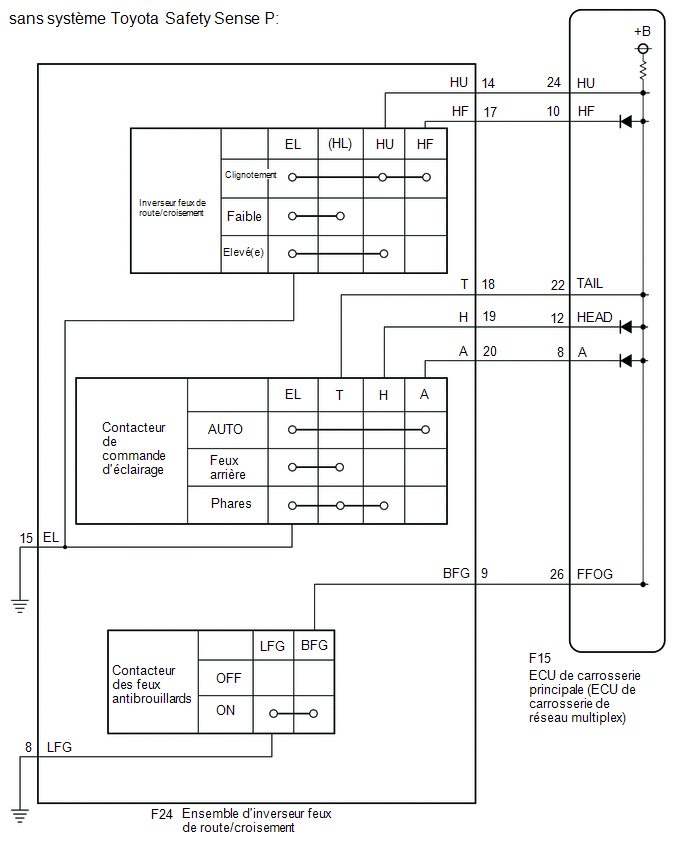
PRECAUTION / NOTICE / HINT
NOTICE:
Before replacing the main body ECU (multiplex network body ECU), refer to the registration section.*1
Click here
- *1: with Smart Key System
PROCEDURE
CHECK VALUE USING TECHSTREAM
(a) Connect the Techstream to the DLC3.
(b) Turn the ignition switch to ON.
(c) Turn on the Techstream.
(d) Select the following menus: Body Electrical / Main Body / Data List.
(e) Read the Data List by following the instructions on the Techstream.
Body Electrical > Main Body > Data ListTester display | Item | Range | Normal Condition | Diagnostic Note |
|---|---|---|---|---|
Dimmer SW |
High beam/low beam switch HIGH position signal |
ON or OFF |
ON: High beam/low beam switch in HIGH or HIGH FLASH position OFF: High beam/low beam switch in LOW position |
- |
Passing Light SW |
High beam/low beam switch HIGH FLASH (Pass) position signal |
ON or OFF |
ON: High beam/low beam switch in HIGH FLASH position OFF: High beam/low beam switch in a position other than HIGH FLASH |
- |
Front Fog Light SW |
Front fog light switch position signal |
ON or OFF |
ON: Front fog light switch in the front position OFF: Fog light switch in OFF position |
*1 |
Auto Light SW |
Light control switch AUTO position signal |
ON or OFF |
ON: Light control switch in AUTO position OFF: Light control switch is not in AUTO position |
- |
Head Light SW (Head) |
Light control switch HEAD position signal |
ON or OFF |
ON: Light control switch in HEAD position OFF: Light control switch is not in HEAD position |
- |
Head Light SW (Tail) |
Light control switch TAIL position signal |
ON or OFF |
ON: Light control switch in TAIL or HEAD position OFF: Light control switch is not in TAIL (tail lights) or HEAD (headlights) position |
- |
- *1: with fog light
Tester display |
|---|
Dimmer SW |
Passing Light SW |
Front Fog Light SW |
Auto Light SW |
Head Light SW (Head) |
Head Light SW (Tail) |
OK:
The normal conditions listed above are displayed.
| OK |  |
GO TO APPLICABLE SYSTEM AS INDICATED IN THE PROBLEM SYMPTOMS TABLE |
|

INSPECT HEADLIGHT DIMMER SWITCH ASSEMBLY
HINT:
Check the items that have not changed when reading the Data List.
(a) Remove the headlight dimmer switch assembly.
Click here
(b) Inspect the headlight dimmer switch assembly.
Click here
| NG | |
REPLACE HEADLIGHT DIMMER SWITCH ASSEMBLY |
|
INSPECT WIRE HARNESS AND CONNECTOR (HEADLIGHT DIMMER SWITCH ASSEMBLY - MAIN BODY ECU (MULTIPLEX NETWORK BODY ECU))
(a) Disconnect the F15 connector from the main body ECU (multiplex network body ECU).
(b) Measure the resistance according to the value(s) in the table below.
Standard resistance:
Tester Connection | Condition | Specified Condition |
|---|---|---|
F24-9 (BFG) - F15-26 (FFOG)*1 |
Always |
Below 1 Ω |
F24-14 (HU) - F15-24 (HU) |
Always |
Below 1 Ω |
F24-17 (HF) - F15-10 (HF) |
Always |
Below 1 Ω |
F24-18 (T) - F15-22 (TAIL) |
Always |
Below 1 Ω |
F24-19 (H) - F15-12 (HEAD) |
Always |
Below 1 Ω |
F24-20 (A) - F15-8 (A) |
Always |
Below 1 Ω |
F24-9 (BFG) or F15-26 (FFOG) - Body ground*1 |
Always |
10 kΩ minimum |
F24-14 (HU) or F15-24 (HU) - Body ground |
Always |
10 kΩ minimum |
F24-17 (HF) or F15-10 (HF) - Body ground |
Always |
10 kΩ minimum |
F24-18 (T) or F15-22 (TAIL) - Body ground |
Always |
10 kΩ minimum |
F24-19 (H) or F15-12 (HEAD) - Body ground |
Always |
10 kΩ minimum |
F24-20 (A) or F15-8 (A) - Body ground |
Always |
10 kΩ minimum |
F24-15 (EL) - Body ground |
Always |
Below 1 Ω |
F24-8 (LFG) - Body ground*1 |
Always |
Below 1 Ω |
*1: with fog light
| OK | |
REPLACE MAIN BODY ECU (MULTIPLEX NETWORK BODY ECU) |
| NG | |
REPAIR OR REPLACE HARNESS OR CONNECTOR |