Brake Backing Plate
GENERAL INFORMATION
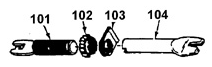
Adjuster
101. THREADED ROD.
102. NUT.
103. CLAMP.
104. HOLLOW ROD
Remove or disconnect:
PROCEDURE.
1. Raise the vehicle and secure it properly..
2. Brake assembly components..
3. Rear wheel hub..
4. Parking brake cable bracket..
5. Brake line from the wheel cylinder. Plug the line opening to prevent brake fluid loss and contamination..
6. Wheel cylinder from the brake backing plate..
7. Brake backing plate
4..
Installation
Warning.
Before installing the brake shoes, apply a thin layer of lubricant to the
contact areas of the shoes with the backing plate. Fully screw nut 102 onto the rod.
101 of the adjuster. Assemble adjuster 14 and install it between the brake shoes..
Check that the adjuster is positioned correctly. Nut 102 must not be jammed on the
thread of the rod (see Adjuster illustration)..
PROCEDURE.
1. Install a new paper gasket on the backing plate..
2. Install backing plate 4 on the suspension arm. Tighten the backing plate mounting bolts to the suspension arm flange to torque 28 N·m..
3. Install the wheel cylinder on the backing plate. Tighten the wheel cylinder mounting bolt to the
backing plate to torque 9 N·m..
4. Brake line to the wheel cylinder. Tighten the line fitting to torque 16 N·m..
5. Install the parking brake cable in the bracket..
6. Rear wheel hub..
7. Brake assembly components..
8. Bleed air from the brake hydraulic system.
Test yourself
A quick Daewoo Nexia quiz: every answer comes with an explanation and a link to the manual page.