Warning lamps
GENERAL INFORMATION
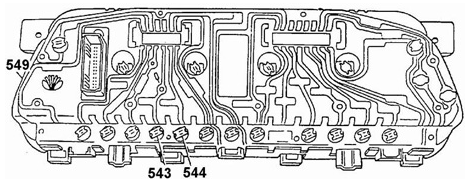
Location of warning lamps on instrument panel
543. WARNING LAMP "BRAKE" (RED).
544. WARNING LAMP "ABS" (YELLOW).
549. INSTRUMENT PANEL.
Remove or disconnect

Removal of instrument panel trim screws
546. STEERING WHEEL.
547. INSTRUMENT PANEL TRIM.
548. DASH PANEL.
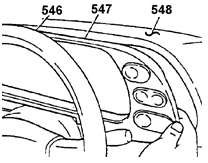
Removal of instrument panel trim
546. STEERING WHEEL.
547. INSTRUMENT PANEL TRIM.
548. DASH PANEL.
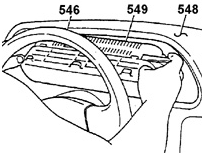
Removal of instrument panel
546. STEERING WHEEL.
548. INSTRUMENT PANEL.
549. INSTRUMENT PANEL.
PROCEDURE.
1. Disconnect the negative battery cable.
2. Remove the two instrument panel trim screw caps..
3. Unscrew the four instrument panel trim screws, Fig. Removal..
instrument panel trim screws..
4. Disconnect the electrical connector and remove the instrument panel trim, Fig. ..
Removal of instrument panel trim..
5. Unscrew the two instrument panel mounting screws..
6. Remove the instrument panel from the dash panel, disconnecting the instrument panel electrical connector, Fig. Removal of instrument panel..
7. Remove the warning lamp socket(s) from the instrument panel socket(s). For socket locations, see Fig. Location of warning lamps on instrument panel..
Installation
PROCEDURE.
1. Install the warning lamp socket into the instrument panel socket, see Fig. Location of warning lamps.
warning lamps on instrument panel..
2. Install the instrument panel into the dash panel and connect the.
electrical connector..
3. Install the two instrument panel mounting screws..
4. Install the instrument panel trim and connect the electrical connector..
5. Install the four instrument panel trim screws..
6. Install the instrument panel trim screw caps..
7. Negative battery cable.
Test yourself
A quick Daewoo Nexia quiz: every answer comes with an explanation and a link to the manual page.