Bleeding the Brake Hydraulic System Manually
GENERAL INFORMATION
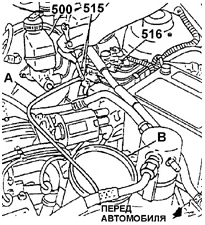
Bleeding the modulator unit. A. HOSE FOR BLEEDING THE BRAKE HYDRAULIC SYSTEM.
B. CONTAINER PARTIALLY FILLED WITH BRAKE FLUID.
500. BRAKE MASTER CYLINDER RESERVOIR.
515. BLEED VALVES FOR HYDRAULIC MODULATOR BLOCK.
516. HYDRAULIC MODULATOR BLOCK WITH ELECTRIC MOTORS
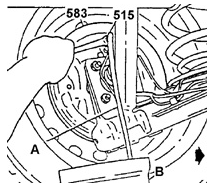
Bleeding the rear wheel cylinder A. BLEEDING HOSE FOR BRAKE HYDRAULIC DRIVE.
B. CONTAINER PARTIALLY FILLED WITH BRAKE FLUID.
515. AIR BLEED VALVE.
583. BRAKE BACKING PLATE
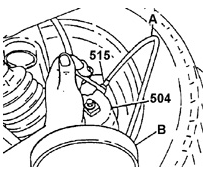
Bleeding the front wheel cylinder A. BLEEDING HOSE FOR BRAKE HYDRAULIC DRIVE.
B. CONTAINER PARTIALLY FILLED WITH BRAKE FLUID.
504. DISC BRAKE CALIPER.
515. AIR BLEED VALVE
PROCEDURE.
1. Clean the outside surface of the brake master cylinder reservoir and adjacent parts.
2. Remove the reservoir cap.
3. Check the brake fluid level. If necessary, add fluid to the reservoir.
Use brake fluid interchangeable with DOT 3 fluid, and bring the
level to the specified mark.
4. Install the reservoir cap.
5. Bleed air from the hydraulic modulator block (see figure Bleeding air from the
modulator block).
5a. Install a clean plastic hose onto the rear bleed valve nipple. Place the other end of the hose into a clean container partially filled with brake fluid.
5b. Slowly loosen the bleed valve by 1/2 to 3/4 turn.
5c. With an assistant, depress the brake pedal and hold it down until brake fluid begins to flow out.
5g. Close the bleeder valve and release the brake pedal. Repeat
until no air bubbles remain. Tighten the bleeder valve to 9 N·m.
5e. Repeat the described operations for the front bleed valve.
Warning.
Brake fluid flowing out of both bleed valves indicates that the modulator chambers are filled with fluid. However, this does not guarantee
that there is no air left in the modulator block. After completing the described
operations, bleed air from the wheel brake cylinders located below the modulator block.
After bleeding the wheel cylinders, finally bleed any remaining air from the modulator chambers.
6. Remove the brake fluid reservoir cap.
7. Check the brake fluid level. If necessary, add fluid to the reservoir.
Use brake fluid interchangeable with DOT 3 fluid, and bring the
level to the specified mark.
8. Install the reservoir cap.
9. Raise the vehicle and support it properly.
Warning.
Bleed air from the wheel brake cylinders in the following sequence.
– right rear wheel cylinder.
– left rear wheel cylinder.
– right front wheel cylinder.
– left front wheel cylinder.
10. Bleed air from the wheel cylinders of drum and disc brakes. See figures Bleeding the rear wheel cylinder and Bleeding the front wheel cylinder.
10a. Install a clean plastic hose onto the bleed valve nipple. Place the other end of the hose into a clean container partially filled with brake
fluid.
10b. Open the bleed valve.
10c. With an assistant, slowly depress the brake pedal.
10d. Close the bleed valve and release the brake pedal.
10e. After a 5-second pause, repeat steps B, C and D, including the pause, several times until the brake pedal becomes firm and no air bubbles come out of the hose with the brake fluid.
Tighten the bleed valve to the specified torque of 9 N·m.
10f. Repeat steps A through E for the remaining wheel cylinders (left rear and both front wheels).
11. Lower the vehicle..
12. Remove the brake fluid reservoir cap.
13. Check the brake fluid level. If necessary, add fluid to the reservoir.
Use brake fluid interchangeable with DOT 3 fluid, and bring the
level to the specified mark.
14. Install the reservoir cap.
15. Bleed air from the hydraulic modulator block (see figure Bleeding air from the
modulator block).
15a. Install a clean plastic hose onto the rear bleed valve nipple. Place the other end of the hose into a clean container partially filled with brake fluid.
15b. Slowly loosen the bleed valve by 1/2 to 3/4 turn.
15c. With an assistant, depress the brake pedal and hold it down until brake fluid begins to flow out.
15d. Close the bleed valve and release the brake pedal. Repeat steps B and C several times until brake fluid flows out without air bubbles.
until no air bubbles remain. Tighten the bleeder valve to 9 N·m.
15e. Repeat the described operations for the front bleed valve.
16. Remove the brake fluid reservoir cap.
17. Check the brake fluid level. If necessary, add fluid to the reservoir.
Use brake fluid interchangeable with DOT 3 fluid, and bring the
level to the specified mark.
18. Install the reservoir cap.
19. Turn the ignition on, depress the brake pedal with moderate force and hold it down. Pay attention to the travel and resistance of the pedal. If the pedal is firm and its travel is short, start the engine. With the engine running, check the pedal travel again. If the pedal is still firm and its travel is short, proceed to step
20. If the brake pedal is soft or its travel is excessive with the engine off or running, use the SCANNER-11 tool to command brake release, then brake application, three times in succession. Then turn the ECM on and off 10 times. Move the modulator pistons to the uppermost position and repeat the brake hydraulic bleeding operations.
21. Test drive the vehicle. Perform several service brake applications (without ABS activation) from a moderate initial speed to check normal operation of the brake system.
Test yourself
A quick Daewoo Nexia quiz: every answer comes with an explanation and a link to the manual page.