Rear Suspension Arms
Removal
PROCEDURE
1. Raise the rear of the vehicle and support it on stands.
2. Remove the wheel.
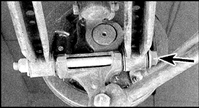
3. Remove the axle nuts (indicated by the arrow) of the arms on the knuckle housing.
4. If the arms are being replaced, mark their position by making marks on the eccentric bolts securing the arms to the body brackets and on the brackets themselves. The eccentrics are used to adjust wheel toe.
5. Remove the nuts securing the arms to the body, then remove the eccentric and bolt.
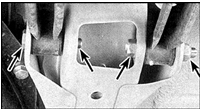
6. Remove the arms (the arrows indicate the nuts securing the arm bolts to the body brackets). Note the bolt positions during removal.
Inspection
PROCEDURE
1. Inspect the arms and bushings.
2. Arms are replaced only as an assembly with bushings.
Installation
PROCEDURE
1. Install the arms into the brackets and insert the bolts in their original order.
2. Install the washers and tighten new nuts.
3. Insert the arm axle from the rear side of the knuckle housing, install the washers and tighten new nuts.
4. Install the wheel and lower the vehicle.
5. Rock the vehicle forward and backward, and bounce it up and down.
6. Tighten the outer arm axle nut.
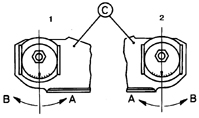
7. Align the eccentrics with the marks, check rear wheel toe, then tighten the nuts to the specified torque (A – negative toe, B – positive toe, 1 – right side, 2 – left side).
8. If toe cannot be checked, tighten the nuts, then have the vehicle inspected at a service station.
Test yourself
A quick Nissan Sunny quiz: every answer comes with an explanation and a link to the manual page.